Axiom Line User Guide
26
English
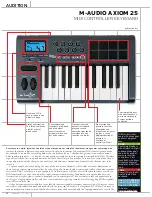
3.6.4 Zone Range
The Zone Range defines the upper and lower limits of the keys contained in a zone.
To set the range of a zone:
<
Press the Zone Range button. The LED in the Zone/Group button lights to indicate that Zone/Group mode is automatically
selected.
<
The LCD display will flash the symbols representing all zones which are currently active, and will therefore be affected by
this range setting. The Range symbol will also appear on the LCD display. Use zone buttons 1 through 4 (1-3 on Axiom
25) to change the selection as necessary.
<
Press a key on the keyboard to select the lower limit of the zone. The note number is displayed in small digits on the
LCD display.
<
Press a second key on the keyboard to select the upper limit of the zone. The note number is displayed in large digits of
the LCD display.
Once two keys have been pressed, the keyboard will automatically return to normal, and the range of the edited zone will be
updated.
Note
: If multiple zones are selected while altering the zone range setting then they will all be assigned to the same section
of the keyboard. This will cause this section of the keyboard to transmit on multiple MIDI channels—a setting useful to create
layered sounds. If you want to split the keyboard into individual sections controlling one sound at a time, then make sure that
only one zone is selected while configuring the zone range and that you assign a section of the keyboard that is not shared
with any other zone. However, it is possible for zones to overlap partially or fully to create the effect of layered sounds.
The range of each zone can be stored to the 20 memory locations. You must ensure that Group A is activated when storing
this data since the Zone settings are stored within this group. Please see section 3.2.1 for more information on Groups.
3.6.5 Octave and Transposition of a Zone
Each zone can be octave shifted or transposed independently.
To set the octave or transposition of a zone:
<
Press the Zone Range button.
<
Select the zone(s) you want to edit using the zone activate/deactivate buttons as described in section 3.6.2.
<
Use the Octave buttons to select the new octave/transpose value, as described in section 2.1.2 and 2.1.3.
If Zone Range mode is not active when you make an octave/transpose change, the change is global, meaning all active zones
will be affected.
If Zone Range mode is active when you make an octave/transpose change, only those zones currently active will be affected.
The Octave and Transpose values for each independent zone, as well as the global octave and transpose values can be stored
to the 20 memory locations. You must ensure Group A that is activated when storing this data since the Zone settings are
stored within this group. Please see section 3.2.1 for more information on Groups.
Note
: There are various creative possibilities for the usage of the Octave/Transpose settings in conjunction with individual
zones. For example, assign three zones to the same section of the keyboard, transpose the second zone two half steps down
and the third six half steps down. Make sure all three zones are active, then play a single key on the keyboard—a chord will
sound. Experiment with the Octave/Transpose and Zone settings to discover the full potential of this feature.
3.6.6 More About Program, Bank LSB And Bank MSB
We saw in section 2.3 how Program and Bank messages can be sent from your Axiom to select different sounds on a connected
device(s).
When you send these messages, they apply to whichever zones are active at that time. If two zones are selected and set to transmit
on different channels, the Program or Bank message will be sent on BOTH channels.
Note: New Program and Bank messages always override previously sent Program and Bank messages. It is important to ensure
that ONLY those zones that you want to send these messages on are active, or you could call up new sounds on a device you
don’t intend to.
The last sent Program, Bank LSB and Bank MSB message for each zone is saved when the unit is powered down, and can be stored
in each of the 20 memory locations. You must ensure Group A is activated when storing this data since the Zone settings are
stored within this group. Please see section 3.2.1 for more information on Groups.
Summary of Contents for AXIOM
Page 1: ...Axiom User Guide English...