


3
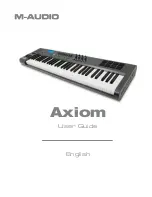
Pro Keys 88 • User Guide
English
Introduction
Congratulations on your purchase of the M-Audio ProKeys 88, the complete all-purpose live stage piano, with additional MIDI
control. We strongly recommend that you read through this manual to learn about proper installation, operation and advanced
functionality before using this product.
What’s in the Box
Besides the product itself, the ProKeys 88 package will include the following items:
<
Software Driver CD (drivers and applications)
<
USB cable
<
Printed User Manual
<
Power supply (12V DC)
<
Sustain Pedal
If any of these items are missing, please contact the retail outlet at which you purchased this product.
ProKeys 88 Overview
The ProKeys 88 is a stage piano with 14 high-quality onboard sounds. M-Audio’s unique hammer-action keyboard design makes
for a realistic grand piano feel. It also functions as a useful MIDI controller for your sequencer or sound module.
We have designed the ProKeys 88 with live performance in mind. As such, the control interface is simplified, with all of the main
features accessible via a single button press. Advanced features such as digital effects and MIDI control messages can be edited
“on-the-fly.”
All connectors are 1/4” jack inserts allowing easy connection into a PA amplifier, mixer or other live sound setup.
The ProKeys 88 is able to start and stop playback from an external MIDI sequencer, as well as controlling sequence tempo. These
features have dedicated buttons giving you real-time control of a MIDI sequencer in a live situation
Before you start reading about the various features of your ProKeys 88, you should first familiarize yourself with some of the
terminology that is commonly used when describing these features.
Terminology
Edit Mode
- Edit Mode describes the 3-second period after a function button has been pressed during which the parameters of
that function can be altered. The numeric keypad can be used to alter a parameter during this time. The LED display will flash
to show you that the displayed parameter can be edited. If an Edit Function Button has been pressed in error, you can press a
different Edit Function Button and re-trigger a new three-second time out period.
Normal Mode
- Normal Mode describes the state of the device when no function buttons have been pressed. In normal mode,
the LED will display the program number that was last entered.
Function Buttons
– These are the buttons to the left of the LED display. When any of these MIDI buttons or digital effects buttons
are pressed, your ProKeys 88 will enter Edit Mode.
Instrument
– The ProKeys 88 comes with 14 built-in sounds that represent various instruments such as pianos, strings and bass.
The term “instrument” refers to one of the 14 internal sound programs. Different instruments are selected by pressing one of the
14 instrument buttons to the right of the LED display.
Split Mode
– When the Split Button is pressed, your ProKeys 88 will enter Split Mode. In this mode, the keyboard is split into two
adjacent, non-overlapping zones. Each zone can have a different instrument assigned to it. Notes to the left of the Split Point will
control one instrument, and those notes to the right of the Split Point continue to control the previously selected instrument.
Layer Mode
– When the Layer Button is pressed the device enters Layer Mode. In this mode, two instrument sounds can be
assigned across the entire keyboard range: the Main Instrument and the Layer Instrument. If Split Mode is also active, only the
keys to the right of the Split Point will have a Layered Instrument.
Main Instrument
– This is the instrument that is selected when neither Split Mode nor Layer Mode is engaged.
Split Instrument
– This refers to the instrument controlled by the keys to the left of the Split Point when Split Mode is active.
Layer Instrument
– This refers to the second instrument that is controlled when Layer Mode is active.