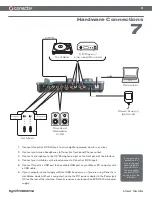
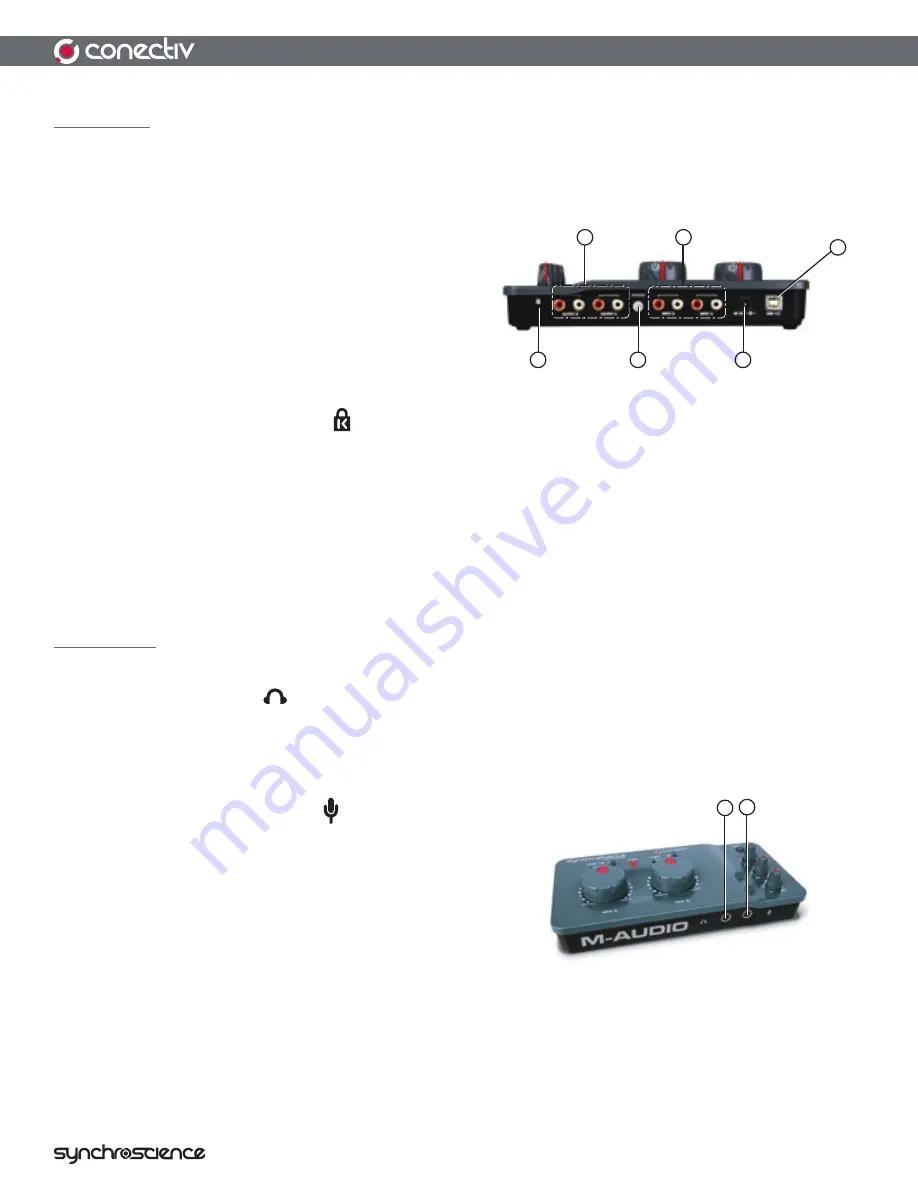
M-Audio Audio Interface Conectiv User Manual Download Page 7


7

User Guide

Rear Panel

8.   

RCA Outputs (OUTPUT A, OUTPUT B)

 – These are Conectiv’s main outputs.  Connect these RCA jacks to 

a DJ mixer, amplified speakers, or another destination. The audio source for these outputs is determined by the Mix 
knobs (7).

9.   

RCA Inputs (INPUT A, INPUT B)

 – These RCA 

input  pairs  accept  stereo  signals  from  a  variety  of 
devices including CD players and turntables.  Use the 
Source  Selector  switches  (1)  to  select  what  type  of 
device you’ve connected to each of these input pairs.

10.  

USB 1.1 Port (USB)

 – The USB port carries digital 

audio to and from Conectiv and provides power to the 
interface.  Connect this jack to an available USB port on your computer.

11.   

Kensington Security Slot    

– This jack is compatible with Kensington security cables to protect your device 

from theft.

12.  

Grounding Connector (GROUND)

 – If you are using turntables, ground them by attaching their ground wire 

to this connector.

13.  

DC Power Jack (9V DC)

 – Conectiv can be powered using an optional DC power supply. This input only needs 

to be used when your computer cannot supply sufficient power over the USB bus, or when Conectiv will be used 
as a standalone dual phono preamp.

Front Panel


14.  

Headphone Jack 


– Connect your headphones to this 1/4” jack.  The volume level of this output is controlled 

by the Volume knob (5) and the source is determined by the Cue knob (4).


 Be  careful  when  connecting  headphones  to  this  output.  Conectiv  features  an  extremely  powerful  headphone 
amplifier designed to help DJs hear over the noisiest clubs and stages.  Because of the high power design, the 
output may be extremely loud.

15.  

1/4”  Microphone  Input   

–  This  jack  accepts  a 

standard dynamic microphone with a 1/4” TS plug.  The 
Mic knob (6) controls the gain level of this input.

14 15

11

12

13

10

8

9

Summary of Contents for Audio Interface Conectiv

Page 1: ...User Guide 4 x 4 USB DJ Audio Interface...

Page 2: ...ctiv 9 Understanding Conectiv s Audio Routing 9 Headphone Monitoring 11 Using Conectiv with SynchroScience Torq and Other DJ Programs 11 Using Control Vinyl or CDs to Control Your DJ Software 11 Using...

Page 3: ...levels respectively allowing you to connect any dynamic microphone line level source such as CD or MP3 players or turntable The USB interface carries audio signals to and from your computer with mini...

Page 4: ...a USB 1 1 connection RCA inputs supporting phono and line level sources 1 4 microphone input with dedicated gain control knob Mix knobs for blending between inputs and audio software outputs 1 4 head...

Page 5: ...arlier versions of the operating system are not supported Hardware Windows Pentium III 500 MHz higher CPU speed may be necessary for laptops 256MB RAM Windows XP SP2 Windows 2000 98 ME NT not supporte...

Page 6: ...e phono and line level inputs However only Channel A has an additional Mic input allowing you to select a dynamic microphone connected to the Mic Input 15 2 Power Indicator LED POWER This red LED will...

Page 7: ...rom theft 12 Grounding Connector GROUND If you are using turntables ground them by attaching their ground wire to this connector 13 DC Power Jack 9V DC Conectiv can be powered using an optional DC pow...

Page 8: ...nel of the interface 4 Connect your turntables or line level sources to Conectiv s RCA inputs 5 Connect Conectiv s USB port to an available USB port on your Mac or PC computer with a USB cable 6 If yo...

Page 9: ...torials and FAQs Understanding Conectiv s Audio Routing Conectiv s exible audio routing allows it to be used in a variety of different situations Take a look at the diagram below to see how signals pa...

Page 10: ...eally understand the various ways signals can be routed through the interface Having a good working knowledge of how signals are routed within the interface will enable you to adapt Conectiv to any si...

Page 11: ...nectiv can be used with either con guration Internal Mode When your software is set to Internal mode its master output is sent to one stereo channel of Conectiv while the other stereo channel is heard...

Page 12: ...as wet dry controls for the selected effects Turning a Mix knob counter clockwise will let you hear only your turntable or CD player source while turning the knob fully clockwise will let you hear on...

Page 13: ...ed on the About tab To adjust the audio buffer size simply drag the slider and press the Apply button Please note that this parameter cannot be changed while an audio application is running Mac For Ma...

Page 14: ...ctor switch has been set correctly Verify that your music source is outputting a proper signal Verify that your ampli er powered speakers or other audio destination is working correctly Using Conectiv...

Page 15: ...s plugged in correctly Make sure your ampli er or powered speakers are working correctly If Conectiv is sending and receiving audio but you are hearing clicks and pops Make sure your input and output...

Page 16: ...Input Impedance 48k Ohms Maximum Input Level at minimum gain 10 dBV 3 162 Vrms unbalanced Channel to Channel Crosstalk 100 dB 1 Khz SNR 97 dB A weighted Dynamic Range 97 dB A weighted THD N 0 00557 85...

Page 17: ...ts available Register online at www m audio com register to receive FREE product updates and for the chance to win M Audio giveaways Conectiv Tested to comply with FCC standards FOR HOME OR STUDIO USE...

Page 18: ...C 0 820 391 191 Assistance Technique e mail support m audio fr mac m audio fr fax 33 0 1 72 72 90 52 Site Web www m audio fr M Audio Germany Kuhallmand 34 D 74613 Ohringen Germany Technical Support e...

Reviews: