background image

CARE & USE/INSTALLATION


|

31

STAINLESS STEEL

Lynx products are known for their attractive appearance. 
We achieve this by selecting only the finest grades of   
stainless steel and applying exacting workmanship.

In order to maintain this attractive appearance over the life 
of the grill it is important to take the following steps:
• After each use wipe down the exterior of the grill to       

remove grease and splatters.

• Be sure to follow the cleaning instructions for keeping the 

grates and burners clean and ready for use.

• Use a commercially available Stainless Steel cleaner* to 

clean and polish the exterior surfaces.

Doing these things on a regular basis minimizes the amount 
of effort required.

Part of the appeal of your Lynx Grill is the fine grain finish. 
When removing stubborn stains:
• Do not use metallic abrasives and always rub in the        

direction of the grain.

• Some household cleaning products are not suitable for 

stainless steel; be sure to read the label before using on 
your Lynx Grill.

• Always use the mildest cleaning solution first, scrubbing 

in the direction of the grain. Specks of grease may gather 
in the grain of the stainless steel and bake on to the     
surface, giving the appearance of rust. 

To remove these baked-on foods use a fine to medium 
grit non-metallic abrasive pad (Scotch Brite is good) in         
conjunction with a stainless steel cleaner. 

• Solutions used for cleaning concrete and masonry 

can be very corrosive and will ‘attack’ stainless steel.      
Ensure your Lynx products are well protected before 
you allow the use of such chemicals near your grill.

SPECIAL NOTE FOR LOCATIONS NEAR POOLS AND 
COASTAL AREAS:

The 304 stainless steel material used in the construction of 
a Lynx Grill is highly rust resistant, however, chlorine in the 
air from swimming pools or the salt from sea air may cause 

surface rust to appear and even create some pitting if left 
on the product. 

Here are a few tips to avoid this:
• Regularly wipe down the exterior surfaces with a damp 

cloth. (Micro fiber cloths such as Ecloth perform very 
well).

• Allow the surfaces to dry before installing the cover. Do 

not cover a damp grill.

• In extreme environments apply a rust inhibitor which 

leaves a microscopic protective layer on the grill.       
Products that provide a layer of vapor corrosion inhibitors 
(VpCI™) protect the surface very well.

• For seasonal storage use the product referred to above, 

ensure the grill is dry and then cover and secure the 
cover to minimize the amount of damp air getting to the 
surfaces.

THE LYNX LIMITED LIFE TIME WARRANTY PROVIDES 
PROTECTION AGAINST RUST THROUGH OF PARTS THAT 
RENDER THE PRODUCT INOPERATIVE. IT DOES NOT 
COVER OCCASIONAL SURFACE RUST OR STAINING DUE 
TO ENVIRONMENTAL CONDITIONS.

After your first use certain areas of the grill may discolor 
from the intense heat given off by the burners - this is    
normal and cannot be cleaned off. 

For light and heavy food stains there are many different 
stainless steel cleaners available. 
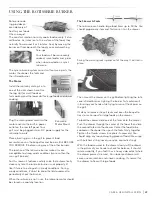
DRIP TRAY

The drip tray should be cleaned after each use. After the 
grill is completely cool, remove the drip tray by pulling it 
out until it stops, then lifting the front edge until the drip 
tray comes free.

Clean it with hot soapy water or an oven-style              
cleaning  product  and  re-install.  When  using  an  oven-style                                                                                     
cleaning product be sure to carefully follow the                
manufacturer’s instructions. Many of these cleaners are 
toxic and can damage the stainless steel finish if not used 
properly.

Also, check the tray after rain. If you’ve left the grill            
uncovered, you may need to remove the drip tray drain 
plug to drain the water from the tray. The drain plug can be 
removed with a flat-head screwdriver.


*

RATED FOR HIGH HEAT                                                                                          

CLEANING YOUR LYNX GRILL (Including Required Maintenance)

Summary of Contents for L27R2LP

Page 1: ...CARE USE INSTALLATION MAKE THE MOST OF YOUR...

Page 2: ......

Page 3: ...trailers boats or any other moving installation Always have an ABC Fire Extinguisher accessible never attempt to extinguish a grease fire with water or other liquids Storing your grill Store your gri...

Page 4: ...ventilation when cooking IF YOU SMELL GAS 1 Shut off all gas supply lines to the grill 2 Extinguish any open flames 3 Carefully open the lid Remember it may be extremely hot 4 If odor continues keep e...

Page 5: ...a WARNING 1 Always maintain the required clearances from combustible construction as detailed The grill is designed for outdoor use only Never use in a garage building shed breezeway or other enclosed...

Page 6: ...CONDITIONS 23 USING YOUR LYNX GRILL 24 Pre Grill Checklist 24 Lighting your Grill 25 Basic Grilling 27 Using the ProSear 2 Burner 28 Using the Rotisserie Burner 29 Using the Smoker Box 30 CLEANING YOU...

Page 7: ...ob in for 5 7 seconds allowing the igniter to heat up 4 Turn the knob to the LITE position 5 After ignition set the knob to the desired setting HOW TO LIGHT YOUR ROTISSERIE BURNER HOW TO LIGHT YOUR GR...

Page 8: ...opane Installation Code CSA B149 1 or Propane Storage and Handling Code B149 2 in Canada BEFORE YOU START WARNING IF SHIPMENT ARRIVES DAMAGED IMPORTANT NOTES WHERE S THE WIND When selecting a suitable...

Page 9: ...earance from sides and back of grill to adjacent combustible construction extending above the counter top surface is 18 from the sides and back D gagement horizontal minimal entre les parois lat rales...

Page 10: ...4 11 50 19 00 24 50 LDW19 4 17 50 19 00 24 50 LMD 4 21 75 5 63 23 38 LTWL 14 50 7 00 7 00 WARMING DRAWERS MODEL A B C L30WD 1 28 50 10 00 20 50 L42CC 1 40 25 19 38 24 50 COCKTAIL PRO SINK MODEL A B C...

Page 11: ...n for doors drawers Cocktail Pro should have an open bottom for plumbing and drain access 1 2 NPT gas connection CLEARANCE 331 2 34 15 25 ICE MACHINE 3 1 square hole must be located at rear of grill c...

Page 12: ...t When pushing lifting or pulling a freestanding Lynx Grill across gravel grass pavers brick stone imperfections in the surface or wood slatted decks be cautious and move slowly or use a carpet dolly...

Page 13: ...E INSTALLATION 13 Inside View Orifice all the way into venturi Heat Shield Removed Orifice Venturi Position Legs in slot Burner sitting flat Orifice all the way into the venturi UNPACKING ASSEMBLY con...

Page 14: ...l installation parts must conform to local codes with the National Electrical Code ANSI Z223 1 NFPA 70 latest edition and the National Fuel Gas Code ANSI Z223 1 NFPA 54 in the U S and CGA B149 1 2 in...

Page 15: ...of the U S Department of Transportation DOT and designed for use with a Type 1 system only Cylinders of free standing grills must be secured using the provided cylinder retention system to avoid acci...

Page 16: ...r to light Hold the knob ON for about 20 seconds to allow the air in the system to purge and the burner to light Wait at least 5 minutes after shutting off the control before attempting to light the b...

Page 17: ...53 Grill Manifold with Brass Elbow ToPropane Tank Angle At Least 20 From Horizon Side Burner Installation LP BOTTLE CART INSTALLATION Shut off the gas supply at the main valve Connect the gas supply t...

Page 18: ...ation must meet local electric codes or in the absence of local codes the latest edition of the National Electrical Code ANSI NFPA No 70 or the Canadian Electrical Code CGA 1 6b2005 Use only a Ground...

Page 19: ...r 2 burner on your Lynx grill feature an adjustable low setting Fluctuations in gas pressure gas conversion and even in the quality of the gas itself may affect burner performance at the LOW setting I...

Page 20: ...ace and light it If the flame is excessively yellow indicating insuf ficient air CAREFULLY turn the air shutter counter clockwise to allow more air to the burner If the flame is noisy sounds like a to...

Page 21: ...of the grill If not wait until the wind subsides or turn your free standing grill so the wind goes into the front of the grill If yes please continue with the lighting process CHECKLIST BEFORE EACH U...

Page 22: ...e flare ups Internal fires or damage caused by them or by the grill being left unattended while cooking are not cov ered under the terms and conditions of our warranty 12 Never grill without the drip...

Page 23: ...ent pending Heat Stabilizer that will deflect wind and in most cases prevent this situation But there are a few things you can do to further prevent the possibility of improper heat buildup On breezy...

Page 24: ...high heat for searing and low controlled heat for slow cooking Thinner cuts of food are often cooked at a HI heat setting with the lid open On the other hand large thick pieces of meat or poultry are...

Page 25: ...n 5 seconds turn off the control wait 5 minutes for gas to dissipate and repeat the lighting procedure 5 YOU NEVER LEAVE THE GRILL UNATTENDED WHILE THE GRILL IS LIT WARNING PRE GRILL CHECKLIST continu...

Page 26: ...ng tube Right Most Main Burner The right most main burner does not feature a manual lighting tube To match light this burner use the lighting rod to insert a lit match through the cooking grate into t...

Page 27: ...grill Direct Heat and Indirect Heat Direct Heat Direct heat cooking occurs when foods are placed directly over the heat source This form of heat is known as radiant heat because the heat radiates dire...

Page 28: ...ProSear 2 burner can clog the tiny ports and damage the burner For the same reason you should minimize water spills on the ProSear 2 burner and should not use water to control flare ups Take special c...

Page 29: ...lit like if it were to extinguish in windy conditions During windy conditions it s best to keep the lid closed and to periodically check the burner When the rotisserie is not in use the rotisserie mo...

Page 30: ...oo high For best results keep the lid closed The best absorption of smoke flavor occurs early in the cooking process When finished with smoking allow the smoker box to cool and dispose of remnants Sli...

Page 31: ...ming pools or the salt from sea air may cause surface rust to appear and even create some pitting if left on the product Here are a few tips to avoid this Regularly wipe down the exterior surfaces wit...

Page 32: ...F position To Remove Brass Burners Remove the grill racks and briquette trays Lift the burner up until the legs exit the frame Then pull to the rear of the grill so the burner head comes off the brass...

Page 33: ...ck a few things before calling for service Is there fuel supplied to the grill Is the main shut off valve open Are you using the correct type of fuel LP or Natural Gas See INDEX Gas Requirements for f...

Page 34: ...Call for service If the burner will not match light and you know you are getting gas wait for any gas to dissipate and remove the burner and check it for blockages SMELL OF GAS WHILE COOKING IF YOU SM...

Page 35: ...trol device reducing the heat output To reset the flow control Shut off all burner controls and close the LP cylinder valve Wait 30 seconds and very slowly reopen the cylinder valve Wait a few seconds...

Page 36: ...NDEX Lighting Rotisserie Burner for further details If the burner will not stay lit when you release the control knob re light it and hold the control knob in for at least 60 seconds to allow the ther...

Page 37: ...a vision A small group of manufacturing engineers with over a century of collective experience had a dream They dared to take their extensive commercial manufacturing know how and create a line of ou...

Page 38: ...sible for damage resulting from misuse abuse failure to provide reasonable and necessary required maintenance natural disaster animals alteration of or tampering with the appliance accident hostile en...

Page 39: ...mplied and all other obligations or liabilities related to the sale or use of Lynx products 4 Warranty shall not apply and Lynx is not responsible for damage resulting from misuse abuse failure to pro...

Page 40: ...40 CARE USE INSTALLATION L27 L30 ROTISSERIE GRILL WIRING SCHEMATICS...

Page 41: ...CARE USE INSTALLATION 41 L36 L42 ROTISSERIE GRILL WIRING SCHEMATICS...

Page 42: ...42 CARE USE INSTALLATION L54 ROTISSERIE GRILL WIRING SCHEMATICS...

Page 43: ...R ELBOW IR HOOD LIGHT ASS Y 12 22B 7 8 13 11 22 21 9 L E N A P T H G I L 10 4 F L E H S G N I M R A W E T A R G 5 6 5 G N I R P S N O I S N E T X E 2 POSITION MOTOR MOUNTING BRACKET KIT PROFESSIONAL S...

Page 44: ...D 15 27 10067 BURNER HANGER PRO 27 55 L27 32557 HOOD HANDLE 27 30 32484 BURNER HANGER PRO 30 L30 32522 HOOD HANDLE 30 L30 32484 BURNER HANGER PRO 30 L36 32523 HOOD HANDLE 36 L36 32245 BURNER HANGER PR...

Page 45: ...FIC BTU OUTPUTS MODEL H BURNER Btu ROTISSERIE Btu PROSEAR 2 Btu TOTAL INPUT L27 F R 2 25 000 1 14 000 64 000 Btu Hr L27PS F R 1 25 000 1 14 000 1 21 000 62 000 Btu Hr L30R F 2 25 000 1 14 000 64 000 B...

Page 46: ...nections are located on the right side A Carpenter s spirit level should be used to assure that the framing is level both front to back and side to side Note Never under any circumstance should you in...

Page 47: ...cautions 22 Indirect Heat Cooking 27 Insulated Jacket Installation 46 L Leak Test Procedure 19 Lighting Manual 26 Lighting Your Grill 7 25 Lighting Rotisserie Burner 7 25 Low Heat Burner Adjustment 19...

Page 48: ...The best outdoor kitchen products come from Lynx Grills Inc 7300 Flores Street Downey CA 90242 Service 888 289 5969 Fax 562 299 6789 www lynxgrills com PN 33816 Rev E 2017...

Reviews: