FinishLynx D
IAMOND
Package Quick Start Guide - For Vision Cameras
4
Step 5:
Set up the Primary Camera and Tripod
Set up the tripod in line with the finish line, preferably on the
infield and approximately
15 feet back
.
NOTE
: Minimum recommended camera distance from the track
is 12 feet (at this distance you may not be able to see the feet of
the athlete in Lane 1. Being able to see the feet is not a
requirement for accurate timing on the torso of the athlete). If you
need to be closer than this, you may have to use the optional 2.8
- 10mm lens supplied with your Diamond package. (See last
page of QSG for these instructions)
1. Extend the tripod legs so the geared head is approximately
7 ft high.
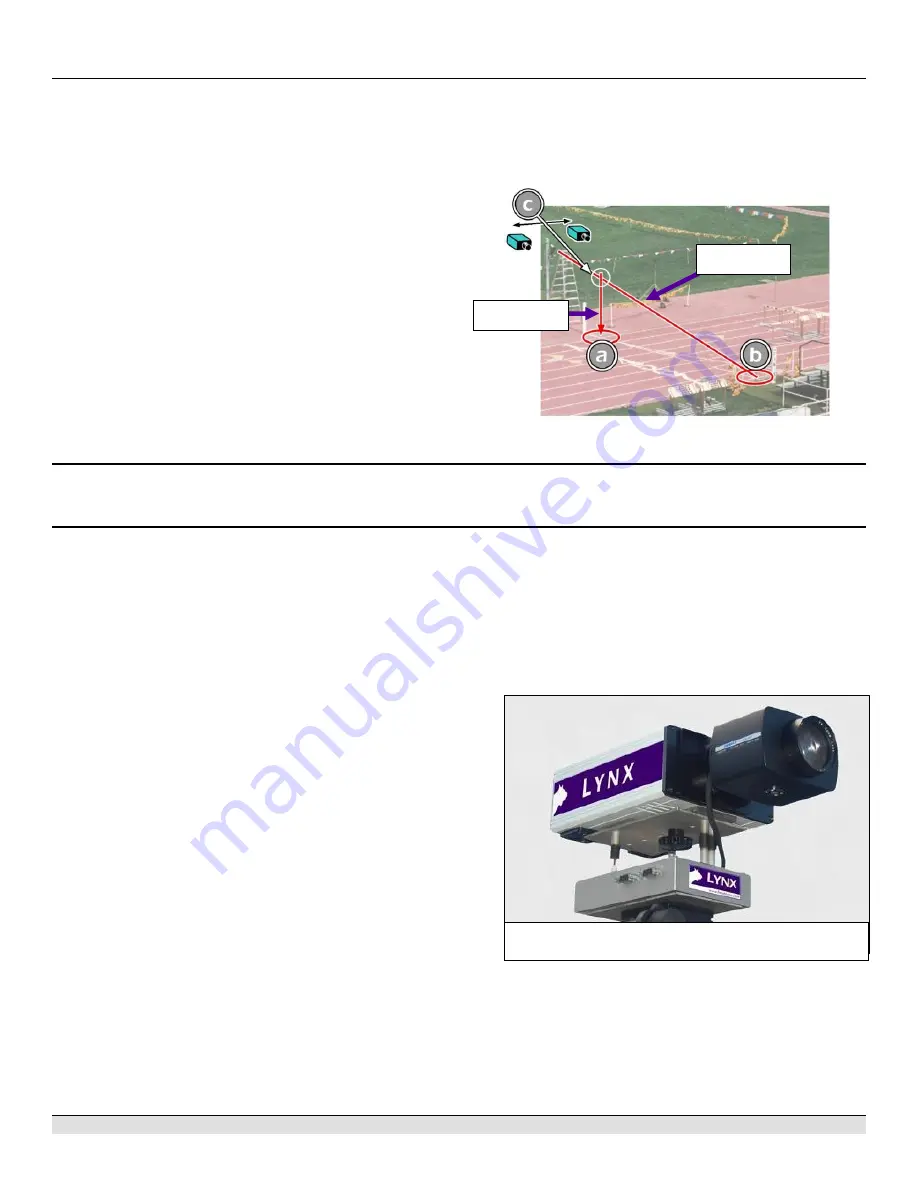
2. On the near side of the finish line, hold a plumb bob so that
it is suspended directly above the middle of the finish line.
This is the
plumb line
, shown as
a
in the image below.
3. Tie string to the screw on the top of the tripod head. Have
your assistant take the other end of the string to the far side
of the finish line and hold the string taught. This is the
sight
line
, shown as
b
in the image below.
4. Move the tripod to the left or right until the plumb line and
sight line touch at position
c
in the image below. The tripod
is now in the plane of the finish line.
Step 6:
Set up the Reverse Angle Camera and Tripod
1. Repeat instructions above for Secondary Camera on the opposite side of the track
Step 7:
Attach the Cameras to the Tripods
NOTE: Primary camera is marked TIMING ENABLED on
camera ID plate on base of camera.
1. Secure the remote positioner to the camera bottom by
turning the black handled thumbscrew. Make sure the
FinishLynx label faces in the same direction as the camera
lens will face.
2. Connect the cable that comes with the remote positioner to
the port on the positioner and the port on the back of the
camera labeled
Remote.
3. Connect the cable on the remote lens to the remaining serial
port on the remote positioner.
4. Secure the geared head to the top of the tripod.
5. Note how the mounting plate is attached to the top of the
geared head. Then pull back on the lever at the top of the
geared head to release the mounting plate.
6. Tighten the mounting plate to the bottom of the remote
positioner by turning the screw with a flathead screwdriver.
Make sure the
Lens
marking on the bottom of the plate is
facing the front of the remote positioner (where the Lynx
label is affixed).
7. Attach the camera with the remote positioner and mounting
plate to the tripod by clicking the mounting plate into place
on the geared head.
8. With the camera lens lined up with and facing the finish line,
make minor adjustments to the tripod legs so both bubbles
on the tripod are centered.
9. Turn the black knob on the geared head that controls the
tilt
of the camera so that it is at about a 30 degree angle to the
ground.
10. Repeat this process for the second EtherLynx Vision
camera.
NOTE: Cables omitted for clarity and actual lens may vary from
model shown
Sight Line
Plumb Line


