background image

3


Table of Contents 

Operating 

Voltage 


4

Unpacking the SDAI 2175 


  4

Serial Number Registration 


  4

Introduction 


5

Accessories 


6

Front 

Panel 


7

Controls 


7

Display      


8

Rear 

Panel 


9

Menu 

system 

    10

Menu 

Tree 

    11

- RELVOL - Relative Volume 


11

- SENSIT - Sensitivity 


11

- BRIGHT - Brightness   


11

- IR RMT - IR Remote 


11

- INPTXT - Select Input Text 


11

- LNKID - Link Address   


12

- LNKSP - Link Comm. Speed 


12

- BAL LR - Balance Left Right 


12

- DEFVOL - Default Volume 


12

- MAXVOL - Maximum Volume   


12

Software     13

Connectors 

    14

Mains 

Connector 

   14

- Loudspeaker connectors 


14

Input 

connectors 

   14

Balanced 

inputs    14

Unbalanced 

inputs 

   14

Trigger 

connectors 

   15

Cleaning and Maintenance 


15

Technical Specifi 

cations 

   16


Audio 

     16


Protection 

    17


Mains 

     17


Trigger     17


Mechanical 

    17

Technical 

Assistance 

   18

Manual version 10-05-07

Summary of Contents for SDAI 2175

Page 1: ...Owner s manual SDAI 2175 Semi Digital Amplifier Integrated ...

Page 2: ...2 ...

Page 3: ...R Remote 11 INPTXT Select Input Text 11 LNKID Link Address 12 LNKSP Link Comm Speed 12 BAL LR Balance Left Right 12 DEFVOL Default Volume 12 MAXVOL Maximum Volume 12 Software 13 Connectors 14 Mains Connector 14 Loudspeaker connectors 14 Input connectors 14 Balanced inputs 14 Unbalanced inputs 14 Trigger connectors 15 Cleaning and Maintenance 15 Technical Specifications 16 Audio 16 Protection 17 Ma...

Page 4: ...ng type of AC mains Unpacking the SDAI 2175 Carefully remove the unit and accessory kit from the carton visually check for shipping damage Contact both the shipper and Lyngdorf Audio immediately if the unit bears any sign of damage from mishandling All Lyngdorf Audio equipment is carefully inspected before leaving our factory Keep shipping carton and packing material for future use or in the unlik...

Page 5: ...connec tors The volume control is implemented as a high precision digital controlled analog attenuation in 0 1 dB steps over a 100 dB range Input selection is performed via precision relays with double gold plated construction of the contact set These kind of relays are normally only used in expensive measurement equipment for high linearity and low losses All controls can be operated from the fro...

Page 6: ...ies You should find the following accessories included Mains cord This manual 1 2 3 4 5 6 7 digital info analog A B random repeat AMP channel ENTER volume RCS CD TUNER menu 8 0 9 Programming cable Remote control ...

Page 7: ...e remote control as well 1 Mains switch Turns the power to the unit On or Off 2 Power Changes the SDAI 2175 mode between Standby and Active 3 Menu Toggles Menu mode on off 4 Enter Activates sub menus for active changes 5 11 Input selectors Selects active input or in menu system select input to change 12 Volume indicates decrease and increase in volume control or in menu mode toggles sub menus or i...

Page 8: ...cates the Menu system is operative of the SDAI 2175 Off The SDAI 2175 is in normal mode Flashing The SDAI 2175 is in menu active mode On The SDAI 2175 is in menu select mode Menu active mode indicates the menu button 3 have been pressed and the different menus can be either toggled by pressing 12 or selected for changes with enter 4 4 1 7 Illuminates active input 5 14 Segment display Main menu sys...

Page 9: ...output after volume control of selected input 10 Pre Out Bal Balanced regulated output after volume control of selected input 11 Trigger Out DC Trigger out for remote start of SDA 2175 power amplifiers or similar equipment 12 13 Input RS232 communication connectors for communication with PC 14 Loudspeaker Connectors Stereo Loudspeaker output 15 Mains socket ...

Page 10: ...inated The volume control keys 12 now changes status from being volume control keys to be sub menu selectors for the menu system Pressing the keys changes between the different menus seen in fig 1 When the wanted menu system is found it can be activated with the Enter key 4 When active the menu LED starts blinking and the parameters for the active setting can be changed with the volume control key...

Page 11: ...ty SENSIT Sensitivity Input amplifier sensitivity 0 or 6 dB for the active input Used for increasing the sensitivity for weak sources in the preamplifier section without increasing noise level BRIGHT Brightness BRIGHT Brightness Brightness of Display from 0 Display off to max intensity 4 IR RMT IR Remote IR RMT IR Remote Enable Disable of remote control Remote can be disabled if the SDAI 2175 is c...

Page 12: ...ation speed 9600 57600 Baud Normal Lyngdorf interconnect speed is 57600 Baud BAL LR Balance Left Right BAL LR Balance Left Right Fine tunes balance of level from Left to Right speaker 6dB in 0 1 dB step DEFVOL Default Volume DEFVOL Default Volume Sets default volume when the amplifier comes out of standby MAXVOL Maximum Volume MAXVOL Maximum Volume Maximum volume the user can select used as a safe...

Page 13: ...w the upgrade steps to bring the product into boot mode Only one device should be connected to the PC when upgrading the firmware Upgrade steps Make sure that a serial cable is connected between PC and amplifier or CD Select File to upload Check Comm Adress and COM port Click Open Comm port Start Amplifier or CD in boot mode Upload new software Wait for Amplifier or CD to Initialize Bootmode Turn ...

Page 14: ...erminal is tightened firmly Always disconnect the SDAI 2175 from the mains before changing any connections to its inputs or outputs Make sure that no conductive part of the speaker wiring is accessible Do not con nect loudspeakers with uninsulated terminals When the SDAI 2175 is operating there is 35V DC on its output terminals with reference to ground Do not connect the output from the amplifier ...

Page 15: ...I 2175 power amplifiers or active subwoofers Cleaning and maintenance Always unplug the unit from the electrical outlet before cleaning This unit does not require any regular maintenance except to keep its exterior clean Simply wipe its exte rior with a clean soft cloth A small amount of non abrasive cleaner may be used on the cloth to remove any excessive dirt or fingerprints Do not use abrasive ...

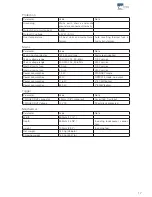
Page 16: ...ill accept bare wire ends of up to 5 mm diameter Output power 8ohms 2 200W 1KHz 1 THD N Output power 4ohms 2 375W 1KHz 1 THD N Nominal load impedance 4 Ohms 8 Ohms It is safe to operate the amplifier with no load Frequency response 0 3Hz 33kHz 3dB points 8ohms load Frequency response 0dB 0 2dB 20Hz 20kHz 8ohms load Frequency response 0 2dB 0dB 20Hz 20kHz 4ohms load Output impedance 0 035 Ohms 20Hz...

Page 17: ...s voltage range 200 240V AC 50 60Hz 230V version Internal mains fuse 8 Amp 115V version Internal mains fuse 4 Amp 230V version Power consumption 1 5 W STANDBY mode Power consumption 35 W OPERATE mode no output Power consumption 116 W 2 37 5W 4ohms Power consumption 820 W 2 300W 4ohms Trigger Parameter Value Note TRIGGER OUT connector 3 5mm 1 8 mono jack Case Gnd Tip Input TRIGGER OUT Voltage 12V D...

Page 18: ...Questions and Answers please check the Support section on the Lyngdorf Audio website If you have any problems with or questions regarding your Lyngdorf Audio product please contact your nearest Lyngdorf Audio representative or Lyngdorf Audio Denmark E mail info lyngdorf com Web http www lyngdorf com ...

Page 19: ...19 ...

Page 20: ...20 www lyngdorf com ...

Reviews: