background image


User Manual | iZoom 6 

13 


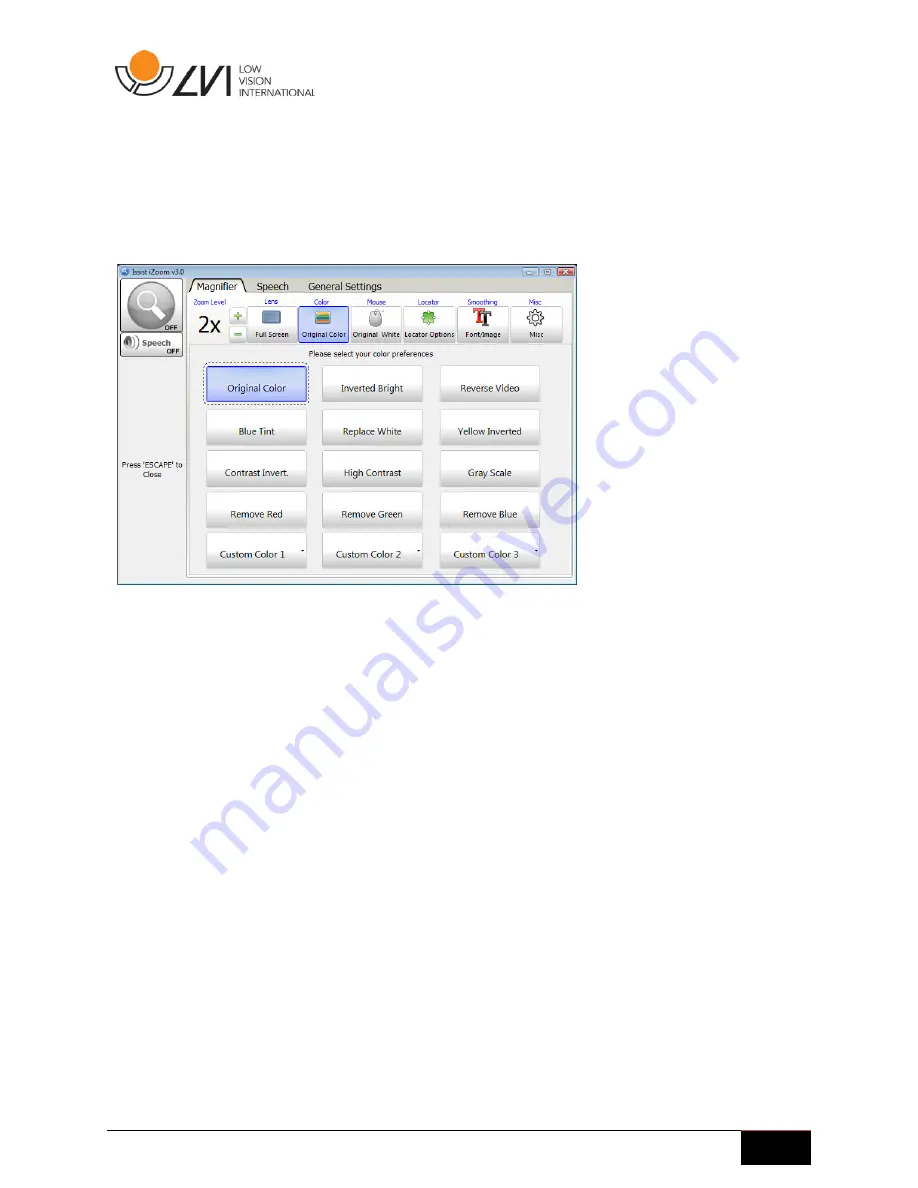
Original Colors is the default color scheme. It will not make any changes to the 

screen colors. Try the different color schemes to find a suitable scheme for 
your needs. Press the “Color” button or the Esc key when done. 


 Figure 13 

2.11


Smoothing 

iZoom supports Font and Image smoothing. These options improve the font 

and image quality.  

However, both of these options require more computing power and cause 

iZoom to run slower on older computers. Font smoothing may cause 

overlapped text in some circumstances. Disable font smoothing during such 

situations to resolve the issue.  

By default, Image Smoothing is Off and font smoothing is On. To change 

these options, click the “Smoothing” button on the iZoom Window.  The 

iZoom Window will expand revealing the Image and Font Smoothing options. 

Press the “Smoothing” button or the Esc key when done.  

2.12


SmartAlign 

Use SmartAlign to swiftly realign text on web pages in Internet Explorer or 

Firefox. Place the cursor over text you want to read. Hold down the left mouse 

button on the text for half a second. The computer will produce a short beep, 

indicating iZoom has detected your request to realign the webpage. If the  

Summary of Contents for iZOOM 6

Page 1: ...USER MANUAL iZOOM 6 LVI Low Vision International Verkstadsgatan 5 Tel 46 70 727700 E mail info lvi se 352 46 V xj Fax 46 70 727725 Internet www lvi se...

Page 2: ...2 User Manual iZoom 6...

Page 3: ...s 7 2 6 Adjusting Lens Size Position 10 2 7 Freeze Window 10 2 8 Mouse Enhancements 11 2 9 Locators 12 2 10 Color Enhancements 12 2 11 Smoothing 13 2 12 SmartAlign 13 2 13 Scroll Padding 14 2 14 Zoom...

Page 4: ...reen such as size colour mouse pointer etc to make your computing experience easier It is available in various versions such as a downloadable version known as iZoom Standard a flash drive known as iZ...

Page 5: ...r IE 6 0 Firefox 2 0 Limited speech support If a security warning dialog appears press Run Then follow the instructions to complete the installation 2 1 Starting Closing iZoom iZoom Standard Double cl...

Page 6: ...in Figure 4 Alternatively iZoom may be closed using a shortcut key Refer to section 4 1 HotKeys for details Figure 4 If you are running iZoom USB DO NOT simply pull out the USB drive after closing or...

Page 7: ...ows a grey magnifying glass indicating magnification is disabled Figure 5 Figure 6 2 4 Increase Decrease Magnification iZoom provides magnification levels from 1X to 36X Increase the magnification pre...

Page 8: ...8 User Manual iZoom 6 Figure 7...

Page 9: ...s around the mouse pointer will appear magnified The rectangular area itself will not change position Once docked lens is selected the position and size of the rectangular area can be adjusted by pres...

Page 10: ...s will appear with red buttons on the corners se figure 9 below Adjust the lens to desired size and position by holding the red squares and dragging When done adjusting press the Esc key or right mous...

Page 11: ...mouse Figure 10 2 8 Mouse Enhancements To change the appearance of the mouse press the Mouse Button on the iZoom Window The iZoom window will expand as shown in Figure 11 Select Pointer size and color...

Page 12: ...small cross only when the mouse is moving Full Cross 1 will display a full cross around the mouse pointer at all times Full Cross 2 will display a full cross only when the mouse is moving Use the Thic...

Page 13: ...e overlapped text in some circumstances Disable font smoothing during such situations to resolve the issue By default Image Smoothing is Off and font smoothing is On To change these options click the...

Page 14: ...the mouse must be moved to the edge of the screen before the viewing area is moved Setting scroll padding to 0 will require movement of the mouse to the absolute edge of the magnified view in order t...

Page 15: ...croll bar moves up and vice versa As the magnified view is scrolled right the horizontal scroll bar moves right and vice versa The intersection is the area of the original screen being viewed Figure 1...

Page 16: ...ier to find To Enable Disable focus highlighting click the Misc button in the iZoom window Click the Preferences tab Use the Enable Focus rectangle check box to enable disable focus highlighting Press...

Page 17: ...tiple times will increase the movement speed of your screen while panning To return to the horizontal starting point of your screen press the Ctrl key Alternatively press and hold Ctrl key while panni...

Page 18: ...ary monitor that is stretched across two screens Figure 23 Independent Magnifies both monitors independently from each other Figure 24 Original and Magnified Leaves primary monitor at original state a...

Page 19: ...speech rate volume Use the Voice dropdown box to select a different voice if available Figure 26 3 2 Echo Settings Echo settings control what iZoom speaks when you type and navigate various applicatio...

Page 20: ...ontrol Echo Control State Announces the state of the active control such as checked and disabled Echo Control Type Announces the type of the active control such as button or checkbox Echo Caret Line S...

Page 21: ...SmartAlign Speaks the text displayed on the screen when SmartAlign is activated 3 3 Narration Narration speaks web pages in Internet Explorer text documents in Notepad and Microsoft Word documents To...

Page 22: ...22 User Manual iZoom 6...

Page 23: ...through keyboard shortcuts iZoom uses the following Hotkeys by default In order to set custom Hotkeys click the Misc icon on the iZoom Window A drop down will appear as shown in Figure 27 To change a...

Page 24: ...ation Ctrl Shift Z Toggle Echo objects under mouse Ctrl Shift M 4 2 Start iZoom on Startup Figure 28 Select the General Settings tab and check Run iZoom on Startup as shown in Figure 28 to start iZoom...

Reviews: