3
FTF01 Rev.3.1 01/2021
Luxier
Important Points
•
This installation guide is subject to change without notice, please contact us to request the most
updated version of this installation guide.
•
This is a general installation guideline, actual installation may vary. Consult a professional if
necessary.
•
Read and understand this instructions completely before installation.
•
Please follow all local building and plumbing codes.
•
Product drawings in this installation guide is for illustration purpose only. Actual product may vary
depends on model.
•
Always take extra precautions and wear appropriate safety equipment when installing this
product.
•
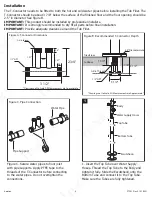
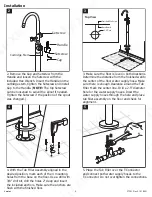
Wrap all threaded connections, except the aerator in the spout, with Tefl on (PTFE) tape. Always
wrap in a counterclockwise direction.
•
When installing your new faucet, fi rst hand tighten the water supply hoses then use a wrench to
give the compression nuts an additional (1/4) turn. Do not overtighten the compression nuts as it
will reduce the integrity of the sealed connection.
You may also need the following tools
1. Safety Glasses
5. Adjustable / Pipe Wrench
2. Teflon (PTFE) Tape
6. Screwdriver
3. Plumber’s Putty and Caulking
7. Electric Drill
4. Pipe Cutter
Maintenance Guide
Please follow the cleaning material manufacturer’s instructions. Damage caused by improper
treatment will not be covered by product warranty. In addition, pay attention to the following points:
•
Regular cleaning can prevent mineral build up on faucet spout.
•
Carefully read the cleaner product label to ensure the cleaner is safe for use on the material.
•
Test the cleaner on a small area before using on the entire surface.
•
Use a mild detergent such as liquid dishwashing soap and warm water for cleaning.
•
Do not use abrasive / harsh chemical when cleaning the fi xture as they will damage and dull the
fi nish.
•
When using spray cleaners, spray fi rst onto a soft cloth or sponge. Never spray directly onto the
faucet as droplets can enter openings and gaps and cause damage.
•
After cleaning, rinse thoroughly with clean water to remove any cleaner residue.


