


Step 10:
Enjoy the comfort, peace of mind and flexibility of your LUX/GEO thermostat.
VISIT OUR ONLINE COMMUNITY FOR INTERESTING ARTICLES AND TIPS FOR SAVING ENERGY AT LUXPRODUCTS.COM. THANK YOU.
53599-17
LUX/GEO
®
is a trademark of LUX Products Corporation. Radius
TM
is a trademark of EnergyHub, Inc.
LUX Products Corporation, Philadelphia, PA 19112 LuxProducts.com ©2017
Step 9: Custom settings & Radius
TM
set-up
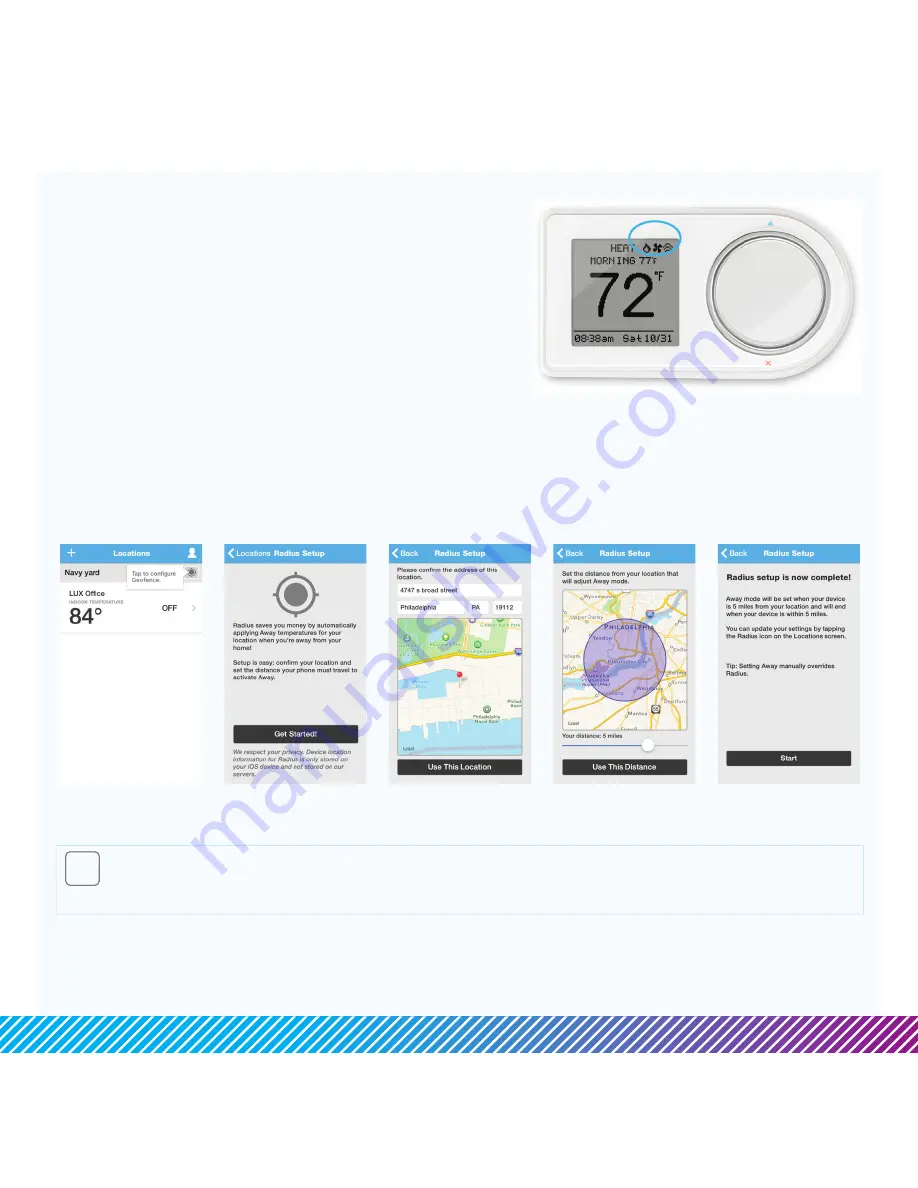
Radius
TM
is a geofence that allows you to set a geographic “fenced” zone via your mobile device. Using GPS, Radius
TM
(geofencing software) will recognize your approach into or out of the “fenced” area and trigger your thermostat to
adjust to either your “at home” comfort settings or “Away” settings which provide more efficient energy use. With
Radius
TM
, geofencing can be set on multiple devices/users and to your custom needs and can work with or without a
thermostat schedule to still save energy when away from home.
Please note and be assured that your GPS location is NEVER reported or known by LUX Products.
TIP: IF YOU SET YOUR FENCE FURTHER FROM YOUR HOME THEN YOUR SYSTEM WILL HAVE MORE TIME TO MAKE YOUR HOME
COMFORTABLE BEFORE YOU GET HOME. IF YOU SET THE FENCE CLOSER TO HOME THEN YOU WILL SAVE MORE ENERGY BUT
SOMETIMES YOUR SYSTEM WILL NOT HAVE TIME TO RECOVER BEFORE YOU GET HOME. IF YOU ARE USING BATTERY POWER,
WE RECOMMEND SETTING A LARGER DISTANCE.
Customize your
distance
Ready to set your
fence
Confirm starting
location
The Radius
TM
icon
can be found in
upper right of screen
Complete
Setting your “fence”
8d. When room temp appears
on GEO display, continue by
following prompts on App
Once you see
on app and
on GEO – your system is now
successfully connected.
Troubleshooting:
You may need to manually reconnect your phone to your WiFi
network. If this is unsuccessful – restart GEO by going to menu/
settings/network and pick up App from step 8b.


