background image

5

INSTALLATION: GROUND STAKE 

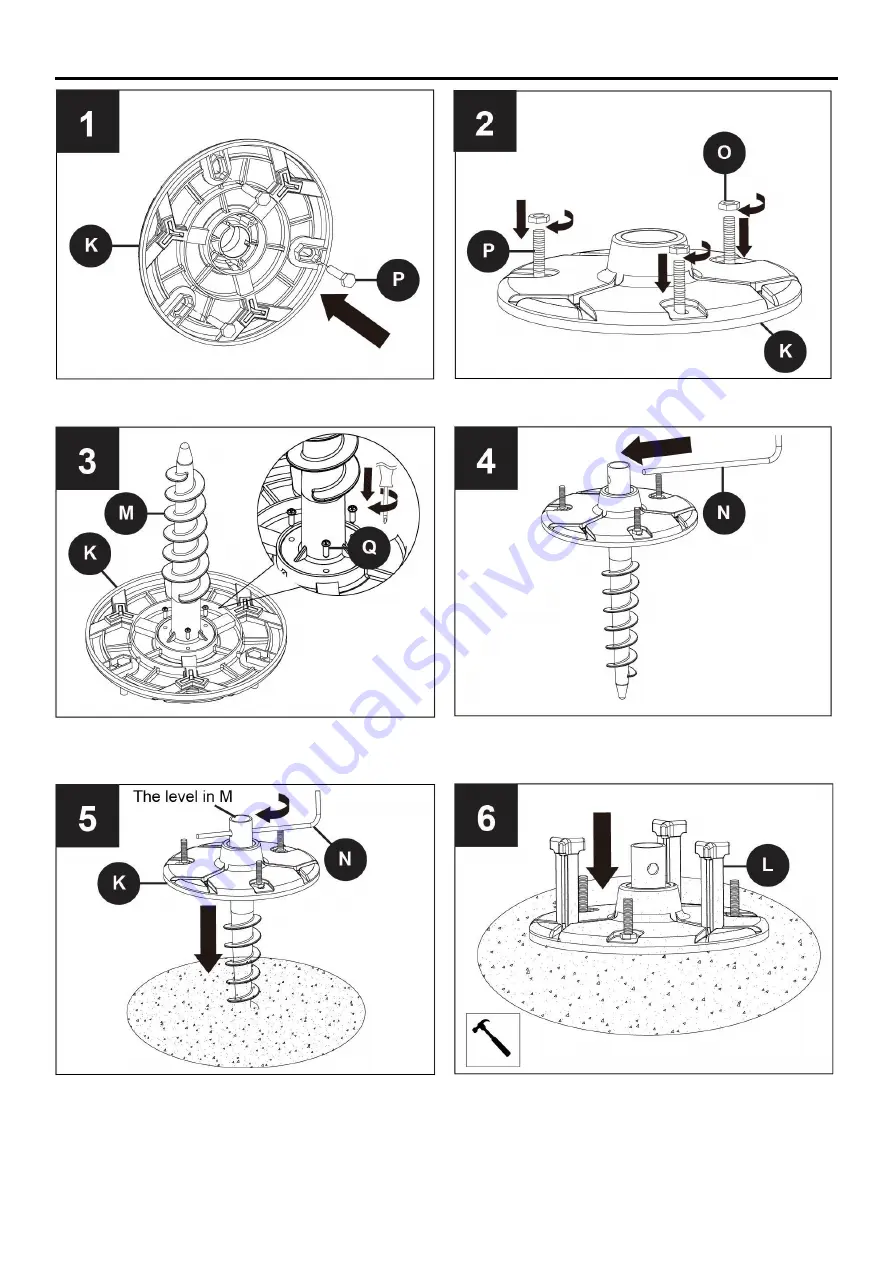
Install three


Hex Bolt (P) into Ground Base Insert (K), and tighten with Nut (O).


Attach the Large Ground Stake (M) to the Ground Base Insert (K) by screwing three Ground Stake 

Screws (Q) tight with Phillips screwdriver. Then insert Turn Rod (N).  


Turn ground stake assembly clockwise by using Turn Rod (N) into the dirt until Ground Base Insert (K)

is tight against the dirt. Insert and pound the three smaller Ground Stakes (L) into the dirt with a 

hammer (not included). 

Note: 

          Make sure the bubble in the level found at the top of the Ground Stake (M) is centered and 

level so the Post Assembly is in a perfect vertical position.


Summary of Contents for 12513LE-SL

Page 1: ...1 LED Solar Post Lantern Owners Manual Model 12513LE SL ITM ART 1900527 English IMPORTANT RETAIN FOR FUTURE REFERENCE READ CAREFULLY...

Page 2: ...2 PACKAGE CONTENTS I J K L M N O P Q A A1 B B1 C E F F1 G H D A2 B2 C1 A3 A5 A4 R...

Page 3: ...ge Ground Stake 1 N Turn Rod 1 s t u N n i 2 3 3 1 O 3 P 3 Q 3 SPECIFICATIONS Model 12513LE SL LED Color 2700K Lumens 300LM Total power 6W Battery Li ion Voltage 7 4V Battery Capacity 2200 mAh Power S...

Page 4: ...o assembly te Charging conditions differ by time zone locations and affects total hours of light discharge DETERMINE DESIRED INSTALLATION PERMANENT CONCRETE PAD OR GROUND STAKE INSTALLATION PERMANENT...

Page 5: ...hillips screwdriver Then insert Turn Rod N Turn ground stake assembly clockwise by using Turn Rod N into the dirt until Ground Base Insert K is tight against the dirt Insert and pound the three smalle...

Page 6: ...hten with Allen Wrench D Remove the preassembled 3 Base Screws F1 from Base F with a Phillips screwdriver not included Save for later use Secure Middle Pole E to Base F with Base Screws F1 Tighten wit...

Page 7: ...test the lights by placing the empty box upside down over the Post Light Head Once darker the LED lights should turn on in several seconds Attach Solar Panel Top A to Lamp Head B with the previously r...

Page 8: ...Tighten with a 1 2 inch wrench not included ssembly over Ground Base Insert K CAUTION Allow the concrete to dry before installing the pole assembly Installation Wood Deck Mark 3 points on the deck by...

Page 9: ...y replacement Generally speaking the rechargeable battery should be replaced every two years in order to maintain the maximum capacity Please refer to the specs for max charge cycles Note Run times an...

Page 10: ...bulb Warning The supplied LED bulbs have been specially developed for use with the solar post light model 12513LE SL and must be replaced with model 9700357000 The use of any other type bulbs will not...

Page 11: ...broken remove the broken Solar LED Bulb B1 and replace Plug new black battery cable into light fixture Insert new battery into battery compartment by carefully placing battery cable into the cable sto...

Page 12: ...The battery is not charged 1 Set to ON 2 Charge for 6 8 hours in direct 3 Check at night 4 Re tighten the bulb 5 Relocate the solar post light 6 Make sure the solar panel is in direct sunlight The fi...

Page 13: ...Blvd Magnocentro No 4 San Fernando La Herradura Huixquilucan Estado de M xico C P 52765 RFC IPR 930907 S70 55 5246 5500 www costco com mx Costco Wholesale Australia Pty Ltd 17 21 Parramatta Road Lidc...

Page 14: ...14 IMPORTANT LIRE ATTENTIVEMENT ET CONSERVER POUR CONSULTATION ULT RIEURE Mod le 12513LE SL ITM ART 1900527 Fran ais Lampadaire solaire DEL Manuel d utilisation...

Page 15: ...15 CONTENU DE L EMBALLAGE I J K L M N O P Q A A1 B B1 C E F F1 G H D A2 B2 C1 A3 A5 A4 R...

Page 16: ...x 2 3 16 po 3 Q Vis pour piquet de sol de 3 16 x 7 8 po 3 CARACT RISTIQUES Mod le 12513LE SL Couleur des DEL 2 700 K Lumens 300 lm Puissance totale 6 W Batterie Lithium ion Tension 7 4 V Capacit de la...

Page 17: ...ller le lampadaire s assurer qu il ne manque aucune pi ce Comparer le contenu de l emballage avec la liste des pi ces et des l ments de quincaillerie Si des pi ces sont manquantes ou endommag es ne pa...

Page 18: ...on compris en serrant compl tement Ins rer la tige de rotation N Ins rer le piquet mont dans le sol en le tournant dans le sens horaire avec la tige de rotation N jusqu ce que le raccord de la base K...

Page 19: ...serrer avec la cl hexagonale D Retirer les trois vis F1 pr install es sur la base F l aide d un tournevis pointe cruciforme non compris Les mettre de c t Fixer le m t inf rieur E la base F avec les v...

Page 20: ...air l ext rieur Pour tester les ampoules placer une boite vide sur la lampe la noirceur les ampoules DEL devraient s allumer apr s quelques secondes Attacher la t te solaire A la lampe B avec les deux...

Page 21: ...d ancrage J Le fixer avec les crous borgnes G et les rondelles H Serrer avec une cl de 1 2 po non comprise ATTENTION Laisser le b ton s cher avant d installer le m t Installation sur une terrasse en...

Page 22: ...lacement de la batterie La batterie rechargeable devrait normalement tre remplac e tous les deux ans afin de maintenir une puissance optimale Consulter les cycles de recharge maximum dans les caract r...

Page 23: ...atterie est le 9700356000 et celui des ampoules le 9700357000 Avertissement Les ampoules DEL fournies sont sp cialement con ues pour le lampadaire solaire 12513LE SL il faut utiliser les ampoules de r...

Page 24: ...B1 est bris e la retirer et la remplacer Brancher le c ble noir de la nouvelle batterie sur la t te solaire Ins rer la batterie dans son compartiment en pla ant doucement le c ble sous la batterie Ins...

Page 25: ...rge pas 1 Mettre l interrupteur en position allum e 2 Exposer le lampadaire au soleil pendant six huit heures 3 V rifier le lampadaire apr s le coucher du soleil 4 Bien serrer l ampoule 5 D placer le...

Page 26: ...tco Importado por Importadora Primex S A de C V Blvd Magnocentro No 4 San Fernando La Herradura Huixquilucan Estado de M xico C P 52765 RFC IPR 930907 S70 55 5246 5500 www costco com mx Costco Wholesa...

Page 27: ...27 IMPORTANTE CONSERVE PARA FUTURA REFERENCIA LEA CUIDADOSAMENTE Modelo 12513LE SL ITM ART 1900527 Espa ol Poste de luz LED Solar Manual del Usuario...

Page 28: ...28 CONTENIDO DEL EMPAQUE I J K L M N O P Q A A1 B B1 C E F F1 G H D A2 B2 C1 A3 A5 A4 R...

Page 29: ...ales de 1 cm x 5 5 cm 3 Q Tornillos de 0 4 cm x 2 3 cm para las estacas de tierra 3 ESPECIFICACIONES Modelo 12513LE SL Color LED 2700 K L menes 300 LM Potencia total 6 W Bater a Li ion Voltaje 7 4 V C...

Page 30: ...CONCRETO PREPARACI N Antes de comenzar el ensamblaje o la instalaci n aseg rese de que todas las piezas est n incluidas Compare el contenido con la lista En caso de que alguna pieza faltara o estuvie...

Page 31: ...la estaca en el sentido de las agujas del reloj utilizando la Palanca N hasta que la Tapa de la base K est firmemente asegurada a la tierra Inserte las 3 Estacas peque as para tierra L y cl velas con...

Page 32: ...e C1 y aseg relo con la Llave Allen D Retire los 3 Tornillos F1 de la Base F con un destornillador Phillips no incluido Guarde estas piezas para uso posterior Asegure el Poste central E a la Base F co...

Page 33: ...oscuridad las luces se encender n transcurridos algunos segundos Utilice los Tornillos de mariposa A1 para unir el Panel solar A y el Farol B Ajuste con un destornillador plano no incluido ENCENDIDO I...

Page 34: ...yuda a otra persona y coloque el poste previamente ensamblado sobre el Soporte para instalaci n sobre concreto I y los Pernos de anclaje J utilizando las Tuercas bellota G y las Arandelas H Asegure co...

Page 35: ...emplazo de la bater a Generalmente las bater as recargables se reemplazan cada dos a os para mantener el mejor funcionamiento Por favor lea las especificaciones para conocer los ciclos m ximos de carg...

Page 36: ...el incorrecto funcionamiento del producto 36 REEMPLAZO DE LA BATER A Y LOS FOCOS Puede conseguir bater as y focos de repuesto en LUTEC USA llamando al 877 714 8669 Solo habla ingl s El n mero de mode...

Page 37: ...onecte el cable de la misma Si el foco estuviera roto ret relo tambi n Conecte el cable de la bater a nueva Inserte la bater a en el compartimento y el cable en el espacio debajo de la bater a Inserte...

Page 38: ...est cargada 1 Coloque el interruptor en posici n de encendido 2 C rguelo de 6 h a 8 h 3 Rev selo durante la noche 4 Ajuste el foco 5 Reubique el poste de luz 6 Aseg rese de que el panel solar reciba...

Page 39: ...dora Primex S A de C V Blvd Magnocentro No 4 San Fernando La Herradura Huixquilucan Estado de M xico C P 52765 RFC IPR 930907 S70 55 5246 5500 www costco com mx Costco Wholesale Australia Pty Ltd 17 2...

Reviews: