background image

FR565WG-INS-LAB-RevB12: Deluxe Preferred Care Recliner Assembly & Operating Instructions 

9

RECLINER POSITIONING MECHANISM TROUBLE-SHOOTING GUIDE

Adjustment Instructions for 
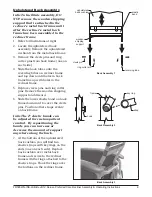
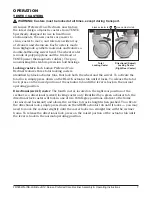
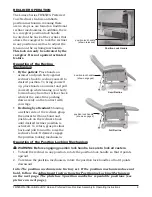
Positioning Locking Mechanism

. WARNING:.DO.NOT.lubricate.the.position.

mechanism.assembly..The.recliner.could.

fail.to.lock.in.position.and.cause.severe.

personal.injury.

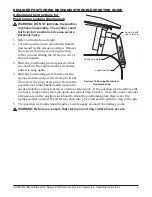
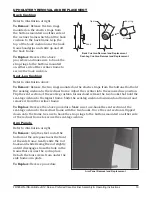
1.  Refer to illustration at right.
2.  Turn the position lock adjustment handle 

downward to the release position.  Remove 
the top clevis pin by removing the ring 
cotter pin and sliding the clevis pin out of 
the mechanism. 

3.  Slide the positioning plate upward so that 

you can turn the square washer clockwise 
until it is snug again. 

4.  Slide the positioning plate down over the 

square washer and put the clevis pin in but 
do not put the ring cotter pin in. Rotate the 
position lock adjustment handle upward to 
ensure that the correct tension is on the position lock.  If the position lock handle is still 
too loose, remove the clevis pin again and repeat Step 2 above.  Once the proper amount 
of tension is on the position lock handle, slide the positioning plate down over the 
square washer and put the clevis pin back into place and secure with the ring cotter pin.

5.  The position lock adjustment handle should engage at about the halfway point.

. WARNING:.Before.use,.ensure.that.clevis.pin.and.ring.cotter.pin.are.secure..

Recliner Positioning Mechanism

Troubleshooting

clevis pin with

ring cotter pin

positioning plate

square washer

Summary of Contents for FR565WG Deluxe

Page 1: ...d Operating Instructions IMPORTANT READ THIS MANUAL BEFORE OPERATING YOUR LUMEX FR565WG DELUXE EXTRA WIDE PREFERRED CARE RECLINER SAVE THIS MANUAL FOR FUTURE USE THE MOST CURRENT VERSION OF THIS MANUA...

Page 2: ...SEAT LEG CUSHION 10 ARM PANELS 10 CARE AND MAINTENANCE 11 EVERY THREE MONTHS 11 UPHOLSTERY MAINTENANCE AND STAIN REMOVAL 11 PERMABLOK3 CARE AND CLEANING GUIDE ADVANCED VINYL PROTECTION 11 CDC RECOMMEN...

Page 3: ...statements in other chapters or sections which may be the same as or similar to the following or specific to the operations Please note the following special statements used throughout this manual and...

Page 4: ...lacement parts may change the structure of the recliner and could create a hazardous condition which may result in serious injury and will void the warranty WARNING GF Health Products Inc specifically...

Page 5: ...lstered seat b One upholstered back c Two clevis pins with ring cotter pins 3 DO NOT remove the wooden shipping support that is attached to the recliner s upholstered back until after the recliner s u...

Page 6: ...r frame 5 Replace clevis pins and ring cotter pins Remove the wooden shipping support and discard 6 Slide the lower elastic band on back frame downward to cover the clevis pins Position other straps e...

Page 7: ...e wheel and the swivel To activate the total lock simply press down on the BLACK actuator tab until it locks To release the total lock press on the raised portion of the actuator tab until the lever i...

Page 8: ...ime pushing down evenly on the footrest with your legs Reclining by attendant Standing on either side of the recliner grasp the armrest with one hand and push back on the recliner s back until desired...

Page 9: ...r clockwise until it is snug again 4 Slide the positioning plate down over the square washer and put the clevis pin in but do not put the ring cotter pin in Rotate the position lock adjustment handle...

Page 10: ...p the seat section of the seat leg cushion forward and release the two hooks that hold the seat leg cushion to the legrest frame Slide the seat leg cushion downward and forward and remove it from the...

Page 11: ...using kerosene or naphtha do so in a well ventilated area and keep away from fire and flame Waxing and refinishing improves wearability Use any quality paste wax A diluted solution of 10 or less of bl...

Page 12: ...OVERINGS AND FLOORING Select EPA registered disinfectants if available and use them in accordance with the manufacturer s instructions Do not use high level disinfectants liquid chemical sterilants fo...

Page 13: ...low proper procedures for effective uses of mops cloths and solutions Prepare cleaning solutions daily or as needed and replace with fresh solution frequently according to facility policies and proced...

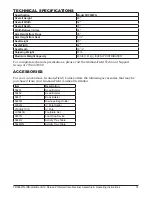
Page 14: ...Weight Capacity 400 lb 181 kg EVENLY DISTRIBUTED For complete technical specifications please call the Graham Field Technical Support Group at 770 447 1609 ACCESSORIES For your convenience Graham Fie...

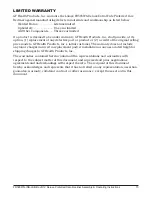
Page 15: ...r product or 2 a credit of the original selling price made to GF Health Products Inc s initial customer The warranty does not include any labor charges incurred in replacement part s installation or a...

Page 16: ...GF Health Products Inc 2935 Northeast Parkway Atlanta Georgia 30360 USA Telephone 770 368 4700 Fax 770 368 2386 Technical Support 770 447 1609 www grahamfield com...

Reviews: