background image


English

 - 

20


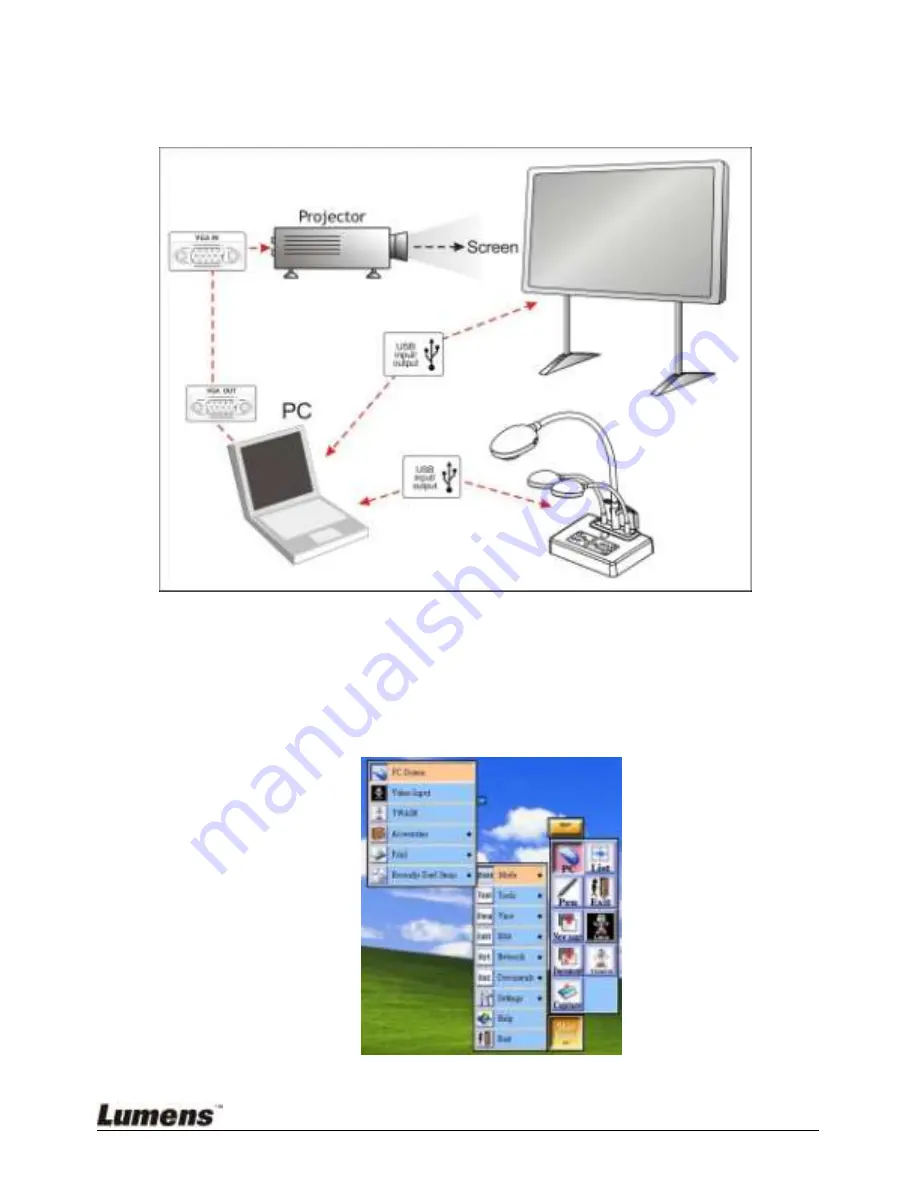
7.6.5  I would like to connect Interactive Whiteboard 

1.  System Diagram 


2.  Using StarBoard 

2.1  Install 

LuLulizer


and execute “LuLulizer.exe” 

<Note> Please download LuLulizer from the website: 
www.lumens.com.tw/goto.htm 

2.2  Press [StarBoard] / [LULU] 


2.3  Display the live image 

Summary of Contents for DC235

Page 1: ...glish 0 DC235 Visual Presenter User Manual Important To download the latest version of quick start guide multilingual user manual software or driver etc please visit Lumens http www lumens com tw goto htm ...

Page 2: ...ns 10 4 1 System Diagram 10 4 2 Mounting the DC235 at Desktop 10 4 3 Connecting with components 10 4 4 Start Using the DC235 11 4 5 Installing application software 12 Chapter 5 DIP Switch Settings 13 5 1 SXGA output default values 13 5 2 XGA output 13 Chapter 6 Introductions to Control Panel Buttons 14 Chapter 7 Descriptions of major functions 15 7 1 I would like to turn on off the lamp 15 7 2 I w...

Page 3: ...English 2 7 5 I would like to switch the pre next screen of the live image PAN 16 7 6 To be used in other applications 16 Chapter 8 Connecting to Microscope 22 Chapter 9 Troubleshooting 23 ...

Page 4: ...ct Lumens Digital Optics Inc hereby reserves the right to make changes to product specifications without prior notice The information in this file is subject to change without prior notice To fully explain or describe how this product should be used this manual may refer to names of other products or companies nevertheless without any intention of infringement Disclaimer of warranties Lumens Digit...

Page 5: ...10 Unplug the projector from the wall socket before cleaning Use a damp cloth for cleaning Do not use liquid or aerosol cleaners 11 Do not block the slots and openings in the projector case They provide ventilation and prevent the visual presenter from overheating Do not place the visual presenter on a sofa rug or other soft surface or in a built in installation unless proper ventilation is provid...

Page 6: ...h could cause electric shock This symbol indicates that there are important operating and maintenance instructions in this User Manual with this unit FCC Warning This equipment has been tested and found to comply with the limits for a Class A or B digital device pursuant to Part 15 of FCC Rules These limits are designed to provide reasonable protection against harmful interference in a residential...

Page 7: ...de User Manual For download of other language versions please visit Lumens website Base Installation Guide Download Card USB Cable Power Cord Microscope Adapter Software Bag Appearance may vary with country region Padded Carry Bag Optional Backlight Optional ...

Page 8: ...English 7 Chapter 3 Product Overview Bottom 5 DIP Switch Settings 4 Lens 1 Lamp 7 Gooseneck 6 AF button 3 LED indicator 2 Control Panel 8 Built in Microphone ...

Page 9: ...English 8 3 1 Relative position of the presenter and DC235 3 2 Recommend distance About 470 mm distance between camera and the desktop is recommended Presenter DC235 Document ...

Page 10: ...English 9 3 3 Incorrect use ...

Page 11: ...IP Switch settings first Refer to Chapter 5 DIP Switch Settings in the DC235 user manual 2 Please refer to the Base Installation Guide for installation instructions for all parts 4 3 Connecting with components 4 3 1 Step 1 Plugging in the Power Outlet Note Appearance of power cord may vary with countries regions PC AC Outlet ...

Page 12: ...a USB cable to connect to a computer and install drivers and applications 4 4 Start Using the DC235 Once DC235 is turned on the LED on the control panel will flash a few times and stay lit Please contact your distributor if the LED is not on Control Panel ...

Page 13: ...plication software you can use the following functions Control the DC235 Capture and record images Annotate the image highlight important details and save it Support the full screen function Note Please refer to Ladibug software user manual for installation steps and software operation ...

Page 14: ...English 13 Chapter 5 DIP Switch Settings Note You must re start DC235 for DIP switching configuration to take effective 5 1 SXGA output default values 5 2 XGA output ...

Page 15: ... to select the needed function AUTO TUNE Automatically adjust the image to have the best brightness and focusing performance BRT Manually adjust the brightness of the image FREEZE Freeze the current image to temporarily stay on the screen Press again to defreeze PAN Switch a part of the live image LAMP Turn on off the lamp ROTATE Rotate the image by 0 90 180 270 ZOOM Increase or decrease the image...

Page 16: ...allation and Connections of this User Manual 2 Select Cisual Presenter V2 to open live screen 7 1 I would like to turn on off the lamp 1 The lamp is ON by default Press Lamp to switch ON OFF 7 2 I would like to zoom in out of images 1 Press Zoom to zoom in the image 2 Press Zoom to zoom out the image 7 3 I would like to use the auto focus 1 Press the AF button on the camera head of main unit ...

Page 17: ... and view the partial enlarged images 3 Press PAN to exit the partial enlarged mode 7 6 To be used in other applications 7 6 1 I would like to insert a photo in MS Paint 1 Click File From Scanner or Camera in MS Paint shown as the bottom left figure 2 Click Get Picture will capture the photos of live images and insert the files in use shown as top right figure 7 6 2 I would like to insert a photo ...

Page 18: ...esenter V2 and click Custom Insert 3 Click Get Picture It will capture the photo of live image 7 6 3 I would like to change the setting of DC235 then capture a photo in MS Word 1 Click Insert Image From Scanner or Camera in MS Word ...

Page 19: ... and click Custom Insert 3 A window showing a live image see below will be displayed 4 Press Setting You are allowed to adjust the live image by exiting the Camera Settings window 5 Press Capture to capture images in MS Word 6 Press Cancel to exit ...

Page 20: ...re such as Skype and MSN The following instructions use Skype as an example 1 Open Skype and enter Tools Options 2 Select Video Settings webcam Visual Presenter V2 and check Start my video automatically when I am in a call as shown below 3 Start calling your contact When both sides are connected Skype will display the video screen ...

Page 21: ...nect Interactive Whiteboard 1 System Diagram 2 Using StarBoard 2 1 Install LuLulizer and execute LuLulizer exe Note Please download LuLulizer from the website www lumens com tw goto htm 2 2 Press StarBoard LULU 2 3 Display the live image ...

Page 22: ...d Mode TWAIN Please refer to 7 10 2 I would like to insert a photo in MS Word for operation 3 Using StarBoard 3 1 Press Insert Picture From Scanner 3 2 Please refer to 7 10 2 I would like to insert a photo in MS Word for operation ...

Page 23: ...S Paint 3 1 2 Select Visual Presenter V2 TWAIN and then click Custom Insert to open Live Image window 3 1 3 Click Setting to close Camera Settings window 3 1 4 Press M Scope 4 If the image is not clear 4 1 Press the AF button on the camera head of main unit to activate the auto focus 5 Zooming In or Zooming Out the image 5 1 Press Zoom Zoom on the control panel If the eyepiece is Ø 33mm or Ø 34mm ...

Page 24: ...e you have plugged in the power cord 2 Unable to focus Probably the document is too close Press Zoom on the control panel Or pull the document away from the lens And then press AF button on both lateral sides of the lens 3 Visual Presenter V2 Ladibug or other application cannot be executed simultaneously Visual Presenter V2 Ladibug and other applications cannot be executed simultaneously Only one ...

Reviews: