background image


English

  - 

39 


Chapter 7 Descriptions of Major Functions 

<NOTE 1> Close the Ladibug

TM

 or Podium View

TM

 before you 

modify any settings. 

[Note 2] After setting, please turn off the DC-A11 power supply 
and restart to apply the settings 

7.1 

I would like to configure DC-A11 connection settings 

on the Internet 

7.1.1  Open the Internet Explorer webpage browser, and enter [192.168.2.1] 

(default) in the address bar. 

7.1.2  Enter the Login Name [Admin].

 (Please pay attention to 

capitalization.)


7.1.3  Enter the Password ([Admin] by default), and click the 

[Login]

 button. 

7.2 

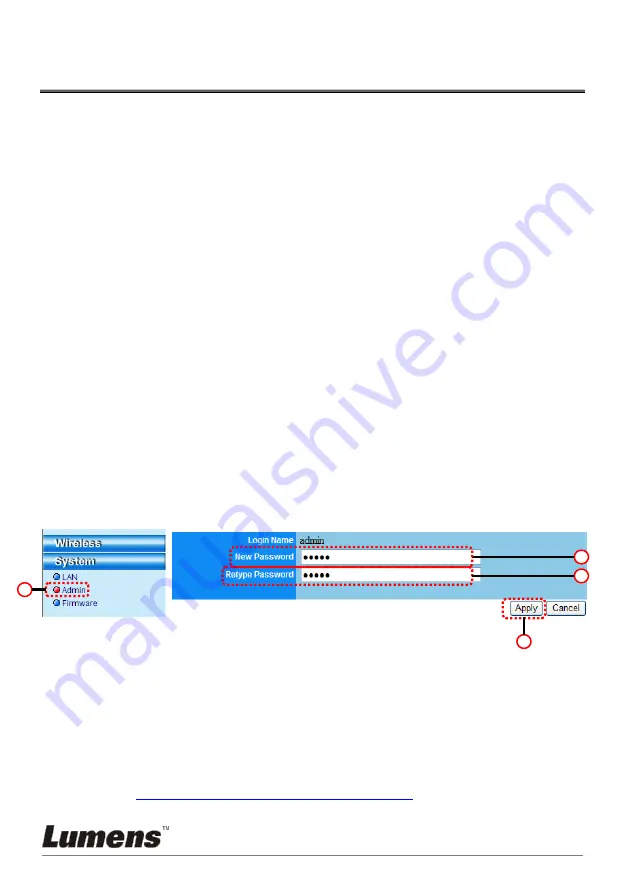
I would like to change the login password 

7.2.1  Click the [Admin] button to enter the [Admin] page. 

7.2.2  Enter the new password in the [New Password] field. 

7.2.3  Re-enter the password in the [Retype Password] field for verification. 

7.2.4  The webpage will be offline after you press [Apply] to apply the 

changes. 

7.2.5  Please log in the webpage again. 


7.3 

I would like to change the SSID and channel 

7.3.1  Click the [Basic] button to enter the [Basic] page. 

 [SSID]: (the public name of a wireless network): Set and change the 

name of the wireless network to be displayed. 

 [Channel]: The channel is [Channel 06] by default. Please choose 

your own channel frequency. 

 [Encryption Type]: Choose your encryption type. (Please refer to 

7.6 I Want to Enable the Encryption Mode

Summary of Contents for DC-A11

Page 1: ...nglish 0 DC A11 Wireless Flyer Important User Manual To download the latest version of Quick Start Guide multilingual user manual software or driver etc please visit Lumens http www Mylumens com goto htm ...

Page 2: ... 2 Dongle 9 3 3 Settle the USB connector 10 Chapter 4 LED Light Indicators 11 Chapter 5 Installation and Connections 12 5 1 Installation flow chart 12 5 2 Installing application software 13 5 3 Installing DC120 24 5 4 Installing Dongle 25 Chapter 6 Start Using 26 6 1 Start wireless connection 27 6 1 1 Method 1 Auto connection 28 6 1 2 Method 2 Manual connection 31 6 1 3 Change the SSID 34 6 2 Chan...

Page 3: ...39 7 4 I would like to check the WPS connection settings 40 7 5 I would like to update the firmware 40 7 6 I Want to enable the encryption mode 41 7 7 I Want to cancel the encryption mode 51 Chapter 8 Administration Menu 52 8 1 Wireless LAN Utility 52 8 1 1 General 52 8 1 2 Profile 53 8 1 3 Available Network 54 8 1 4 Status 54 8 1 5 Statistics 55 8 1 6 Wi Fi Protected Setup WPS 55 8 2 Webpage admi...

Page 4: ...ct Lumens Digital Optics Inc hereby reserves the right to make changes to product specifications without prior notice The information in this file is subject to change without prior notice To fully explain or describe how this product should be used this manual may refer to names of other products or companies nevertheless without any intention of infringement Disclaimer of warranties Lumens Digit...

Page 5: ...a damp cloth for cleaning Do not use liquid or aerosol cleaners 11 Do not block the slots and openings in the projector case They provide ventilation and prevent the Wireless Flyer from overheating Do not place the Wireless Flyer on a sofa rug or other soft surface or in a built in installation unless proper ventilation is provided 12 Never push objects of any kind through cabinet slots Never allo...

Page 6: ...d to provide reasonable protection against harmful interference in a residential installation This device complies with Part 15 of the FCC Rules Operation is subject to the following two conditions 1 This device may not cause harmful interference 2 This device must accept any interference received including interference that may cause undesired operation This transmitter must not be co located or ...

Page 7: ...y be required to take adequate measures The typical use is in a conference room meeting room or auditorium SAR Warning This transmitter Dongle must not be co located or operating in conjunction with any other antenna or transmitter This device complies with internationally recognized standards covering Specific Absorption Rate SAR related to human exposure to electromagnetic fields from radio devi...

Page 8: ...English 7 Revisions ...

Page 9: ...ackage Contents DC A11 Quick Start Guide Wireless USB Dongle for PC To download this manual in other languages visit Lumens web site USB Connection Cable AC Adapter Power Cord Appearance may vary depending on country region ...

Page 10: ...English 9 Chapter 3 Product Overview 3 1 DC A11 3 2 Dongle 4 USB 2 WPS 8 LED indicator 1 POWER 6 LAN 7 Antenna 3 Default 5 USB connector fixing hole 1 WPS ...

Page 11: ...English 10 3 3 Settle the USB connector 1 Disconnect the ball chain on the USB connector holder 2 Thread the ball chain through the connector fixing hole on DC A11 3 Shackle the ball chain 1 3 2 ...

Page 12: ...POWER The battery indicator lights blue 4 2 Battery 4 2 1 Light Off No Power 4 2 2 Blue Full Power 4 2 3 Red Low power 4 2 4 Flashing Blue Light In Charge 4 3 WPS 4 3 1 Flashing Red Light Detecting connection 4 3 2 Blue Light Connection established ...

Page 13: ...fer to Chapters 7 and 8 for details of major functions and administrative programs Install software Refer to Section 5 2 Installing application software for software installation Install Wireless LAN Utility Install hardware Refer to Sections 5 3 to 5 4 for hardware installation Install Dongle Install USB Document Camera Install Ladibug TM or Podium View TM ...

Page 14: ...tible Resolution 1024x768 100MB Free Hard disk Space CPU PowerPC G4 866MHz or Intel Pentium 1 83GHz Intel Core 2 Duo Memory 512MB Resolution 1024x768 24 bit Full Color Display 1GB Free Hard disk Space QuickTime 7 4 5 and above 5 2 2 Installing Ladibug or Podium View in Windows XP Vista 5 2 2 1 Please download the Ladibug or Podium View software after connected to the Lumens web site 5 2 2 2 Click ...

Page 15: ...s Yes to create a Ladibug TM or Podium View TM shortcut on your desktop 5 2 2 6 Click NO then press Finish to cancel the restart NOTE Please restart the computer only when the installation of Wireless LAN Utility is completed ...

Page 16: ...el 5 2 3 4 Enter the username and password of the Administrator 5 2 3 5 Click Anywhere 5 2 3 6 Click Allow From Anywhere confirm to disable the validation and start installation 5 2 3 7 Please download the Ladibug or Podium View software after connected to the Lumens web site 5 2 3 8 Click the Ladibug or Podium View icons for installation after decompressing the downloaded file 5 2 3 9 Run the ins...

Page 17: ...English 16 5 2 3 10 Press Continue 5 2 3 11 Press Install ...

Page 18: ...English 17 5 2 3 12 Enter your name and password and then press OK 5 2 3 13 Press Continue Installation ...

Page 19: ...English 18 5 2 3 14 Press Restart to finish the installation ...

Page 20: ...nload the Wireless LAN Utility software after connected to the Lumens web site 5 2 4 2 Click the EXE file after decompressing the downloaded file 5 2 4 3 Select Language 5 2 4 4 Please follow the instructions then press Next 5 2 4 5 Please click the Finish button to restart your computer ...

Page 21: ...el 5 2 5 4 Enter the username and password of the Administrator 5 2 5 5 Click Anywhere 5 2 5 6 Click Allow From Anywhere confirm to disable the validation and start installation 5 2 5 7 Please download the Wireless LAN Utility software after connected to the Lumens web site 5 2 5 8 Press the Installer icon open the installation wizard and run the installation process by following the onscreen inst...

Page 22: ...English 21 5 2 5 9 Press Continue 5 2 5 10 Select the language and press Continue ...

Page 23: ...English 22 5 2 5 11 Press Agree 5 2 5 12 Press Install 5 2 5 13 Enter your name and password and then press OK ...

Page 24: ...English 23 5 2 5 14 Press Continue Installation 5 2 5 15 Press Restart to finish the installation ...

Page 25: ...English 24 5 3 Installing DC120 5 3 1 Installing DC120 on DC A11 5 3 2 Installing USB connection cable on DC120 and DC A11 USB connection cable ...

Page 26: ...ve film 5 4 2 Installing the Dongle into the USB port on a computer NOTE If the preview of Ladibug TM or Podium View TM is opened do not unplug the Dongle directly from the computer You should unplug the Dongle after the Ladibug TM or Podium View TM is closed Computer Dongle Computer ...

Page 27: ...ps of 6 1 3 Change the SSID for modification 5 Double click on Ladibug or Podium View icon to activate Ladibug TM or Podium View TM software 6 Move the cursor to Ladibug or Podium View icon and the main function menu will be displayed or 7 Place an object to be displayed under the camera 8 Press to display a live image Please make the following settings before the first use 8 1 Windows security al...

Page 28: ...void such interference the power supply of wireless apparatuses such as wireless telephone Bluetooth equipment microwave etc that are near to your Wireless Flyer should be switched off and be moved far away Or alternatively set them 2 channels or more away from the channel of your Wireless Flyer Please refer to 7 3 I would like to change the SSID and channel for related setting information The wal...

Page 29: ...onnection a Press the WPS button of DC A11 b Within 30 seconds press and hold the WPS button of Dongle for about 5 seconds Note The WPS indicator of DC A11 will now flash red and then light blue after the connection is made The WPS connection of a second DC A11 at the same time may cause disturbance and lead to connection failure c Connection For Windows ...

Page 30: ...The connection will start when the following window pops up The connection will complete when the window closes For MAC The connection will start when the following window pops up Press OK to finish the connection ...

Page 31: ...English 30 d Connection succeeded For Windows Double click the icon of Wireless LAN Utility For MAC The following window pops up when the connection is finished ...

Page 32: ...LAN Utility b Select Available Network tab double click DC A11 Default c Click OK Remark This step may not show up due to different OS d Confirm the connection setting and click OK to apply the setting Note Please refer to 7 6 2 Enable encrypted connections for how to use encrypted connection ...

Page 33: ...English 32 e The connection is activated if the status is Associated Please click Close to exit ...

Page 34: ...English 33 For MAC a Insert Dongle and the following window will pop up b Select Available Network tab and click DC A11 Default Then press Connect to start connection ...

Page 35: ... in the address bar 6 1 3 2 Enter the Login Name Admin 6 1 3 3 Enter the Password Admin by default and click the Login button 6 1 3 4 Enter the Basic page 6 1 3 5 Enter new SSID and click Apply to apply the changes Note Please use English letters and numbers in SSID name 6 1 3 6 Follow the steps of 6 1 1 Auto connection for reconnection ...

Page 36: ...Setting window click the tab Exceptions 6 2 1 4 Be sure to select Ladibug Podium View under Programs and Services and then click OK 6 2 1 5 If Ladibug Podium View was not listed under Programs and Services click Add Program 6 2 1 6 Select the Ladibug Podium View program then click OK If it was not listed please click Browse select Ladibug Podium View program and then click Enable Remark Ladibug Po...

Page 37: ...hen click Allow a program through Windows Firewall Remark Click Windows Firewall in the icon view of Console 6 2 2 3 Select Change settings in Allowed programs and features window 6 2 2 4 Please select Ladibug Podium View program in the list 6 2 2 5 If Ladibug Podium View was not listed please click Allow another program and then you will find Ladibug Podium View program ...

Page 38: ...g exe Podium View exe 6 2 2 7 Click OK in Allowed Program window 6 2 2 8 Close Windows Firewall Setting window 6 2 3 MAC OS X v10 6 10 7 10 8 6 2 3 1 Select the setting of System Preferences in the Apple Menu 6 2 3 2 Click Security 6 2 3 3 Click the tab Firewall 6 2 3 4 Click the lock on the lower left corner to unlock the panel and enter the username and password of the Administrator 6 2 3 5 Clic...

Page 39: ...3 7 Select Automatically allow signed software to receive incoming connections 6 2 3 8 Change Ladibug Podium View in the list to Allow incoming connections If the software name was not listed please click to add new programs to the list and start to use the software ...

Page 40: ...I would like to change the login password 7 2 1 Click the Admin button to enter the Admin page 7 2 2 Enter the new password in the New Password field 7 2 3 Re enter the password in the Retype Password field for verification 7 2 4 The webpage will be offline after you press Apply to apply the changes 7 2 5 Please log in the webpage again 7 3 I would like to change the SSID and channel 7 3 1 Click t...

Page 41: ... 7 4 2 The default is Enabled To cancel WPS function please click Disable 7 4 3 Click Apply Note Auto connection is available for WPS function 7 5 I would like to update the firmware 7 5 1 Please visit Lumens web site http www Mylumens com goto htm to download the updated firmware file 7 5 2 Click the Firmware button to enter the Firmware page 7 5 3 Click Browse to load the update file that you ve...

Page 42: ...elect an encryption mode It is recommended that you set up your password with WEP Type 3 WEP Key 1 4 Select one and enter a passphrase 1 To use ASCII Enter 5 or 13 characters 0 9 and A Z only 2 To use HEX Enter 10 or 26 characters 0 9 and A F only NOTE Only one set of columns can be used at a time 4 Press Apply to apply your changes 2 1 3 4 ...

Page 43: ...e 2 Encryption Type Select an encryption type WPA PSK WPA2 PSK 3 WPA Cipher Suite Select a format TKIP CCMP 4 WPA Passphrase Set up a password 1 To use ASCII Enter 8 to 63 characters 0 9 and A Z only 2 To use HEX Enter 64 characters 0 9 and A F only 5 Press Apply to apply your changes 5 3 4 2 1 ...

Page 44: ...ty icon 2 Select Available Network tab and click DC A11 Default SSID name 3 Settings A Enter a Network Key A1 To use ASCII Please check ASCII and enter a corresponding passphrase A2 To use HEX Please enter a corresponding passphrase in the Network key and Confirm network key column 4 Press OK to apply your changes 1 2 ...

Page 45: ...English 44 Connection is successfully encrypted V A2 A1 4 A1 ...

Page 46: ...k tab and click DC A11 Default SSID name Press Connect 3 Settings A Enter a network key A1 To use ASCII Please check ASCII and enter a corresponding passphrase A2 To use HEX Please enter a corresponding passphrase in the Network key and Confirm network key 4 Press OK to apply your changes 1 2 3 ...

Page 47: ...English 46 V A2 A1 4 A1 Connection is successfully encrypted ...

Page 48: ...xed encryption For Windows 1 Double click the Wireless LAN Utility icon 2 Select Available Network tab and click DC A11 default 3 Please enter a corresponding passphrase in the Network key and Confirm network key column 4 Press OK to apply your changes 1 2 ...

Page 49: ...English 48 Successfully connected 3 4 ...

Page 50: ...he Wireless Network Utility icon 2 Select Available Network tab and click DC A11 Default SSID name Press Connect 3 Please enter a corresponding passphrase in the Network key and Confirm network key 4 Press OK to apply your changes 1 2 3 ...

Page 51: ...English 50 Connection is successfully encrypted 3 4 ...

Page 52: ...cryption mode 7 7 1 Setup 1 Enter Basic page 2 Encryption Type Select None 3 Press Apply to apply your changes 7 7 2 Connecting Without encryption Please refer to Method 1 or Method 2 of 6 1 Start wireless connection for reconnection 2 1 3 ...

Page 53: ...n to refresh the information NO Functions 1 Status Check if the device is connected to target network 2 Speed The current connection speed 3 Type Connection type 4 Encryption Encryption during connection 5 SSID The SSID network name of the connected wireless network 6 Signal Strength Wireless signal strength 7 Link Quality Quality of wireless connection 8 Network Address Shows the current MAC addr...

Page 54: ...me of the profile In the list icon indicates the connected communication equipment 2 SSID The SSID of the profile 3 Add To add a connection profile 4 Remove To remove a connection profile 5 Edit To modify a connection profile 6 Duplicate To make a copy of a connection profile 7 Set Default To select a connection profile as your default wireless connection 2 2 3 4 5 6 7 1 ...

Page 55: ...ss network NO Functions 1 Refresh To rescan available wireless networks 2 Add to Profile To connect and add an available connection profile 8 1 4 Status The Status page shows current equipment status including the name of manufacturer firmware version and the current network settings 2 1 ...

Page 56: ...ues from zero 8 1 6 Wi Fi Protected Setup WPS An easy and secure setup solution for Wi Fi network NO Functions 1 Pin Input Config To select the PIN Code in your AP for WPS connection 2 Push Button Config Search the base station with WPS function for available network connection Note Please also push the WPS button on DC A11 for connection 2 1 ...

Page 57: ...select any of channels 1 to 14 3 Encryption Type Encryption mode settings 4 Apply Apply your settings 5 Cancel Cancel your changes 8 2 1 2 WPS You can enable disable the WPS function on this page NO Function Descriptions 1 WPS Function Enable disable the WPS function 2 Current PIN The PIN code in use 3 Generate New PIN Regenerate PIN code 4 Add Wireless Station To connect other wireless equipment ...

Page 58: ...el Width Band width mode 2 ShortGI Enable or disable the Short GI Guard Interval 8 2 2 System 8 2 2 1 LAN Network setting page NO Function Descriptions 1 IP IP address setting 2 Subnet Mask Netmask 3 DHCP Server Address Range Available address range 2 2 1 2 2 2 3 2 1 2 ...

Page 59: ...pe Password Re type password for confirmation 8 2 2 3 Firmware You can update the software return to the default value and restart the machine on this page NO Function Descriptions 1 Firmware Version To load the file and update firmware version 2 Restore to Factory Default Reset all configurations to factory default settings 3 Reboot device Restart 2 2 3 2 1 2 2 2 3 2 1 2 Browse ...

Page 60: ...le cannot be used If the WPS button on the wireless Dongle cannot be used open the Wireless LAN Utility and go to the Wi Fi Protected Setup page Click Push Button Config to enable the WPS connection 3 Automatic connection failed 1 Check the WPS settings Please refer to 7 4 I would like to check the WPS connection setting 2 If the device still fails to connect to the network automatically please fo...

Page 61: ... refer to 7 3 I would like to change the SSID and Channel 6 If WEP encryption is used check whether settings or passwords are entered correctly 6 DC A11 network is connected but malfunctions 1 Please confirm that the adapter is plugged into the USB port 2 Please restart network connection of DC A11 and make sure that the USB connection between DC A11 and DC120 is enabled Then start the Ladibug or ...

Page 62: ... Click Yes for confirmation 12 The corresponding DC A11 cannot be identified when two DC A11 or more are connected Please follow the steps of 6 1 3 Change the SSID to modify the SSID 13 Do I have to reset the configurations when changing the DC A11 or Dongle 1 You should reset the configurations when the DC A11 is changed 2 You do not have to reset the configurations when the Dongle is changed 14 ...

Page 63: ...etwork and Sharing Center window and access points found in your wireless environment will appear for your selection 3 Select DC A11 from the Dongle wireless network connection Realtek RTL819ISU Wireless LAN 802 11n USB 2 0 Network Adapter and click Connect 4 If encryption function is enabled enter key password and click OK 5 Return to the Network and Sharing Center window and the wireless network...

Reviews: