background image


33

Do not use any other types of oil. The use of any other 
type of oil will adversely affect the operation of the 
hydraulic cylinder.


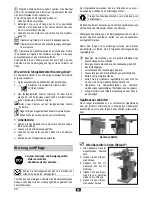
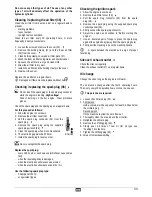
Cleaning / replacing the air filter (36)


Clean the air filter from dust and dirt on a regular basis to 
prevent  


starting problems, 


loss of output, 


too high fuel consumption. 

Clean the air filter every 25 operating hours, or more 
frequently in dusty environments. 

1.


Loosen the screw and remove the cover (29).  


2.


Remove the holding clamp (37) and the foam air filter 
(36) from the cover.  


3.


Clean holding clamp, cover and air filter plate (37). 

4.


Wash the foam air filter using water and liquid cleaner. 

5.


Squeeze the air filter in a dry and clean cloth. 

6.


Allow the air filter to dry well. 

7.


Install the air filter and the holding clamp in the cover. 

8.


Re-mount the cover. 

Replace the air filter on a regular basis.  


Damaged air filters must be replaced without delay. 


Checking / replacing the spark plug (38)    


Do not touch the spark plug or the spark plug connector 
while the engine is running. High voltage! 
Risk of burning on the hot engine.


Wear protective 

gloves. 

 
Check the spark plug and the spark gap on a regular basis. 
For this proceed as follows:   
1.


Allow the engine to cool down. 

2.


Remove the air filter cover (29).  


3.


Pull the spark plug connector (35) from the 
spark plug.  


4.


Remove the spark plug using the supplied 
spark plug wrench (39).  


5.


Clean the spark plug when it is contaminated.  

6.


The electrode gap must be 0.76mm. 

7.


Install the spark plug in reverse order. 


 Do not overtighten the spark plug. 

 
Replace the spark plug: 


every 100 hours or each season (whichever case comes 
first) 


when the insulating body is damaged, 


when the electrodes show excessive erosion, 


when the electrodes show excessive dirt or oil. 

 
Use the following spark plug type: 


Champion RC12YC 


or equivalent types 


Checking the ignition spark 

1.


Allow the engine to cool down. 

2.


Remove the air filter cover (29).  


3.


Pull the spark plug connector (35) from  the  spark           
plug (38).  


4.


Remove the spark plug using the supplied spark plug 
socket spanner (39). 

5.


Firmly connect the spark plug connector. 

6.


Adjust the engine as described in "Before starting the 
engine". 

7.


Use an insulated pair of tongs to press the spark plug 
against the engine body (away from the spark plug hole). 

8.


Firmly pull the cranking rope on the cranking handle. 


A spark between the electrodes is a sign of proper 

functioning 


Silencer / exhaust outlet    

Check the silencer regularly.  
Clean the exhaust outlet (27) on a regular basis. 


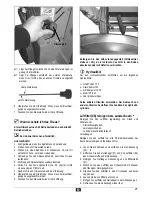
Oil change 


Change the oil as long as the engine is still warm. 


The oil must be changed after the first 5 operating hours. 
Then, only every 100 operating hours or once in a season. 


Two persons are required.


1.


Loosen the oil drain plug (34).  


2.


First person:  

Hold a container with a capacity of at least 0.6 litres below 

the oil drain plug.  


Second person:  

Tilt the machine to allow the oil to flow out.  


3.


Thoroughly clean the area around the oil outlet. 

4.


Retighten the oil drain plug. 

5.


Remove the oil filling plug (33). 


6.


Slowly pour 0.6 litres of new oil (for oil type see 
“Fuelling”) into the hole.  

7.


Tighten the oil filling plug (33). 


8.


Wipe off oil residues/spilling. 


Summary of Contents for HB10S

Page 1: ...anje ogrjevnog drveta Originalne upute za rad Sigurnosne upute Rezervni dijelovi Pagina 109 Spaccalegna Istruzioni originali Indicazioni per la sicurezza Pezzi di ricambio Blz 121 Brandhoutsplijter Oo...

Page 2: ...se vztahuje toto prohl en odpov d p slu n m z kladn m bezpe nostn m a zdravotn m podm nk m sm rnice 2006 42 ES jako i podm nk m dal ch p slu n ch sm rnic 2004 108 ES ilmoittaa t ten yksinomaisella va...

Page 3: ...normer har anv nts Seuraavia harmonisoituja normeja on k ytetty N sleduj cie normy byly pou it A k vetkez harmoniz lt szabv nyok ker ltek alkalmaz sra Uporabljeni so bili naslednjih harmonizirani stan...

Page 4: ...be er re en nd de ez z s s l le e r r s sa a O Op pi is s u ur re e a aj ja a D De es sc cr ri iz zi io on ne e d de el ll l a ap pp pa ar re ec cc ch hi io o B Be es sc ch hr ri ij jv vi in ng g v va...

Page 5: ...Hydraulikventil Hydraulic valve Valve hydraulique Hydraulick ventil Hydrauliikkaventtiili Hidraulikus szelep 19 400142 Hydraulik l 1 Liter Hydraulic oil 1 litre Huile hydraulique 1 litres 1 Hydraulic...

Page 6: ...Zaw r hydrauliczny Ventil hidraulic Hydraulikventil Hydraulick ventil Hidravli ni ventil 19 400142 hidrauli no ulje 1 litar Olio idraulico 1 litro Hydraulische olie 1 liter Olej hydrauliczny 1 l Ulei...

Page 7: ...anual 1 table plate 1 bag of accessories 1 control arm left 2 wheels F Fo ou ur rn ni it tu ur re e Apr s le d ballage de la machine v rifiez le contenu du carton quant l int gralit des pi ces la pr s...

Page 8: ...kroz transport Reklamacije odmah prijavite trgovcu distributeru ili proizvo a u Kasnije reklamacije se ne priznaju 1 ure aj 2 kota 1 ru ica za poslu ivanje desno 1 vre ica za vijke 1 Stol 1 Osovina 1...

Page 9: ...h llet i kartongen dvs om leveransen r komplett om leveransen ev har tagit skada Informera din terf rs ljare leverant ren resp tillverkaren omg ende om n gon del fattas eller har tagit skada Senare re...

Page 10: ...tite plo evinaste spone Bedienarme montieren Bedienarme einsetzen und das Rohr in die Aussparung der Querverbindung einf hren Mount control arms Insert control arms and insert pipe in recess of cross...

Page 11: ...lni ep Haltebolzen auf der Unterseite sichern Lock the holding bolt at the bottom S curiser le bouton d immobilisation sur sa face inf rieure Z chytn ep zajist te na spodn stran Varmista pidiketappi a...

Page 12: ...vorhanden Setzen Sie die Tischplatte in die entsprechenden Haltewinkel ein Achten Sie darauf dass der Verriegelungsbolzen eingerastet ist Locking bolt is available in the installation position Fit th...

Page 13: ...perno di bloccaggio deve scattare in posizione In elke inbouwpositie zijn er vergrendelingshaken aanwezig Plaats de tafel in het overeenkomstige houderelement Let erop dat de vergrendelingsbout vastg...

Page 14: ...efahr Ber hren Sie keine hei en Motorteile Diese bleiben auch nach Abschalten der Maschine f r kurze Zeit hei Nur der Bediener darf im Arbeitskreis der Maschine stehen Unbeteiligte Personen sowie Haus...

Page 15: ...s Risiko von Per sonenverletzungen und Besch digungen Ignorierte oder bersehene Sicherheitsvorkehrungen k nnen zu Verletzungen beim Bediener oder zu Besch digungen von Eigentum f hren Durch Unachtsamk...

Page 16: ...esultie rende Sch den haftet der Hersteller nicht Sicherer Umgang mit Kraftstoffen Kraftstoffe und Kraftstoffd mpfe sind feuergef hr lich und k nnen beim einatmen und auf der Haut schwere Sch den veru...

Page 17: ...Benzin ist erh hte Auf merksamkeit geboten Rauch und offenes Feuer ist nicht zul ssig Explosionsgefahr L sauberes frisches bleifreies Benzin mit einer Mindestoktanzahl von 85 F llen Sie kein verbleite...

Page 18: ...tors 1 Fassen und ziehen Sie langsam den Seilgriff 30 bis Widerstand sp rbar ist 2 Ziehen Sie schnell am Seilgriff und lassen Sie ihn dann langsam los Ziehen Sie das Startseil nicht ganz heraus und la...

Page 19: ...Sie den Stamm auf den Tisch des Spalters L Bearbeiten Sie das Spaltgut ausschlie lich in Faser richtung 3 Halten Sie den Stamm mit den Spannpratzen fest 4 Dr cken Sie beide Bedienungsgriffe gleichzei...

Page 20: ...en Sie den Tisch zur Seite Spaltkreuz justieren 1 Sterngriffschraube l sen 2 Das Spaltkreuz in die richtige Position schieben Die Sterngriffschraube liegt ber der Bohrung im Spaltmesser 3 Sterngriffsc...

Page 21: ...Reinigungsarbeit Motor ausschalten Z ndkerzenstecker abziehen F hren Sie Wartungsarbeiten nicht in der N he von offenem Feuer durch Brandgefahr Zum Warten und Reinigen entfernte Sicherheitseinrichtung...

Page 22: ...rgen Sie das Alt l ordnungsgem Alt lsammel stelle vor Ort Es ist verboten das Alt l in den Boden abzulassen oder mit Abfall zu vermischen L Hydraulik l F r den Hydraulikzylinder empfehlen wir die folg...

Page 23: ...he des Kerzen loches 8 Ziehen Sie kr ftig das Startseil am Anwerfgriff LBei einwandfreier Funktion muss ein Funke zwischen den Elektroden sichtbar sein Schalld mpfer Austritts ffnung Kontrollieren Sie...

Page 24: ...ft nicht Motor im kalten Zustand Chokehebel auf gestellt Chokehebel auf stellen Gashebel auf gestellt Gashebel auf stellen Motorschalter auf OFF gestellt Motorschalter auf ON stellen Kraftstoffhebel a...

Page 25: ...tte wenden Sie sich an den Hersteller oder an von ihm benannte Firma Gest nge vom Hersteller oder von ihm benannte Firma nachjustieren lassen Spalts ule f hrt schwankend oder mit starken Vibrationen e...

Page 26: ...t time even after the machine has been stopped Nobody else should be in the working area of the machine other than the operator Keep other persons or animals out of the danger area minimum distance 5...

Page 27: ...evice in closed or poorly ventilated rooms Impairment of hearing when working on the machine for longer periods of time without ear protection In addition in spite of all the precautionary measures ta...

Page 28: ...have spilled fuel or oil Change your clothes immediately when you have spilled fuel or oil on them Make sure that no fuel can come into the soil Carefully close the tank cap after fuelling and check...

Page 29: ...petrol is recommended for environment protection reasons Storing fuel petrol Fuels have only a limited shelf life they are subject to ageing Outdated fuels and fuel mixtures may result in starting pro...

Page 30: ...y a single person The machine may only be operated by persons over the age of 18 years and who have read and understood these operating instructions Wear protective equipment safety goggles mask glove...

Page 31: ...approx 2 cm above the log 2 Release one control handle so that the blade stays in this position 3 Release the second control handle 4 Shorten the return path at the rod fitted to the side by fixing th...

Page 32: ...he stuck log with a crowbar backwards and forwards to loosen it Don t damage the splitting pillar Never hammer on the stuck log Never use a saw to cut the stuck log out of the machine Do not enlist th...

Page 33: ...lean funnel 6 Check the oil seal and replace it if it is damaged in any way 7 Replace the dipstick into the oil reservoir When should I change the oil The first oil change should be carried out after...

Page 34: ...lug in reverse order Do not overtighten the spark plug Replace the spark plug every 100 hours or each season whichever case comes first when the insulating body is damaged when the electrodes show exc...

Page 35: ...h an environment compatible biodegradable spray oil to protect them against corrosion M Ma ai in nt te en na an nc ce e s sc ch he ed du ul le e Maintenance work Before each use After each use After t...

Page 36: ...n the fuel into a container outdoors Fill the tank with fresh and clean fuel Engine is sputtering runs erratically Incorrect carburetor adjustment Have the caburetor adjusted correctly customer servic...

Page 37: ...ed approx 0 17 m sek Hydraulic oil max 10 l Hydraulic pressure 21 4 MPa 214 bar Motor 4 stroke petrol motor Power supply 4 8 kW 6 5 HP max engine speed n0 3600 min 1 Dimensions length 1050 x width 580...

Reviews: