background image

 7

LSL160

Operation of the LSL160

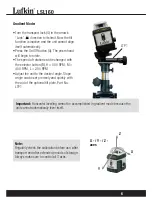
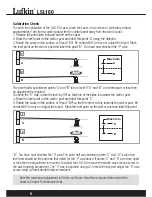
• Open the battery compartment (H), insert the batteries and connect the plugs to the sockets. 

The plugs fit in the sockets in one position only (see pictures on right). Close the battery 
compartment.

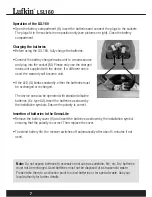
Charging the batteries

• Before using the LSL160, fully charge the batteries. 

• Connect the battery charger/mains unit to a mains source 

and plug into the socket (M). Please only use the charger/
mains unit supplied with the device. If a different one is 
used, the warranty will become void.

• If the LED (Q) blinks constantly, either the batteries must 

be exchanged or recharged. 

The device can also be operated with standard alkaline 
batteries (6 x type AA). Insert the batteries as shown by 
the installation symbols. Ensure the polarity is correct.

Insertion of batteries in the SensoLite

• Remove the battery cover (9) and insert the batteries as shown by the installation symbol, 

ensuring that the polarity is correct. Then replace the cover.

• To extend battery life, the receiver switches off automatically after about 5 minutes if not 

used.

Note:

 Do not expose batteries to excessive heat such as sunshine, fire, etc. Dry batteries 

must not be recharged. Used batteries must not be disposed of as household waste. 
Please take them to a collection point for used batteries or for special waste. Ask your 
local authority for further details. 

Summary of Contents for LSL160

Page 1: ...Self Levelling Rotary Laser Detector LSL160 User Guide...

Page 2: ...ialist workshop Calibration by yourself is only approximate and the accuracy of the calibration will depend on the care with which you proceed Warranty The warranty period is two years from the date o...

Page 3: ...thread for tripod J Adjustable foot K Vertical base wall mount L Locking lever M Charger socket DC 6 V N Adjustable foot receptacle O Vertical wall bracket receptacle P Operating Battery display Q Ch...

Page 4: ...chover precision range free hand range 11 LCD indicator rear side 12 LCD indicator SensoLite is able to detect the laser beam up to 200m from laser Move the SensoLite up and down through the laser bea...

Page 5: ...ts receptacle O To do this the locking lever L must be in its lower position and the bracket must latch audibly To release the bracket press the locking lever L down Align the unit with the adjustment...

Page 6: ...th the selector button B H 600 RPM M 400 RPM L 200 RPM Adjust the unit to the desired angle Slope angle can be set precisely and quickly with the aid of the optional tilt plate Part No LTP1 Important...

Page 7: ...xchanged or recharged The device can also be operated with standard alkaline batteries 6 x type AA Insert the batteries as shown by the installation symbols Ensure the polarity is correct Insertion of...

Page 8: ...EN60825 1 2007 10 Laser output rating 1 mW Rechargeable Batt batt operating time approx 20 h 45 h 6 x type AA Battery recharging time approx 14 h Working temperature range 10 C 40 C Protection class I...

Page 9: ...one of the sides is towards the wall or post 4 Mark the level point on the wall or post and label this point C 5 Rotate the Laser on the surface or Tripod 180 so that the other side is towards the wa...

Page 10: ...eet ALBURY N S W 2640 Australia GUARANTEE This product is guaranteed against any defect in material or workmanship for two years Damage caused by abuse improper use or excessive wear is not covered by...

Reviews: