


22 | LP Morgan Installation Instructions
LP Morgan Flipper Manual
Maintenance and Troubleshooting
The unit has stopped working and won’t go up or down:
1. Check that all the terminations are secure, that the power supply is
plugged in and that the cables are free from damage.
2. A light on the power supply indicates power - if it is off, then the power
supply may be damaged.
3. Open the black plastic enclosure to expose the control board. Switch
the power off and on. You will see a LED flash on the circuit board which
indicates power, and that the circuit board is operating correctly.
4. Close the Switch “Up” and “Common” terminals on the control board (refer
to page 17 for a wiring diagram). If the unit does not move, but you hear
a “clicking” sound then the motor may be damaged. Contact Herma for
advice.
If you have integrated the Flipper into a control system (eg. Projector
triggering, IR repeating, Crestron, AMX, etc) then the problem is most likely
with the control system! Check that the right signal is getting to the Flipper.
Use the wall switch (close the Switch “Up” and “Common” terminals) to test
the unit.
If it still doesn’t work, Contact Herma for advice.
The projector cables get jammed in the pivot frame as it rotates:
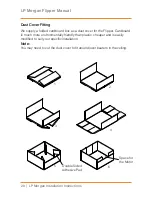
Check that the cutout for the projector cable is on the right side – NOT THE
MOTOR SIDE.
You may have it installed upside down! Check the diagram on page 10 and
take careful note of the motor and projector orientation.
The unit may be turning the wrong way – if this is so, it will damage the
microswitches as it turns. Contact Herma for advice.
The Face panel is not squared/centred in the trim:
Loosen the 6 screws (but don’t undo!), and you will be able to adjust the
position of the face panel slightly (by about 2mm)– since the holes the screws
go through are a 2mm larger than the screws.