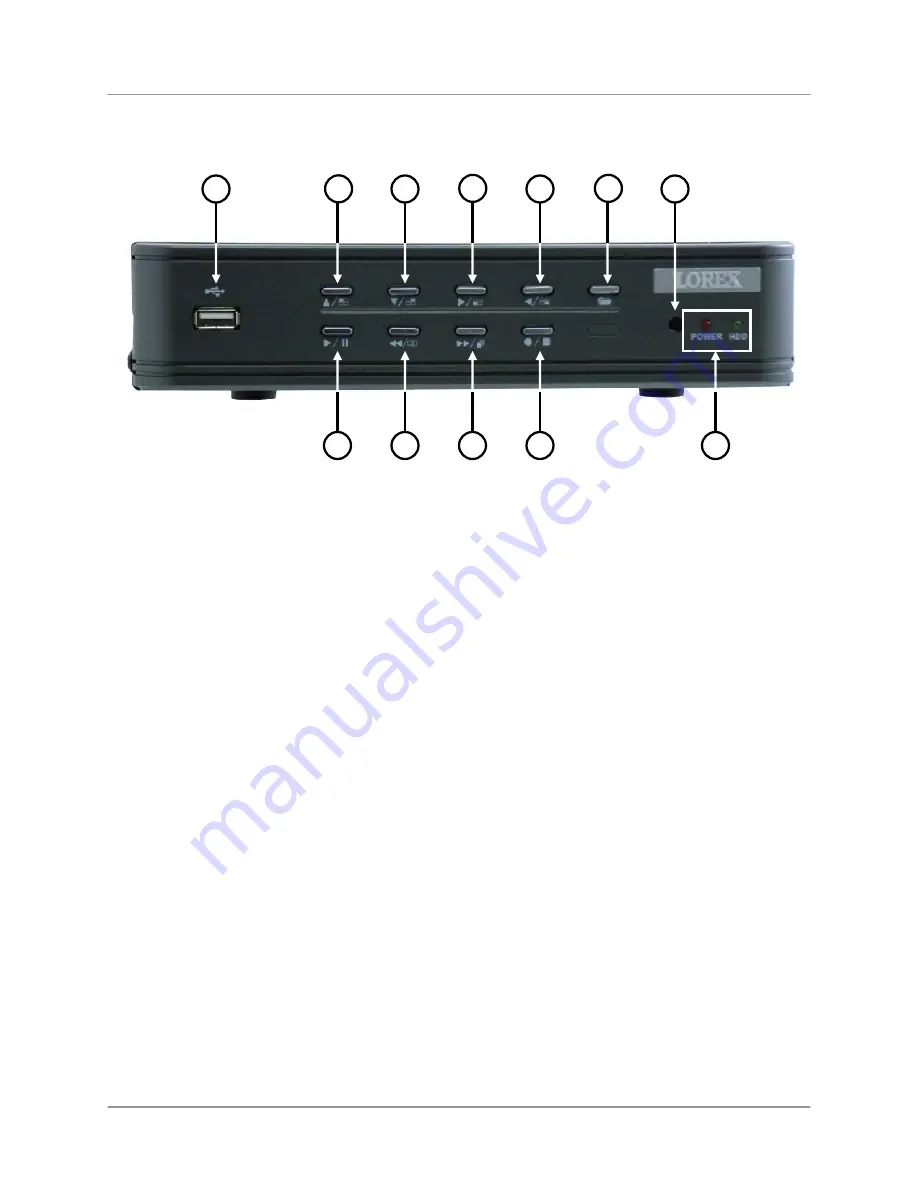
L104 Series - Front
9
L104 Series - Front
1
2
3
4
5
7
8
9 10
6
11 12
1.
USB -
One USB 2.0 port is provided to connect the DVR to a PC using the provided USB (Male to
Male) Cable and the included PC Viewer Software. Video can be archived on the PC in either *.MYS
or *.AVI format.
2.
UP NAVIGATION / CH1 DISPLAY -
Press the key to view Channel 1 during Live View Mode. Use
this key in Menu Mode to Navigate UP and change settings.
3.
DOWN NAVIGATION / CH2 DISPLAY
- Press the key to view Channel 2 during Live View Mode.
Use this key in Menu Mode to Navigate DOWN and change settings.
4.
RIGHT NAVIGATION / CH3 DISPLAY
- Press the key to view Channel 3 during Live View Mode.
Use this key in Menu Mode to Navigate RIGHT and change settings.
5.
LEFT NAVIGATION / CH4 DISPLAY
- Press the key to view Channel 4 during Live View Mode. Use
this key in Menu Mode to Navigate LEFT and change settings.
6.
MENU -
Press the MENU
key to enter or exit the DVR Setup Mode.
7.
IR RECEIVER
- Receives the signal from the Remote Control
8.
PLAY / PAUSE
- Press the key to start the playback of Video. Press the key during Video Playback
to Pause.
9.
REVERSE / MUTE
- Press the key to during video playback to reverse the video (2x, 4x or 8x
speed). Press the key during Live View to MUTE the sound (if using a Sound Input device).
10.
FAST FORWARD / SEQUENCE MODE -
Press the key to during video playback to Fast Forward
the video (2x, 4x or 8x). Press the key during Live View to Sequence through all Channels.
11.
RECORD
/
PAUSE
- Press the key during video playback to freeze the video on the screen. Press
the key during Live Video viewing to start manual recording.
12.
POWER LED / HDD ACTIVITY LED
- The RED POWER LED indicates that the unit is ON. The
GREEN HDD ACTIVITY LED blinks when video is being recorded to the Hard Drive.


