


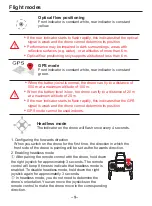


In GPS mode (when the indicator is
constant), hold the return to home, so the
drone will return to its take-off position
automatically. During the return flight, you
can use the joystick to control the drone
ascend, descend and move left/right in
order to avoid obstacles. To terminate the
return flight, hold the return to home
button.
If the remote control signal is lost for
more than 6 seconds, the drone will
automatically return to the take-off
position. If the signal is restored during
the return flight, you can hold the return to
home button to terminate the return flight.
-11-
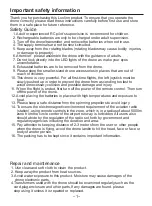
!
No signal
Automatic return
due to loss of signal
*
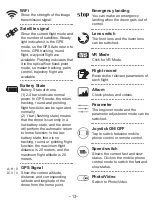
Photo and video recording gestures cannot be used when the bottom
camera is on.
(
See Loolinn Air App User Manual for further information
)
*
The camera may accidentally take a photo or start a video recording if
there are surrounding objects that resemble the or gestures.
*
If there is no memory card in the drone, photos and video recordings will
be saved to your phone.
*
If there is a memory card inserted in the drone, photos and video
recordings will be saved to the memory card and your phone.
*
The drone supports memory cards with a capacity of up to 64 GB.
*
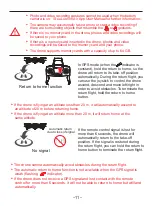
If the drone is flying at an altitude less than 20 m, it will automatically ascend to
an altitude of 20 m before returning home.
*
If the drone is flying at an altitude more than 20 m, it will return home at the
same altitude.
*
The drone cannot automatically avoid obstacles during the return flight.
*
The automatic return to home function is not available when the GPS signal is
weak (flashing indicator).
*
If the drone does not receive a GPS signal and lost contact with the remote
control for more than 6 seconds, it will not be able to return to home but will land
automatically.
Return to home function