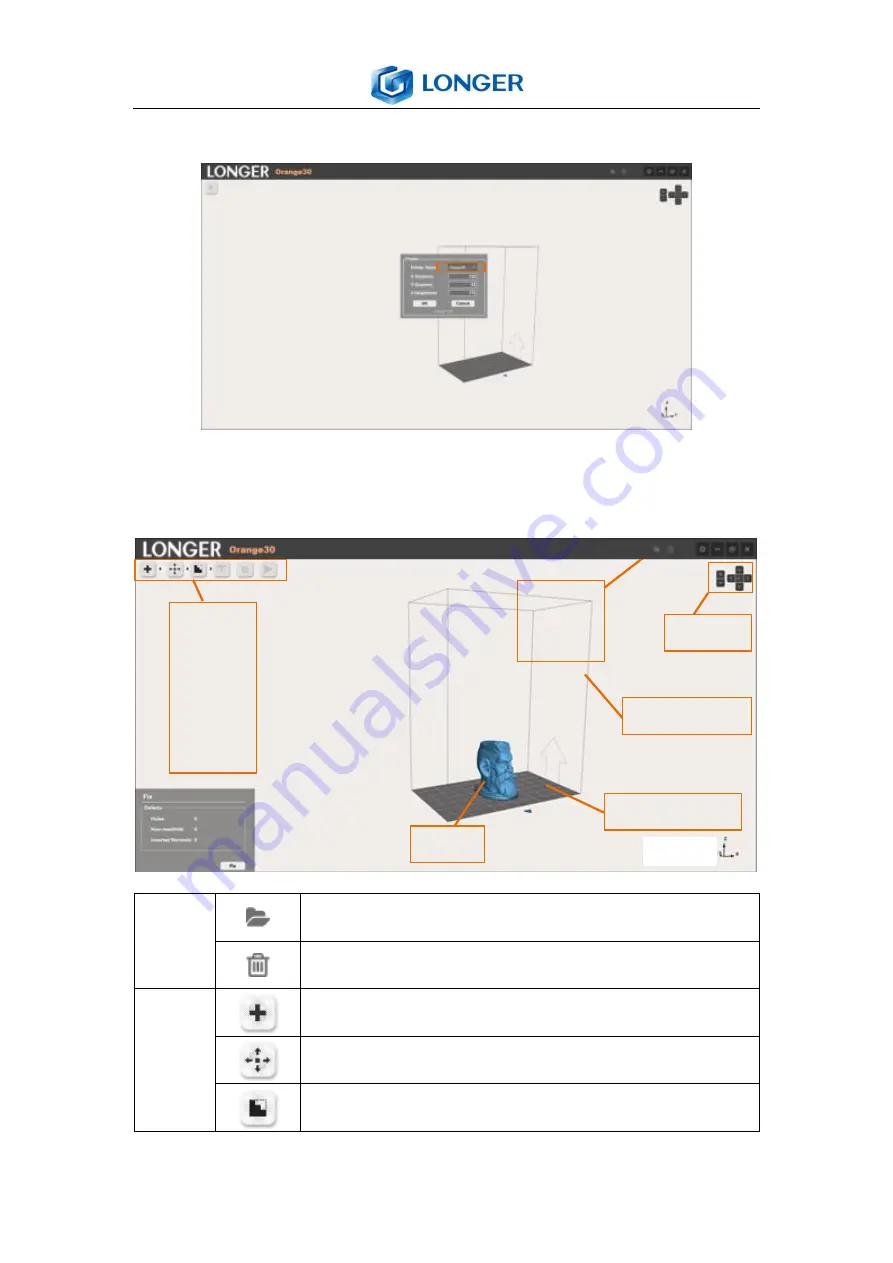
LONGER Orange30 User Manual Download Page 22


www.longer3d.com                                                       

20

                                                        [email protected]


6.4 Main menu 


After software installation, click printer setting button to 

select 

Orange30 printer

 model from the list, then click OK.


Menu 

Bar 


Import

: import the ZIP or lgs file. 


Delete

: delete the selected model. 

Tools 

Bar 


Open

: load the stl model. 


Edit

: translate, rotate, scale the model.


Fix

: check and fix the model error.


Menu Bar 

Import 

Delete 

Tools Bar 

Open 

Edit 

Fix 

Support 

Slice 

Print 

View Bar 

Building Volume 

Building Platform 

Model 

Summary of Contents for Orange30

Page 1: ...www longer3d com info longer3d com LONGER Orange30 LCD SLA 3D Printer User Manual Version1 0 2019 7 30...

Page 2: ...6 5 2 File 7 5 3 Job 9 5 4 Setting 12 5 5 About 14 5 6 Leveling 14 6 Software User Manual 16 6 1 PC Requirements 16 6 2 Software installation 16 6 3 Printing Procedure 19 6 4 Main menu 20 6 5 Open 21...

Page 3: ...remove the USB Disk during printing 3 Do not scape the resin tank by sharp plastic or metal knife it may cause film damage and resin leakage 4 Please take care of the metal scrapper to avoid injury du...

Page 4: ...st be read carefully before installation and operation of the printer The non compliance with warnings and instructions may result in printer damage or individual injury And the user should be solely...

Page 5: ...eed 30mm h 100 m layer thickness Material Rapid resin castable resin etc Light Source UV LED 405nm Software LONGER Operation System Windows 7 8 10 64 bit MAC OS Connectivity USB Disk Format STL ZIP lg...

Page 6: ...nfo longer3d com 3 Product Overview 3 1 The 3D printer description Z aix Building platform fixed screw Vat fixed screw Touch screen Thermal via Building platform Leveling fixed screw Cover Resin Vat S...

Page 7: ...mer Resin 250g 1 Card 5 Release Film 1 Hexagon Wrench 1 5mm Hexagon Wrench 2mm Hexagon Wrench 2 5mm Hexagon Wrench 3mm Card Reader 1 Clean Wiper 1 4 Active Your 3D Printer Put the printer on a flat pl...

Page 8: ...he list of printing files and selection of file to print Setting move the Z axis check LCD and LED information of the printer Note After turning on the printer if the printer board is wired incorrectl...

Page 9: ...aged it displays Waiting to insert a USB or back to main menu by touch anywhere If there is no longer3d folder in the root directory of the USB Disk it displays The longer3d folder is not detected ple...

Page 10: ...ill appear and it is required to make sure there is no model below the build plate or in the resin tank otherwise it will cause damage to the printer Choose YES to start the printing or select NO to c...

Page 11: ...fo longer3d com 5 3 Job Do not pull out the USB disk during printing it will cause printing failure Elapsed time from start printing Remaining time to printing completion Printing process of current l...

Page 12: ...d during exposure While it will be paused after the end of the Z axis movement exposure and finish of Z axis motion once again when paused during Z axis motion Resume the paused printing job and it is...

Page 13: ...g and it will show a tip as shown in the left picture if it is abnormal then it needs to check the printer s wiring or cooling fan If the temperature of LED is higher than normal temperature during pr...

Page 14: ...down the Z axis Move the Z axis by 1mm change move distance by clicking the button Move the Z axis by 10mm Move the Z axis by 50mm Move the Z axis to the home position Make sure there is model below...

Page 15: ...t and a white picture will be showed to confirm the LCD screen and LED are OK make sure there is no resin in the vat otherwise it will be cured Turn off the LED light Real time temperature of LED PCB...

Page 16: ...Build Size Maximum size of the printer Firmware Version the version of printer s firmware 5 6 Leveling 1 Turn on the printer move up the Z axis take out the building plate install it as the picture a...

Page 17: ...and hold the building platform then fasten the leveling fixed screws 4 Drag the A4 paper and feel the force of dragging the paper The leveling is suitable when it needs some force to drag the paper Ho...

Page 18: ...hten the vat fixed screw pour into the resin It needs to add resin manually if the volume of model is bigger than resin left in the vat during printing 6 Software User Manual 6 1 PC Requirements Windo...

Page 19: ...ogram File 86 longerware the installation will begin If there is an anti virus software blocking program installed please select the option of allowing all the operations of the software installed To...

Page 20: ...or select Run this program as an administrator in compatibility of software properties If the window of the software is black after running please update the graphics card driver to latest version ac...

Page 21: ...third party graphics driver detection and installation software 6 3 Printing Procedure 1 Open the stl model 2 Edit the model such as translate rotate scale and clone 3 Fix the error 4 Generate suppor...

Page 22: ...r model from the list then click OK Menu Bar Import import the ZIP or lgs file Delete delete the selected model Tools Bar Open load the stl model Edit translate rotate scale the model Fix check and fi...

Page 23: ...slice the model Print set the printing parameter generate and save the printing job View Bar Top view Bottom view Left view Right view Isometric view Printer Setting select the kind of printer Minimiz...

Page 24: ...color of model will change to red if the size of the model exceeds building volume in some dimensions It needs to scale model when the size is out of range 6 6 Edit There are three edit submenus trans...

Page 25: ...ll change along XYZ axis by equal scale Clone make a copy of the selected model Reset recover to the original status Maximize change the model size to max within building volume 6 7 Fix Fix check out...

Page 26: ...ick the purple point It can rotate the model by holding down the right mouse and drag it by holding down the mouse wheel Delete delete the support of selected model Density the density of generating s...

Page 27: ...model and building platform is lifted by generating support The suggested value is between 0 to 3mm Default recover support parameters to original values Make a copy of supported model select the mod...

Page 28: ...height of base is about 0 3mm so the layer number is set to 6 when the layer thickness is 50 m and sets to 3 layers when layer thickness is 100 m It is recommended to add plate players to facilitate...

Page 29: ...n the upper right corner of the software when slice the model Slicing Image Preview preview the image of sliced model by drag the slider as shown in forth arrow Adjust the layer thickness to suitable...

Page 30: ...ine size Burn in time the exposure time for the bottom layers The longer the exposure time the greater the adhesion between the model and building platform The default time is 80000ms Stable Time the...

Page 31: ...ect the corresponding printing parameters from the list according to the layer thickness shown at the bottom There are three defaulted recipes respectively for 25 50 100 m layer thickness which cannot...

Page 32: ...save the changes to the parameters of selected recipe then a new recipe will be added to the list 6 11 Convert ChiTuBox ZIP file to lgs30 If it needs to hollow or perforate the model it can use ChiTuB...

Page 33: ...t _Orange30 cfg file which is located in C Program Files x86 LongerWare config chitu Then it can change the name of machine to Orange30 and make sure the LCD_mirror is selected in the mirror type The...

Page 34: ...zip format then run LONGER slicer software to convert the zip file to lgs30 file Run the LONGER slicer software click import file icon a popup window appears select the corresponding machine type and...

Page 35: ...lgs30 file can be altered but the layer thickness keeps constant the operation is as follows Run the LONGER slicer software click import file icon a popup window appears select the corresponding machi...

Page 36: ...elected directory and upload new lgs30 file to the USB flash disk to print 6 13 Post processing After printing job finished put on latex gloves scrape the resin on the building platform into resin vat...

Page 37: ...metal scrapper with attention Pour the ethanol with 95vol concentration into a container immerse the model into ethanol and shake it gently then swash the model with clear ethanol for better cleaning...

Page 38: ...t 5 LED broken 6 LCD broken 7 bottom layer is small 1 tighten the building platform 2 level the platform again 3 level the platform again 4 make bottom time is right 5 check the LED voltage and LED re...

Page 39: ...lding platform when tighten and loosen it 6 Keep the printer cover closed during usage 7 Clean up the resin vat before the change of a new kind resin 8 Keep the building platform and printer clean and...

Reviews: