background image

Quick Installation Guide 

Access the LigoPTP 5-23  UNITY 

LigoWave 

Page 13


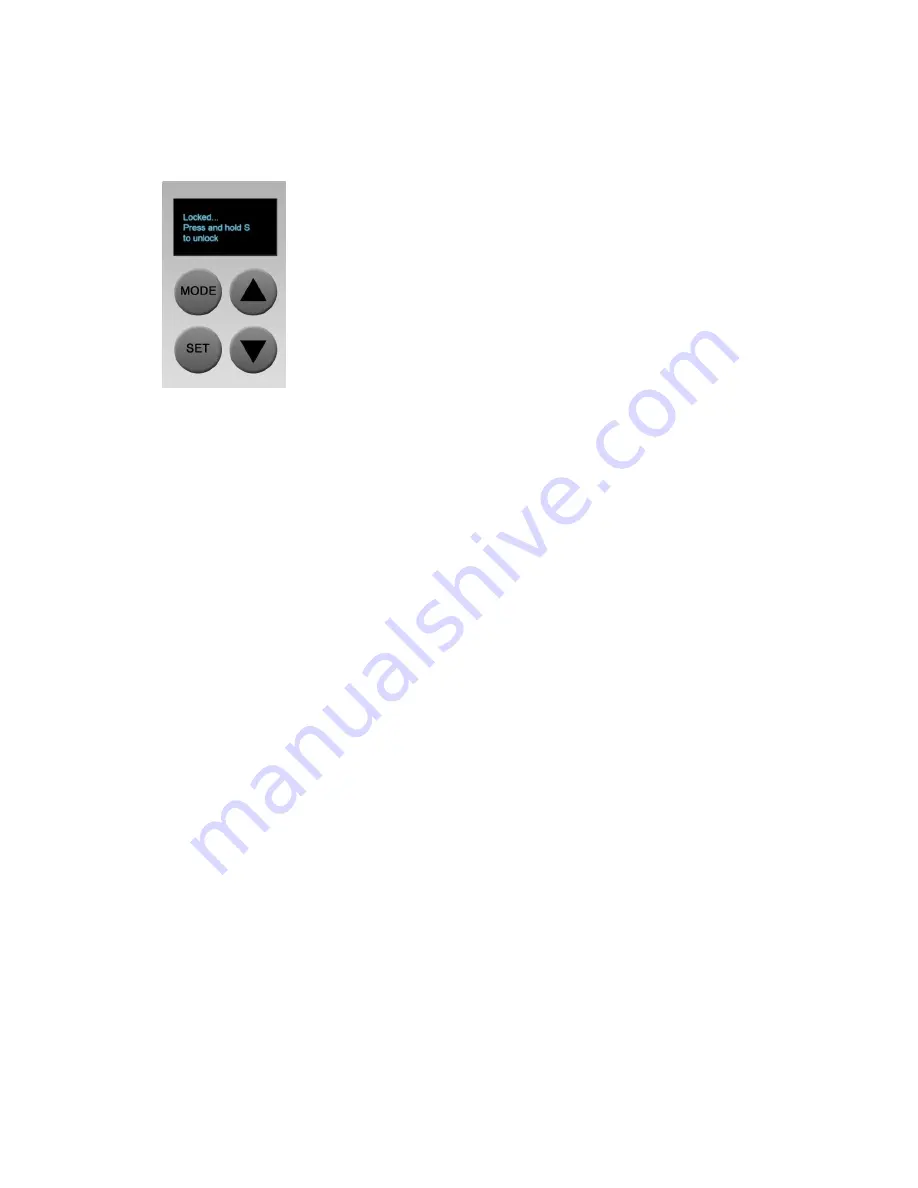
OLED Display Control 

LigoPTP 5-23 UNITY 

products have the capability to monitor the primary device’s parameters and 

execute maintenance tasks through an OLED display and keypad. 

Steps to use the OLED display and keypad: 


Step 1.


Press and hold 

“SET” for 3 seconds to unlock (to lock again press “SET” once). The 

keypad automatically locks and the OLED turns off after 5 min of inactivity. 


Step 2.


Press 

“UP” or “DOWN” button to navigate menu items. 


Step 3.


From the main menu, choose Antenna alignment and press 

“SET” to enter and show 

local and remote signal levels. Press 

“UP” or “DOWN” button to next/exit page, press 

“SET” to return to main menu. 


Step 4.


From the main menu, choose Link test and press 

“SET” to enter. Press “MODE” button 

to change packet size, press 

“SET” to start the link test. Press “UP” or “DOWN” button 

to next/exit page, press 

“SET” to return to main menu. 


Step 5.


From the main menu, c

hoose Statistics and press “SET” to enter and show device’s/link 

information. Press 

“UP” or “DOWN” button to next/exit page, press “SET” to return to 

main menu. 


Step 6.


From the main menu, choose Reboot and press 

“SET” to enter. Press “SET” button and 

hold for 5 seconds to reboot the device. Press 

“UP” or “DOWN” button to next/exit 

page, press 

“SET” to return to main menu. 


Step 7.


From the main menu, choose Reset to defaults and press 

“SET” to enter. Press “SET” 

button and hold for 5 seconds to re

set the device’s configuration to factory defaults. 

Press 

“UP” or “DOWN” button to next/exit page, press “SET” to return to main menu. 


OLED display menu: 


Unlock/Lock 


Antenna alignment 


Link test 


Statistics 


Reboot 


Reset to defaults 


Summary of Contents for LigoPTP 5-23 UNITY

Page 1: ...LigoPTP 5 23 UNITY Quick Installation Guide Revision 1 7 January 6 2015 Copyright 2015 LigoWave www ligowave com ...

Page 2: ...ions without prior notice While the information in this manual has been compiled with great care it may not be deemed an assurance of product characteristics LigoWave shall be liable only to the degree specified in the terms of sale and delivery The reproduction and distribution of the documentation and software supplied with this product and the use of its contents is subject to written authoriza...

Page 3: ...ful interference and 2 this device must accept any interference received including interference that may cause undesired operation The device must not be installed where a TDWR can strike the antenna at a distance of less than 3 1miles 5km FCC Caution To assure continued compliance any changes or modifications not expressly approved by the party responsible for compliance could void the user s aut...

Page 4: ...Mutual Recognition of their Conformity R TTE The R TTE Directive repeals and replaces in the directive 98 13 EEC Telecommunications Terminal Equipment and Satellite Earth Station Equipment As of April 8 2000 Safety This equipment is designed with the utmost care for the safety of those who install and use it However special attention must be paid to the dangers of electric shock and static electri...

Page 5: ...EU Countries Not Intended for Use 4 CONTENTS 5 ABOUT THIS GUIDE 6 Purpose 6 Definitions Acronyms and Abbreviations 6 LigoWave Technical Support 6 Contact Us 6 INSTALLATION 7 Package Contents 7 Hardware Introduction 7 Mounting the LigoPTP 5 23 UNITY 8 Mounting on a Pole 8 Mounting on a Wall 9 ACCESS THE LIGOPTP 5 23 UNITY 11 Connection via WEB browser 11 Resettingto Factory Defaults 12 OLED Display...

Page 6: ...mation that may be helpful but which is not required Important information that should be observed LigoWave Technical Support If you encounter problems when installing or using this product please consult the LigoWave website at www ligowave com for Direct contact to the LigoWave support centers Frequently Asked Questions FAQ Download area for the latest software user documentation and product upd...

Page 7: ...or mounting bracket attaching to the device 4 Screws for pole mounting 2 48V 802 3af PoE 1 If any of these items are missing or damaged please contact your reseller Hardware Introduction The LigoPTP 5 23 UNITY unit is housed in rugged cast aluminum enclosure and has an integrated 23dBi directional antenna Figure 1 LigoPTP 5 23 UNITY Overview The label of the LigoPTP 5 23 UNITY contains following i...

Page 8: ...he unit must be properly grounded to protect against lightning The grounding wire must be attached to the grounding stud on the unit If the unit is attached to a metal pole which is earth grounded no further grounding is required Step 3 Connect the unit to the bracket together and tighten up with the screws It is recommended not to tighten the unit s mounting bracket details until the alignment pr...

Page 9: ...ached tighten the unit s bracket in the optimum position Mounting on a Wall The mounting bolts for unit installation on the wall are not included in the package For mounting LigoPTP 5 23 UNITY unit on the wall first mount one half of the bracket to the wall and then connect the two halves of the bracket together and tighten the nut and bolt Step 1 Make sure that the unit is powered off Step 2 Grou...

Page 10: ...l the alignment process of the antenna is complete Step 7 Power up the LigoPTP 5 23 UNITY unit It is recommended to use shielded Ethernet cable to reduce exposure of the electromagnetic noise Step 8 Run the Antenna Alignment tool on Web management interface or on OLED screen Figure 2 Antenna Alignment Tool on Web and OLED and move the antenna in the horizontal and vertical planes until the maximum...

Page 11: ...t with mask 255 255 255 0 Connect the LigoPTP 5 23 UNITY Ethernet interface in to the same physical network as your PC Open the Web browser and type the default IP address of the unit https 192 168 2 66 Step 2 Enter the administrator login details to access the Web management The default administrator login settings for all LigoPTP 5 23 UNITY are Login admin Password admin01 Step 3 After successfu...

Page 12: ...le might be flushed during wired link status change connecting the device that will be reset Steps to reset to default settings Step 1 Power off the device Step 2 Obtain the device MAC address Step 3 Connect a PC to the same physical subnet as the device Step 4 Execute arp s command to assign the IP address IP address should be from the same subnet as PC to the device MAC address arp s IP address ...

Page 13: ...ain menu choose Link test and press SET to enter Press MODE button to change packet size press SET to start the link test Press UP or DOWN button to next exit page press SET to return to main menu Step 5 From the main menu choose Statistics and press SET to enter and show device s link information Press UP or DOWN button to next exit page press SET to return to main menu Step 6 From the main menu ...

Page 14: ...ΩΝΕΙ ΟΤΙ Ligowave LigoPTP 5 23 UNITY ΣΥΜΜΟΡΦΩΝΕΤΑΙ ΠΡΟΣ ΤΙΣ ΟΥΣΙΩ ΕΙΣ ΑΠΑΙΤΗΣΕΙΣ ΚΑΙ ΤΙΣ ΛΟΙΠΕΣ ΣΧΕΤΙΚΕΣ ΙΑΤΑΞΕΙΣ ΤΗΣ Ο ΗΓΙΑΣ 1999 5 ΕΚ Magyar Hungarian Alulírott Deliberant nyilatkozom hogy a Ligowave LigoPTP 5 23 UNITY megfelel a vonatkozó alapvetõ követelményeknek és az 1999 5 EC irányelv egyéb elõírásainak Íslenska Icelandic Hér með lýsir Deliberant yfr því að Ligowave LigoPTP 5 23 UNITY er í ...

Reviews: