background image

GB-14

Charging the Battery

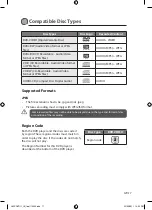
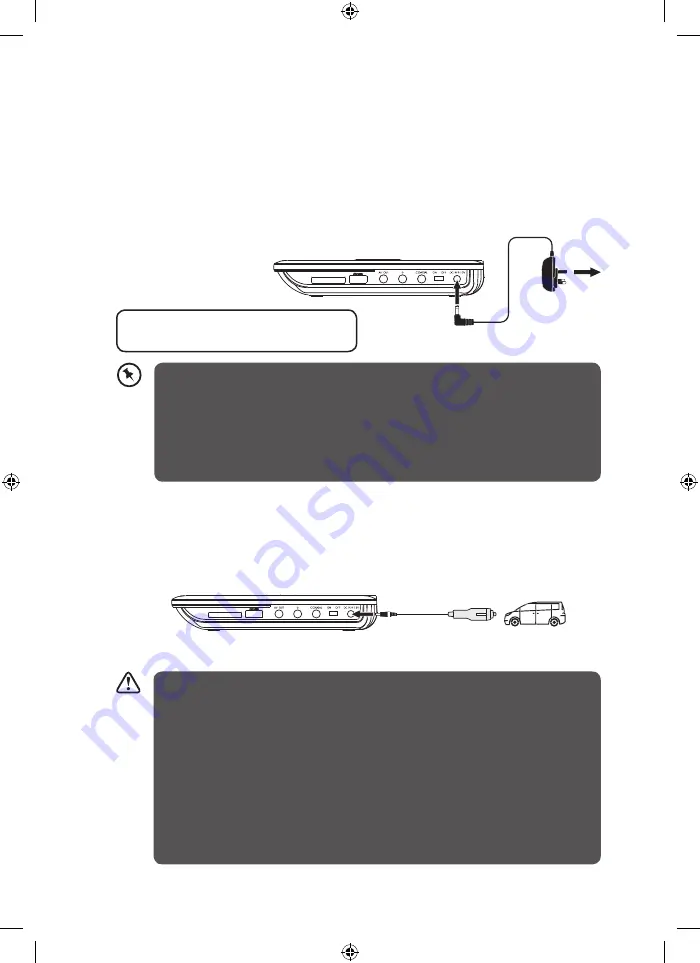
1.  Connect the mains adapter (Included) to the DC IN socket at the right side of the 

unit and then connect the mains adapter to a mains socket.
•  The LED indicator illuminates red indicating that the battery is in charging 

mode. When the battery is charged to full capacity, the LED indicator 

illuminates green.

2.  Remove the mains adapter. The battery is now fully charged and the unit is ready 

to use.

Using the Car Power Adapter (for in-car use)

The 12V car power adapter (included) allows the unit to be used with vehicles that 

have a 12V negative ground electrical system.

•  Disconnect the car power adapter when not in use. Not for use in 24V vehicles.

•  Use the provided 12V car power adapter only. Using other car power adapters 

could damage the unit.

•  In the interest of traffic safety, do not operate this unit or view videos while driving 

a vehicle.

•  Make sure the unit is securely fastened to prevent it from falling or flying through 

the air in the event of an accident.

•  When the inside of the cigarette lighter socket is dirty with ash or dust, the plug 

section may become hot due to poor contact. Be sure to clean the cigarette lighter 

socket before use.

•  After use, disconnect the 12V car power adapter from both the unit and the 

cigarette lighter socket.

SD/MMC/MS

SD/MMC/MS

DVD Player 

Right Side

DVD Player Right Side

To DC IN 

9V-12V Socket

To DC IN 
9V-12V Socket

To the Mains 
Socket

To Cigarette 
Lighter Socket

* Battery Operation time from fully 

charged battery = Approx. 3~4 hours

•  The battery is partially charged at shipment. We suggest that for first time use fully 

charge the battery. It may take up to 4 hours to fully charge the battery.

•  Everytime you see the Low Battery indicator on the screen, you must connect 

your mains adapter to the unit and the mains socket. The battery will now start to 

recharge.

•  The battery will charge slower when the DVD player is in use.
•  It is recommend to turn off the unit while the battery is charging.

L9SPDVD11_IB_final110322.indd   14

22/03/2011   12:25 PM

Summary of Contents for L9SPDVD11

Page 1: ...9 Portable DVD Player Instruction Manual L9SPDVD11 L9SPDVD11_IB_final110322 indd 1 22 03 2011 12 25 PM...

Page 2: ...L9SPDVD11_IB_final110322 indd 2 22 03 2011 12 25 PM...

Page 3: ...L9SPDVD11_IB_final110322 indd 3 22 03 2011 12 25 PM...

Page 4: ...use 14 Connections 15 Connecting to a TV 15 Connecting to a Multi channel Audio Receiver 15 Using Earphones 15 Using a USB Device or and SD MMC MS Card 16 General Operation 16 Compatible Disc Types 1...

Page 5: ...21 MENU 21 Customising the General Settings 22 Customising the Audio Settings 23 Customising the Video Settings 24 Customising the Preference Settings 24 Customising the Password Settings 26 Maintenan...

Page 6: ...our new Logik Portable DVD Player These operating instructions will help you use it properly and safely We recommend that you spend some time reading this instruction manual in order that you fully un...

Page 7: ...disc 5 ENTER Button Press to confirm selections on the menu screen 6 SETUP Button Press to enter the setup menu VOL Button Press to increase and decrease the volume SOURCE Button Press to select the...

Page 8: ...S 1 2 3 4 5 6 7 1 SD MMC MS Memory Card Slot 2 USB Slot 3 AV OUT Socket 4 Earphones Socket Right Side View 5 COAXIAL Socket 6 ON OFF Switch 7 DC IN 9 12V Socket L9SPDVD11_IB_final110322 indd 8 22 03 2...

Page 9: ...has been programmed with multiple camera angles 6 TITLE Button Return to DVD Title Menu 7 Cursor Buttons Move between selections on a menu screen and adjust certain settings ENTER Button Confirm sele...

Page 10: ...on To select one of the audio sound tracks on a DVD if more than one is available or select the audio output mode on a CD 18 Button Press to start playback or pause 19 STOP Button Press to stop playin...

Page 11: ...may cause corrosion or battery leakage which could cause fire personal injury or damage to property Install the battery correctly by following the polarity and indications in the battery compartment...

Page 12: ...hat the battery holder tray is secure in the remote control Seek medical advice if you believe a cell has been swallowed Handling the Remote Control Take care of your fingernails when you press and ho...

Page 13: ...res from the remote control sensor and within 40 of the front of the unit The operating distance may vary depending on the brightness of the room 20 20 Within about 2m 1 2 3 4 5 6 7 8 9 0 10 REPEAT TI...

Page 14: ...ed to prevent it from falling or flying through the air in the event of an accident When the inside of the cigarette lighter socket is dirty with ash or dust the plug section may become hot due to poo...

Page 15: ...nnel audio receiver DVD mode Using Earphones Turn down the volume before connecting and then adjust the level When earphones are connected no sound will be emitted from the unit s speaker SD MMC MS SD...

Page 16: ...ess the SOURCE button to access the data in the drive 3 Use the buttons to select MEDIA 4 Press the button and then press the buttons to highlight USB SD MMC or MS depending on the type of device you...

Page 17: ...act Disc Digital Audio AUDIO Supported Formats JPEG The file extensions has to be jpg and not jpeg Pictures encoding must comply with JPEG ISO format Some recorded files may not be able to be played d...

Page 18: ...n about the options available on that DVD may appear on the screen during operation means that the desired operation is not permitted by the unit or disc Basic DVD Playback 1 Make sure the unit is eit...

Page 19: ...splay will show With some discs the unit can recall the stopped location such as on DVDs 2 Press the button on the unit or the remote control to resume playback from the location where playback was st...

Page 20: ...number of different angles For these discs the same scene can be viewed from each of these different angles 1 While you are playing a DVD with different angles recorded press the ANGLE button on the...

Page 21: ...0 buttons to input the title chapter track number and then press the buttons to select START To resume normal playback press the PROGRAM button and press the buttons to select STOP For JPEG Press the...

Page 22: ...een will be displayed 16 9 Wide screen display WIDE SQUEEZE Set screen mode to 4 3 A wide picture will be squeezed to fit a 4 3 conventional display ANGLE MARK The multi angle logo with the number of...

Page 23: ...coder STEREO Select this option to change channel output to stereo which delivers sound from only the two front speakers DIGITAL OUTPUT Select the SPDIF Output SPDIF Off Turns off the digital output S...

Page 24: ...setting SHARPNESS Set the sharpness level of video output BRIGHTNESS Set the brightness level of video output CONTRAST Set the contrast level of video output HUE Set the hue value of the video SATURAT...

Page 25: ...by entering the 4 digit password you have set in PASSWORD setup at the PASSWORD SETUP PAGE If you change the control level you must input password Initial password 1369 In case you forget your passwo...

Page 26: ...igit password will be required to play a prohibited disc If the disc is locked and the system prompts you to enter the password 1 Use the 0 9 buttons to input the current password in the OLD PASSWORD...

Page 27: ...cleaners or antistatic spray They may damage the disc Storing Discs Do not store discs in places subjected to direct sunlight or near heat sources Do not store discs in places subjected to moisture a...

Page 28: ...paused Press the button Make sure the unit is not in fast forward or fast reverse mode Press the button Make sure the AUDIO VIDEO input output connections are correct The DTS DVD cannot be decoded to...

Page 29: ...es due to the type of disc or condition of the recording If you are having trouble playing a certain disc remove the disc and try a different one Improperly formatted discs will not play on this DVD p...

Page 30: ...1Vp p 75 Audio Out 1 4 Vrms 1 KHz 0 dB Audio Speaker 1W x 2 Earphones Output Coaxial Output AV Output System Laser Semiconductor laser wavelength 650 nm Signal System NTSC PAL Frequency Response 20Hz...

Page 31: ...ediately Withdraw the mains adapter and consult your dealer Ventilation To prevent the risk of electric shock or fire hazard due to overheating ensure that curtains and other materials do not obstruct...

Page 32: ...h with arrowhead symbol within an equilateral triangle is intended to alert the user to the presence of uninsulated dangerous voltage within the unit s enclosure that may be of sufficient magnitude to...

Page 33: ...iler where you purchased the product NOTE If you require a replacement for any of the items listed below please quote their corresponding part numbers Replacement Part Part Number Remote Control 1706...

Page 34: ...L9SPDVD11_IB_final110322 indd 34 22 03 2011 12 25 PM...

Page 35: ...L9SPDVD11_IB_final110322 indd 35 22 03 2011 12 25 PM...

Page 36: ...L9SPDVD11_IB_final110322 indd 36 22 03 2011 12 25 PM...

Reviews: