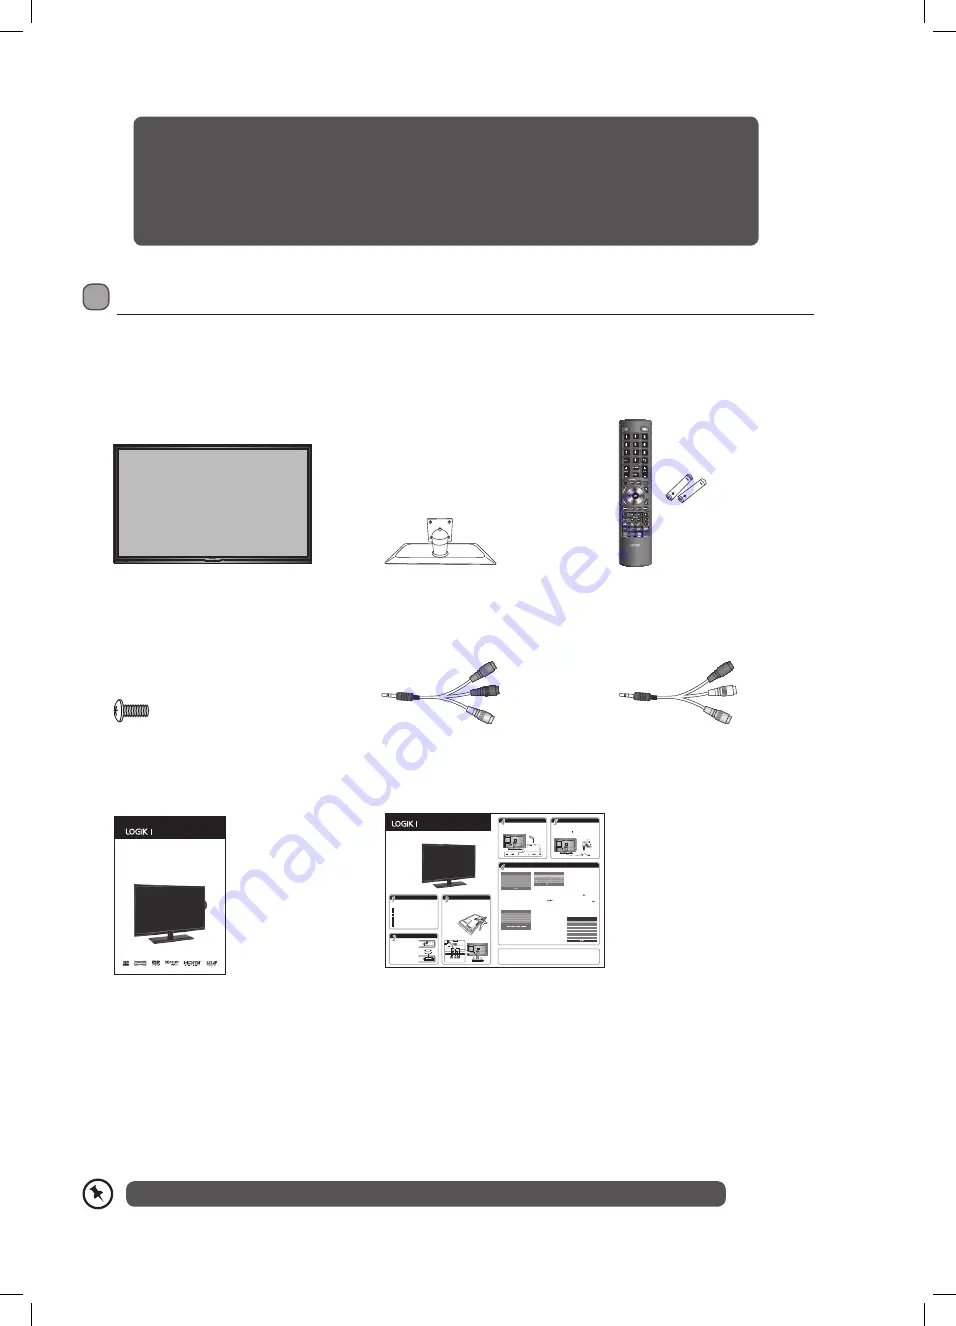
Logik L32HED13A Instruction Manual Download Page 7

7

Preparation

 Unpacking the TV

Remove all packaging from the TV. Retain the packaging. If you dispose of it please do so according to local regulations.

The following items are included:

Remote Control / 

AAA Batteries x 2

Instruction Manual

Quick Start Guide

Instruction Manual

32” HD Ready LED TV 
with DVD Player

L32HED13A

L32HED13A_IB.indd   1

22/01/2014   10:28

Connecting the Aerial

Connect one end of the RF coaxial cable to the aerial socket on the wall 

and the other end of the cable to the AERIAL IN socket at the rear right 

bottom view of your TV.

Connecting to the Mains Socket

1. Connect the mains cable to the mains socket after you have 

completed all the connections.

2. In standby mode, press the   button on the remote control to  

turn the TV on. The red LED indicator will turn blue.

Installing the Base Stand

Unpacking

Remove all packaging from the TV. Retain the packaging.  

If you dispose of it please do so according to local regulations.

 TV

 TV Stand

  Remote Control/AAA Batteries x 2

 Screw x 5

  Component Adapter Cable (YPbPr)

 Composite Adapter Cable (AV)

 Instruction Manual

Operating Your Remote Control

1.  Press and lift the back cover to 

open the battery compartment 

of the remote control.

2.  Insert two AAA size batteries. 

Make sure to match the (+) and  

( - ) ends of the batteries with 

the (+) and ( - ) ends indicated  

in the battery compartment.

3.  Close the battery compartment 

cover.

1.  Disconnect all cables connected to the TV.

2.  Lay the TV down on a flat surface ideally on the edge of a table so the 

base of the TV slightly overhangs the edge of the table, with the back 

side facing up. Please make sure a soft cushioned material (such as 

a dry bath towel or thick piece of foam) is placed beneath the screen.

3.  To install the TV stand, place  

the stand into the stand  

recess on the back of  

the TV. 

PC-RGB In

PC

Audio In

SCART

RF In

HDMI 1 In

HDMI 2 In

To the mains socket

Well done

, your new TV is now ready to use. You will find that there are many exciting features available. To get to know all these features,  

please take some time to read the instruction manual provided with your TV.

If after reading the instruction manual you have additional questions related to the use of your TV please call our UK Call Centre on 0844 561 1234.  

Our UK Customer Contact Centre is open Monday-Saturday 8am-8pm or Sunday 8am-6pm.

QSG-L32HE13A_HED13A-140121V1

Turning On and Tuning In the TV

1.  The first time you turn the TV on, it will go 

straight into the First Time Installation menu.


Please ensure the aerial is plugged in and 

then press the OK button.

2.  Your TV should be automatically sent to 

the correct OSD language and Country. So 

simply press OK to start tuning in your TV.


If you need to change the OSD language and 

Country press the 


 buttons. Leave 

the TV in Home mode.

3.  Channel tuning will commence. This operation 

may take up to 10 minutes. The display will 

show the progress of the tuning and the 

number of channels found.

First Time Installation

Country

UK

Home Mode

Next

OK

OSD Language

English

Please ensure aerial is plugged in!!

Then press OK button to start

Target Region Setting

Country Code

GBR

Primary Region

England

Secondary Region
Tertiary Region

London

Channel Tuning

DTV                 :                 0   Channel

Radio               :                 0   Channel

Data                 :                 0   Channel

1  %...     471.25 MHz                        (DTV)

Please press MENU key to skip

Target Region Setting

During tuning your TV may have received  

signals from more than one transmitter. If this 

has occurred the Target Region Setting screen 

will be displayed. This will enable you to select 

the correct regional transmission for the local 

news service that you require.

1.  Press the OK button to confirm the Country 

Code, this will highlight the Primary Region 

England.

2.  Press the OK button to highlight Secondary 

Region and press the     buttons to select 

your preferred option (if available).

3.  Press the OK button to confirm, and Tertiary 

Region will be highlighted. Press the     

buttons to select the your preferred option  

(if available).

4.  Press the OK button to confirm. The main 

menu will be briefly displayed.

Your TV is now fully tuned in.

Quick Start Guide

32” HD Ready LED TV

L32HE13A
L32HED13A


(with DVD Player)

Table

Cushioned 

material 

screw in

Screws x 5

4.  Secure the stand using the 5 screws provided.

L32HED13A_QSG.indd   1

21/01/2014   11:33

HDMI

Thank you

 for purchasing your new Logik 32” HD Ready LED TV with DVD Player.

Your new TV has many features and incorporates the latest technology to enhance your viewing 
experience. We recommend that you spend some time reading this instruction manual so that you fully 
understand these features. You will also find some hints and tips to help you resolve any issues.
Read all the safety instructions carefully before use and keep this instruction manual for future reference.

If items are missing, or damaged please contact Partmaster (UK only). Tel: 0844 800 3456 for assistance.

TV

Screw x 5

Component Adapter Cable

(YPbPr)

Composite Adapter Cable 

(AV)

TV Stand

Red

Blue

Green

Red

White

Yellow

L32HED13A_IB.indd   7

22/01/2014   11:21

Summary of Contents for L32HED13A

Page 1: ...Instruction Manual 32 HD Ready LED TV with DVD Player L32HED13A L32HED13A_IB indd 1 22 01 2014 11 21...

Page 2: ...L32HED13A_IB indd 2 22 01 2014 11 21...

Page 3: ...ge Device 21 Recording DTV Programmes onto a USB Storage Device 22 Timer Programming 23 Playing Recorded Programmes 24 Digital Teletext DTV Mode 25 Teletext within Digital Service 25 Listening to the...

Page 4: ...ance 43 Key Lock 44 Connecting a USB Storage Device 44 Viewing Photos 45 Listening to Music 46 Viewing Movies 47 My Text 48 Play Recorded Programme 49 Maintenance 50 Hints and Tips 51 YPbPr Mode 53 PC...

Page 5: ...moving the unit Unplug the unit from the mains socket during a lightning storm Mains Cable Make sure the unit or unit stand is not resting on top of the mains cable as the weight of the unit may damag...

Page 6: ...ways remove the disc when the unit is not in use Failure to do so will risk severely damaging the disc and the unit Do not stack devices heat from other devices may affect the performance of the unit...

Page 7: ...e first time you turn the TV on it will go straight into the First Time Installation menu Please ensure the aerial is plugged in and then press the OK button 2 Your TV should be automatically sent to...

Page 8: ...ace the stand into the stand recess on the back of the TV Installing Removing the Base Stand Four mounting holes size M6 screw The LCD display is very fragile and must be protected at all times when i...

Page 9: ...Insert the disc with the label side facing the rear of the TV 12 cm discs only Don t insert 8 cm discs 4 Press to eject disc DVD mode 5 Press to start playback or pause DVD mode 6 SOURCE Press to sel...

Page 10: ...evices with a VGA interface 4 RF In Connects to the aerial socket on the wall with the RF coaxial cable 5 YPbPr Connects to a DVD player Digital Set Top Box or other AV devices with component YPbPr vi...

Page 11: ...tery type indicated in this manual When the batteries are exhausted the remote will not function Replace both batteries at the same time with new ones Do not install new batteries with used ones and d...

Page 12: ...3 12 DVD A short cut to switch input source to DVD DVD mode 13 USB A short cut to switch input source to TV Digital radio channels DTV mode 14 SOURCE Select among the different input signal sources DT...

Page 13: ...rapidly DVD USB mode 30 To start the timeshift playback DTV mode To start playback or pause DTV DVD mode 31 DVD SETUP Display and exit the DVD setup menu DVD mode 32 DVD MENU Display the DVD menu DVD...

Page 14: ...mode press the button on the remote control to turn the TV on The red LED indicator will turn blue Always disconnect the TV from the mains socket when not in use for a long period of time The STANDBY...

Page 15: ...r of channels found If you want to exit the tuning menu press the MENU button to interrupt the tuning process A pop up screen will be displayed press the button 7 After tuning is complete the channels...

Page 16: ...o the previously viewed channel Display Channel Information Press the INFO button to view the current information Volume Adjustment Press the V or button on the right side panel of the TV or the VOL o...

Page 17: ...e Cold Increases blue tint Normal Warm Increases red tint Noise Reduction Reduces the noise level of the connected device Off Low Middle High Default Screen PC mode Adjusts the PC desktop content Auto...

Page 18: ...the left and right of the screen 16 9 This selection will allow you to adjust the picture horizontally in linear proportion to fill the entire screen This selection will allow you to view a picture wi...

Page 19: ...und HD builds upon its predecessor the industry leading surround sound virtualiser SRS TruSurround XT Not only does TruSurround HD process up to 6 1 channels for playback over two speakers or headphon...

Page 20: ...e GREEN button to set a reminder Press once to remind once press twice to remind daily or press three times to remind weekly YELLOW Previous Day Press the YELLOW button see the previous days programme...

Page 21: ...ogress bar and return to the current live broadcast press the button and then press the button to confirm The PVR Time Shift Progress Bar 1 Indicates the status of the currently displayed video 2 Indi...

Page 22: ...ng progress bar will disappear after 15 seconds To display the recording progress bar again press the OK button or the button 2 Press the button to stop recording If you want to turn off your TV durin...

Page 23: ...T 1 BBC ONE Lon When the preset time is reached the TV will start recording automatically If a programme recording starts when the TV is in standby mode the LED indicator will alternatively flash red...

Page 24: ...ump back 30 seconds During playback press the button to display a still screen and then press the button again to resume playback During fast forward fast backward state press the button to return to...

Page 25: ...n to select Follow on screen prompts for other functions 3 Press the TEXT button to exit Listening to the Radio You can listen to radio stations through your TV 1 Press the TV RADIO button to select r...

Page 26: ...es AUDIO VIDEO JPEG CD RW CD Rewritable Audio Video format or JPEG files AUDIO VIDEO JPEG AUDIO CD Compact Disc Digital Audio AUDIO Supported Formats JPEG Pictures encoding must comply with JPEG ISO f...

Page 27: ...tton will restart the disc from the beginning If the current track is the last one pressing the button will stop the playback There will be no sound during forward or backward Forward Backward for DVD...

Page 28: ...is not available on every DVD check your DVD for details Press the ANGLE button repeatedly to select the different angle you want to view Zoom for DVD Allows you to zoom into the picture 2x 3x or 4x...

Page 29: ...Widescreen picture shown in the full screen General Setup Page TV Display 16 9 OSD Lang ENG Screen Saver On Last Memory Off English French German Spanish Italian Protuguese OSD Set the OSD language t...

Page 30: ...udio Setup Page Speaker Setup Dual Mono Dynamic Audio Setup Page Downmix STR LT RT Stereo Speaker Setup Downmix LT RT Mixed stereo LT RT output Stereo Mixed stereo surround output Audio Setup Page Spe...

Page 31: ...s Module 1 Before you remove the Common Access Module ensure that the TV is switched off at the mains 2 Pull the Common Access Module from the slot 3 Switch the TV on CI Common Interface DTV Mode The...

Page 32: ...Information This screen is for illustration only To view the module information 1 Press the MENU button and then press the buttons to select the CHANNEL menu and then press the OK button CHANNEL PICTU...

Page 33: ...ot turn off or unplug your TV If you experience difficulties after the software update we recommend that you restore your TV to the factory default settings To do this follow the steps below 1 Press t...

Page 34: ...tons to select the TIME menu and then press the OK button 2 Press the buttons to select the following time options and then press the OK button Clock TIME Time Zone Sleep Timer Auto Standby OSD Timer...

Page 35: ...n 20min 30min 60min 90min BACK MENU EXIT Auto Standby The unit will automatically switch to standby mode up to 4 hours after the last time the remote control was used A reminder screen will pop up and...

Page 36: ...aired Aspect Ratio Blue Screen Restore Factory Default OSD Language Audio Language TT Language PVR File System Subtitle Language Off Auto On HDMI CEC English English West English TT Language Allows yo...

Page 37: ...BTITLE button on the remote control to display the Subtitle Language List and then press the buttons to select the Subtitle Language or OFF Press the OK button to confirm Only applicable when the TV p...

Page 38: ...tton to start formatting Formatting the disk will delete any information previously stored on the disk Warning All data will be lost Start Exit Format disk Format disk File System Size PVR File System...

Page 39: ...ct Auto Turn Off and then press the buttons to turn on This will allow the connected HDMI compliant device to automatically turn off when you turn the TV to standby mode 3 Press the MENU button to ret...

Page 40: ...n to select Yes The TV will return to the first time installation menu Press the button to select No to cancel and return to the main menu Are you sure Yes No All channel and user settings will be los...

Page 41: ...able programmes The Lock System must be set to On for this function to operate If the Lock System is set to On a valid password must be entered when you access Auto Tuning Manual Tuning Channel Edit R...

Page 42: ...block or unblock the channel Press the GREEN button again to unblock 6 Press the MENU button to return to the previous menu press again to return to the main menu 7 Press the EXIT button to exit the...

Page 43: ...OK button Lock System Set Password Block Channel Parental Guidance On Key Lock Off Off Parental Guidance Off 4 5 6 7 8 BACK MENU EXIT 5 Press the buttons to select an age rating Off 4 18 Then press t...

Page 44: ...TV before connecting any USB storage device 2 Connect your USB storage device to the USB port of your TV If your USB device is powered by the main plug the connected devices into the mains socket and...

Page 45: ...le press the RED button to enter the Sub Menu and then press the button to confirm 5 Press the OK button to display the function bar Press the buttons and then press the OK button to select the functi...

Page 46: ...the button to confirm 3 Press the buttons to select your storage device and then press the OK button Some audio file formats will not be supported Supported file formats mp3 5 The music information Al...

Page 47: ...OK button to select the function Pause FB FF Prev Next Stop Repeat Repeat All Repeat Off Repeat 1 Set A Playlist Info Aspect Ratio 6 Press the EXIT button to return to the previous menu 3 Press the b...

Page 48: ...ay the function bar Press the buttons and then press the OK button to select the function Prev page Next page Prev Next Stop Music Playlist Info 6 Press the EXIT button to return to the previous menu...

Page 49: ...tons to select your recorded programme and then press the OK button The programme will start to play If you want to delete the file press the RED button to enter the Sub Menu and then press the button...

Page 50: ...Do not attach paper or tape to the disc Playback side Cleaning Discs Fingerprints and dust on the disc cause picture and sound deterioration Wipe the disc from the centre outwards with a soft cloth Al...

Page 51: ...er five minutes No or poor colour or poor picture Adjust the settings in the PICTURE menu Try another channel The problem may be caused by the broadcaster Check if the video cables are connected prope...

Page 52: ...my digital picture In most cases blocking is caused by a reception problem either the signal is too weak or there is some kind of interference Talk to your retailer or contact your local aerial insta...

Page 53: ...0 576P 720 x 576 720P 1280 x 720 50 60 1080I 1920 x 1080 50 60 1080P 1920 x 1080 50 60 PC Mode Please check the display settings of your computer before connecting to the TV If the display setting of...

Page 54: ...Power Consumption In HOME STANDBY mode 35W 0 5W Average Annual Energy Consumption 51 1 kWh annum Standby Power Consumption 0 5W Operating Temperature 0 C 50 C Operating Humidity 10 80 Mercury Content...

Page 55: ...55 L32HED13A_IB indd 55 22 01 2014 11 22...

Page 56: ...Restriction on Use Rovi Trade Mark Rights Use of the copyright protection technology contained in this product must be authorised by Rovi Corporation and is intended for home and other limited viewin...

Reviews: