background image

NOTE: If you require a replacement for any of the items listed below, please quote their corresponding 
part numbers:

Replacement Part

Part Number

Grill Rack

251511701721

Glass Turntable Plate

262100500004

Turntable Support

262200200018

DSG Retail Ltd • Maylands Avenue • Hemel Hempstead 

Herts • HP2 7TG • England

This symbol on the product or in the instructions means that your 
electrical and electronic equipment should be disposed at the end 
of its life separately from your household waste. There are separate 
collection systems for recycling in the EU.
For more information, please contact the local authority or your 
retailer where you purchased the product.

(P.N.: 261800307210)

Visit Partmaster.co.uk today for the easiest way to buy 

electrical spares and accessories. With over 1 million 
spares and accessories available we can deliver direct 

to your door the very next day. Visit www.partmaster.co.uk or call 0844 800 3456 (UK 
customers only) Calls charged at National Rate.

DSG Retail Limited is responsible for after sales service.

If you have a query about the product please contact our product support line 0844 561 6263 
(Currys).

Summary of Contents for L20GSS11

Page 1: ...20 Litre Stainless Steel Microwave with Grill Instruction Manual L20GSS11 ...

Page 2: ......

Page 3: ...crowave 11 Clock Setting 12 Setting the Child Lock 13 Microwave Cooking 14 Grill or Combination Cooking 15 Two Stage Cooking 17 Delay Start Cooking Programme Set in Advance 18 Auto Cooking 19 Auto Menu 19 Auto Menu Table 20 Defrosting 21 Defrost by Weight 21 Defrost by Time 21 Quick Start Cooking 22 Querying the Cooking Function 23 To find out the current cooking setting 23 To find out the preset ...

Page 4: ...irm Clock Pre Set Stop Clear T i m e Weight Auto M e n u Thank youfor purchasing your new Logik Microwave These operating instructions will help you use it properly and safely We recommend that you spend some time reading this instruction manual in order that you fully understand all the operational features it offers Read all the safety instructions carefully before use and keep this instruction ...

Page 5: ...ep out of the reach of babies and young children 3 Plug your microwave into a standard household electrical socket Avoid using a socket that also has an adaptor and other equipment plugged in Do not use a multi adaptor 4 Put the turntable support inside the microwave and place the glass turntable plate on top of the support The turntable support is shaped to sit securely on the spindle You must al...

Page 6: ...n deboned Meat and poultry which is cooked for 15 minutes or more will brown lightly in it s own fat Anything cooked for a shorter time can be brushed with a browning sauce to give an appetising colour Strips of aluminium foil can be used to cover the thinner pieces of food to stop them overcooking before the thicker parts of the food have had a chance to cook Use the aluminium foil sparingly and ...

Page 7: ...s through aluminium foil but provided you keep the aluminium foil away from the side of the microwave it will not cause sparks and there will not be any damage to your microwave Using aluminium foil is a good way of shielding parts of food that you do not want to cook as quickly as others perhaps where the food is narrower and would otherwise overcook Place the aluminium foil over the area you wan...

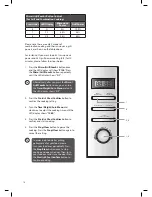
Page 8: ...ERAL TIMES 3 Place on a microwaveable plate 4 Heat on full power 5 Turn halfway through heating Heating Category Wattage IEC705 B D 650W 750W Full power in minutes 3 2 5 3 2 5 Turn Turn Turn Full power in minutes 4 3 5 4 3 5 Standing time in minutes 1 1 1 1 Microwave Heating Categories Your microwave has been tested and labelled to meet the government s voluntary agreement on the reheating of pre ...

Page 9: ... door Condensation As the steam cools you may find that condensation gathers in small pools inside your microwave and on the work surface beneath the door and vents Always dry the microwave after cooking foods with a high moisture content Your microwave is designed to let steam escape from the vents and around the door without microwave energy escaping There is no danger of microwave energy escapi...

Page 10: ...microwave grill and combination function Clock Pre Set Button Use this button to set the clock and preset cooking time Stop Clear Button Use this button to stop cooking and cancel cooking settings Start 30Sec Confirm Button Use this button to quick start cooking of 30 seconds increase cooking time by 30 seconds by each press or confirm cooking settings Weight Time Defrost Button Use this button to...

Page 11: ... 6 When the cooking cycle has finished the water should be hot be careful when you take the cup out of the microwave Press the Stop Clear button to clear any settings Micro Grill Combi Weight Time Defrost Start 30Sec Confirm Clock Pre Set Stop Clear T i m e Weight Auto M e n u 4 6 5 Micro Grill Comb i Weight Time Defrost Start 30Sec Co nfirm Clock Pre Set Stop Clear T i m e Weight Auto M e n u Che...

Page 12: ...ll start flashing and the time will illuminate to confirm that the clock setting is complete This is a 24 hour clock When the microwave is connected to the mains power for the first time or when the power is resumed after a power interruption the LED display will show 0 00 To re set the clock simply follow the above 5 steps In the process of clock setting if the Stop Clear button is pressed or if ...

Page 13: ...ss the Stop Clear button for 5 seconds and a long tone will sound The LED display will show to indicate that the microwave has set the child lock 2 To release the child lock press the Stop Clear button again for 5 seconds and a long tone will sound to indicate that the microwave has released the child lock Micro Grill Combi Weight Time Defrost Start 30Sec Confirm Clock Pre Set Stop Clear T i m e W...

Page 14: ...ill Combi button once you can turn the Time Weight Auto Menu dial until the LED display shows P80 2 Press the Start 30Sec Confirm button to confirm the microwave power level 3 Turn the Time Weight Auto Menu dial clockwise to adjust the cooking time until the LED display shows 20 00 4 Press the Start 30Sec Confirm button to confirm and start cooking 5 Press the Stop Clear button to pause the cookin...

Page 15: ...y after you press the Micro Grill Combi button once you can turn the Time Weight Auto Menu dial until the LED display shows G Alternatively after you press the Micro Grill Combi button once you can turn the Time Weight Auto Menu dial until the LED display shows C 1 or C 2 2 Press the Start 30Sec Confirm button to confirm the grill cooking setting 3 Turn the Time Weight Auto Menu dial clockwise to ...

Page 16: ...ease turn your food over periodically Press the Stop Clear button once to stop cooking and open the door Then turn your food over and close the door Press the Start 30Sec Confirm button to continue cooking Alternatively after you press the Micro Grill Combi button once you can turn the Time Weight Auto Menu dial until the LED display shows C 1 2 Press the Start 30Sec Confirm button to confirm the ...

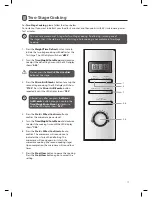
Page 17: ...ge cooking The LED display will show P100 Press the Micro Grill Combi button repeatedly until the LED display shows P80 4 Press the Start 30Sec Confirm button to confirm the microwave power level 5 Turn the Time Weight Auto Menu dial clockwise to adjust the cooking time until the LED display shows 7 00 6 Press the Start 30Sec Confirm button to confirm The microwave will sound once to indicate it h...

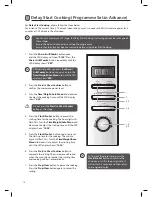
Page 18: ... starting time for the cooking The hour digits will flash first Turn the Time Weight Auto Menu dial clockwise to adjust the starting time until the LED display shows 13 00 5 Press the Clock Pre Set button again to preset the starting time for the cooking The minute digits will flash first Turn the Time Weight Auto Menu dial clockwise to adjust the starting time until the LED display shows 13 30 6 ...

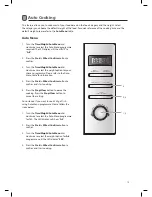
Page 19: ...Auto Menu table for information 4 Press the Start 30Sec Confirm button to confirm and start cooking 5 Press the Stop Clear button to pause the cooking Press the Stop Clear button to cancel the setting For instance If you want to cook 350g of fish using Auto Menu programme Please follow the steps below 1 Turn the Time Weight Auto Menu dial clockwise to select the Auto Menu programme for fish The LE...

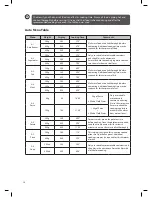
Page 20: ...fish 350g 350 5 00 450g 450 7 00 A 4 Meat 250g 250 4 00 Make sure food is cooked thoroughly before consuming Additional cooking time may be required for thicker pieces of meat 350g 350 5 30 450g 450 6 30 A 5 Pasta 50g 50 18 00 50g of Pasta 450ml of Cold Water Only use suitable microwavable containers and cling film in the microwave Ensure to check the cooking regularly to make sure the water does ...

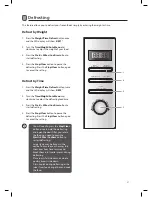
Page 21: ...djust the defrosting leadtime 3 Press the Start 30Sec Confirm button to start defrosting 4 Press the Stop Clear button to pause the defrosting Press the Stop Clear button again to cancel the setting You will need to press the Stop Clear button once to hold the defrosting and open the door After you rotate the food you need to press the Start 30Sec Confirm button to restart defrosting Large items m...

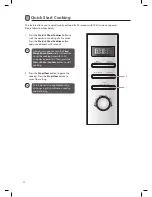
Page 22: ...nds Alternatively you can turn the Time Weight Auto Menu dial anti clockwise to set the cooking time with 100 microwave power first Then press the Start 30Sec Confirm button to start cooking Micro Grill Combi Weight Time Defrost Start 30Sec Confirm Clock Pre Set Stop Clear T i m e Weight Auto M e n u 1 2 This feature is also applicable during microwave grill combination cooking and defrosting 2 Pr...

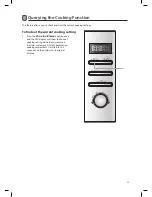
Page 23: ...e Micro Grill Combi button once and the LED display will show the current cooking setting while the microwave is in either microwave Grill or Combination cooking respectively It will last for 2 3 seconds and then return to its original display Micro Grill Combi Weight Time Defrost Start 30Sec Confirm Clock Pre Set Stop Clear T i m e Weight Auto M e n u 1 ...

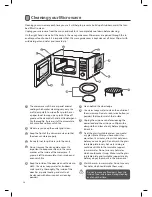
Page 24: ... left to accumulate it can smoke and even catch fire 5 Keep the inside of the door clean with a damp cloth Use warm soapy water for stubborn marks and dry thoroughly The inside of the door has a special coating and must not be cleaned with abrasive pads or cleaning powders 6 Clean behind the door ledge 7 Treat the glass turntable plate as you would any glass plate After you have used it for more t...

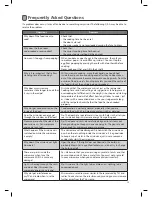
Page 25: ... Why do I get condensation on the inside of the door Condensation is perfectly normal especially when you are cooking food with a high moisture content such as potatoes Does the microwave energy get through the window on the door No The door has a special metal screen with holes in that lets you see inside but stops microwave energy from getting out Steam comes out of the side of the door and vent...

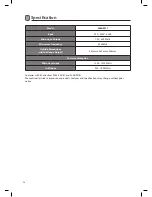
Page 26: ...50MHz Outside Dimensions width x deep x height 440mm x 362mm x 258mm Power consumption Microwave Input 1200 1270 Watts Grill Input 950 1000 Watts Complies with EC directives 2004 108 EC and 2006 95 EC We continually strive to improve our products Features and specifications may change without prior notice ...

Page 27: ...emoval of a cover that gives protection against exposure to microwave energy WARNING If the door or door seals are damaged the microwave must not be operated until it has been repaired by a qualified technician If smoke is observed switch off or unplug the microwave and keep the door closed in order to stifle any flames If the mains cable is damaged it must be replaced by a service agent or a qual...

Page 28: ...ower Unplug the microwave from the mains power First Aid Treat scalding by Quickly placing the scald under cold running water for at least 10 minutes Cover with a clean dry dressing Do not use creams oils or lotions Cleaning your Microwave The microwave should be cleaned regularly and food deposits removed Failure to maintain the microwave in a clean condition can affect the life of the microwave ...

Page 29: ...tainers WARNING Pressure will build up in sealed containers and can cause them to explode Therefore do not use the following in your microwave Sealed containers Capped bottles Vacuum containers Sealed jars Hard boiled eggs Eggs in their shells Nuts Always pierce the skin of fruit and vegetables such as potatoes Never use scratched cracked or damaged glass in a microwave Damaged glass can explode W...

Page 30: ...rom your household waste There are separate collection systems for recycling in the EU For more information please contact the local authority or your retailer where you purchased the product P N 261800307210 Visit Partmaster co uk today for the easiest way to buy electrical spares and accessories With over 1 million spares and accessories available we can deliver direct to your door the very next...

Page 31: ......

Page 32: ......
Reviews: