background image

4

Safety Warnings 

•  Read all the instructions carefully 

before using the unit and keep 

them for future reference.

•  Retain the manual. If you pass the 

unit onto a third party make sure 

to include this manual.

•  Check that the voltage marked 

on the rating label matches your 

mains voltage.

Damage
•  Please inspect the unit for 

damage after unpacking.

•  Do not continue to operate the 

unit if you are in any doubt about 

it working normally, or if it is 

damaged in any way - switch off, 

unplug from the mains socket 

and consult your dealer.

Temperature
•  Avoid extreme degrees of 

temperature, either hot or cold. 

Place the unift well away from 

heat sources such as radiators or 

gas / electric fires.

•  Avoid exposure to direct sunlight 

and other sources of heat.

•  The use of apparatus in moderate 

climates.

Naked Flames
•  Never place any type of candle 

or naked flame on the top of or 

near the unit.

Moisture
•  To reduce the risk of fire, electric 

shock or product damage, do not 

expose this unit to rain, moisture, 

dripping or splashing. No objects 

filled with liquids, such as vases, 

should be placed on the unit. Do 

not operate the unit with wet 

hands, near water or other liquid.

•  If you spill any liquid into the 

unit, it can cause serious damage. 

Switch it off at the mains 

immediately. Withdraw the mains 

plug and consult your dealer.

Safety
•  Always disconnect the unit 

from the mains supply before 

connecting / disconnecting other 

devices or moving the unit.

•  Unplug the unit from the mains 

socket during a lightning storm.

•  In the interests of safety and 

to avoid unnecessary energy 

consumption, never leave the unit 

switched on while unattended 

for long periods of time, e.g. 

overnight, while on holiday or 

while out of the house. Switch it 

off and disconnect the mains plug 

from the mains socket.

Interference
•  Do not place the unit on or near 

appliances which may cause 

electromagnetic interference. If 

you do, it may adversely affect the 

L1PERCD20_IB_Final200410.indd   4

14/04/2020   11:12

Summary of Contents for L1PERCD20

Page 1: ...CD player Instruction Manual L1PERCD20 L1PERCD20_IB_Final200410 indd 1 14 04 2020 11 12 ...

Page 2: ...L1PERCD20_IB_Final200410 indd 2 14 04 2020 11 12 ...

Page 3: ...ting to a Sound System Component 11 Listening with the Earphones 11 Operation 12 Inserting CD 12 Playing CD 12 Removing CD 12 Other Functions 13 Folder function operation 13 Repeat 14 Play Tracks in the order you want Program Play 14 A B Repeat Playback 14 Electronic Shock Protection 15 To Increase the Bass 15 Hold Function Key Lock 15 Maintenance 16 Hints and Tips 17 Specifications 18 L1PERCD20_I...

Page 4: ...oisture To reduce the risk of fire electric shock or product damage do not expose this unit to rain moisture dripping or splashing No objects filled with liquids such as vases should be placed on the unit Do not operate the unit with wet hands near water or other liquid If you spill any liquid into the unit it can cause serious damage Switch it off at the mains immediately Withdraw the mains plug ...

Page 5: ...ices may affect the performance of the unit CAUTION RISK OF ELECTRIC SHOCK DO NOT OPEN CLASS 1 LASER PRODUCT The lightning flash with arrowhead symbol within an equilateral triangle is intended to alert the user to the presence of uninsulated dangerous voltage within the unit s enclosure that may be of sufficient magnitude to constitute a risk of electric shock The exclamation point within an equi...

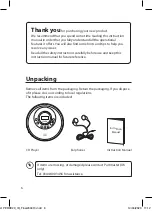
Page 6: ...duct We recommend that you spend some time reading this instruction manual in order that you fully understand all the operational features it offers You will also find some hints and tips to help you resolve any issues Read all the safety instructions carefully before use and keep this instruction manual for future reference If items are missing or damaged please contact Partmaster UK only Tel 034...

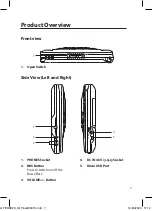
Page 7: ...et 2 BBS Button Press to switch on off the Bass effect 3 VOLUME Button OPEN PHONES BBS VOLUME DC IN 4 5V USB 1 2 1 3 4 5 1 Open Switch 4 DC IN 4 5V Socket 5 Micro USB Port Side View Left and Right L1PERCD20_IB_Final200410 indd 7 14 04 2020 11 12 ...

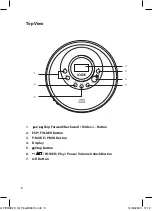
Page 8: ...ckward Folder Button 2 ESP FOLDER Button 3 P MODE PROG Button 4 Display 5 Stop Button 6 POWER Play Pause Volume Unlock Button 7 A B Button FOLDER ESP 6 7 5 4 2 1 3 Top View L1PERCD20_IB_Final200410 indd 8 14 04 2020 11 12 ...

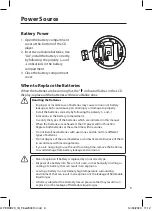
Page 9: ...anual When the batteries are exhausted the CD player will not function Replace both batteries at the same time with new ones Do not install new batteries with used ones and do not mix different types of batteries Do not dispose of the used batteries as domestic waste Dispose of them in accordance with local regulations If you are not going to use the unit for a long time remove the batteries to av...

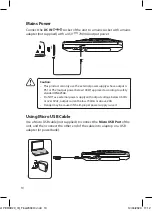
Page 10: ... then connect the other end of the cable into a laptop or a USB adapter or powerbank Caution This product can only use the external power supply whose output is PS1 or PS2 output power below 100W approved according to safety standard EN62368 Do NOT use external power supply with output voltage below 4 5Vdc or over 5Vdc output current below 700mA or above 20A Danger may be caused if the improper po...

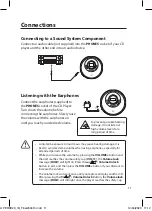
Page 11: ...t to avoid extreme volume when using earphones especially for extended periods of time While you increase the volume by pressing the VOLUME button and the unit reaches the volume safety cap VOL 11 the Volume lock message HOLD will light on Press the Volume Unlock Button to exit and then press the VOLUME button if you still want to increase the volume The volume lock will work once until you replac...

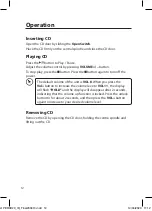
Page 12: ... The default volume of the unit is VOL 8 When you press the Vol button to increase the volume leve to VOL 11 the display will flash HOLD and the display will disappear after 2 seconds indicating that the volume up function is locked Press the unlock button to for about 2 seconds and then press the VOL button again to increase to your desired volume level Removing CD Remove the CD by opening the CD...

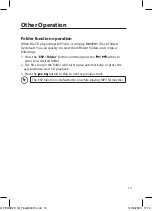
Page 13: ...songs as followings 1 Press the ESP Folder button and then press the button to enter your desired folder 2 The first song in the folder will start to play automatically or press the button to start CD playback 3 Press the button to skip to next or previous track The ESP function is defaulted to on while playing MP3 format disc L1PERCD20_IB_Final200410 indd 13 14 04 2020 11 12 ...

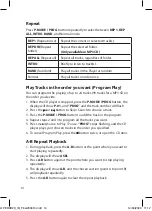
Page 14: ...w P 01 and PROG and the track number will flash 2 Press the or button to Skip Search to choose a track 3 Press the P MODE PROG button to add the track in the program 4 Repeat steps 2 and 3 to program all the tracks you want 5 Press the button to Play Pause PROG stops flashing and the CD player plays your chosen tracks in the order you specified 6 To cancel Program Play press the button twice or op...

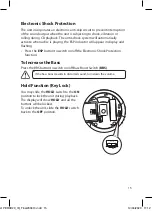
Page 15: ...hing Press the ESP button to switch on off the Electronic Shock Protection function To Increase the Bass Press the BBS button to switch on off Bass Boost Switch BBS If the bass boost results in distorted sound turn down the volume Hold Function Key Lock You may slide the HOLD switch to the ON position to lock the unit during playback The display will show HOLD and all the buttons will be locked To...

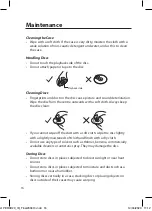
Page 16: ...clean Playback side If you cannot wipe off the dust with a soft cloth wipe the disc lightly with a slightly moistened soft cloth and finish with a dry cloth Do not use any type of solvent such as thinner benzine commercially available cleaners or antistatic spray They may damage the disc Storing Discs Do not store discs in places subjected to direct sunlight or near heat sources Do not store discs...

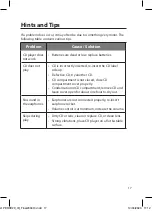
Page 17: ...fective CD try another CD CD compartment is not closed close CD compartment cover properly Condensation in CD compartment remove CD and leave cover open for about one hour to dry out No sound in the earphones Earphones are not connected properly re insert earphone socket Volume control is at minimum increase the volume Skips during play Dirty CD or lens clean or replace CD or clean lens Strong vib...

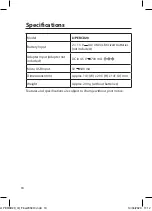
Page 18: ...cluded Adapter Input Adapter not included DC in 4 5 V 700 mA Micro USB Input 5V 500 mA Dimensions mm Approx 141 W x 29 5 H x 141 D mm Weight Approx 200 g without batteries Features and specifications are subject to change without prior notice L1PERCD20_IB_Final200410 indd 18 14 04 2020 11 12 ...

Page 19: ...equipment The separate collection and recycling of your waste equipment at the time of disposal will help conserve natural resources and ensure that it is recycled in a manner that protects human health and the environment For more information about where you can drop off your waste for recycling please contact your local authority or where you purchased your product Notes for battery disposal The...

Page 20: ...G Retail Ltd co no 504877 1 Portal Way London W3 6RS UK EU Representative DSG Retail Ireland Ltd 259460 3rd Floor Office Suite Omni Park SC Santry Dublin 9 Republic of Ireland L1PERCD20_IB_Final200410 indd 20 14 04 2020 11 12 ...

Reviews: