background image

33

GB

U

sing
 the
 Fea

tur

es

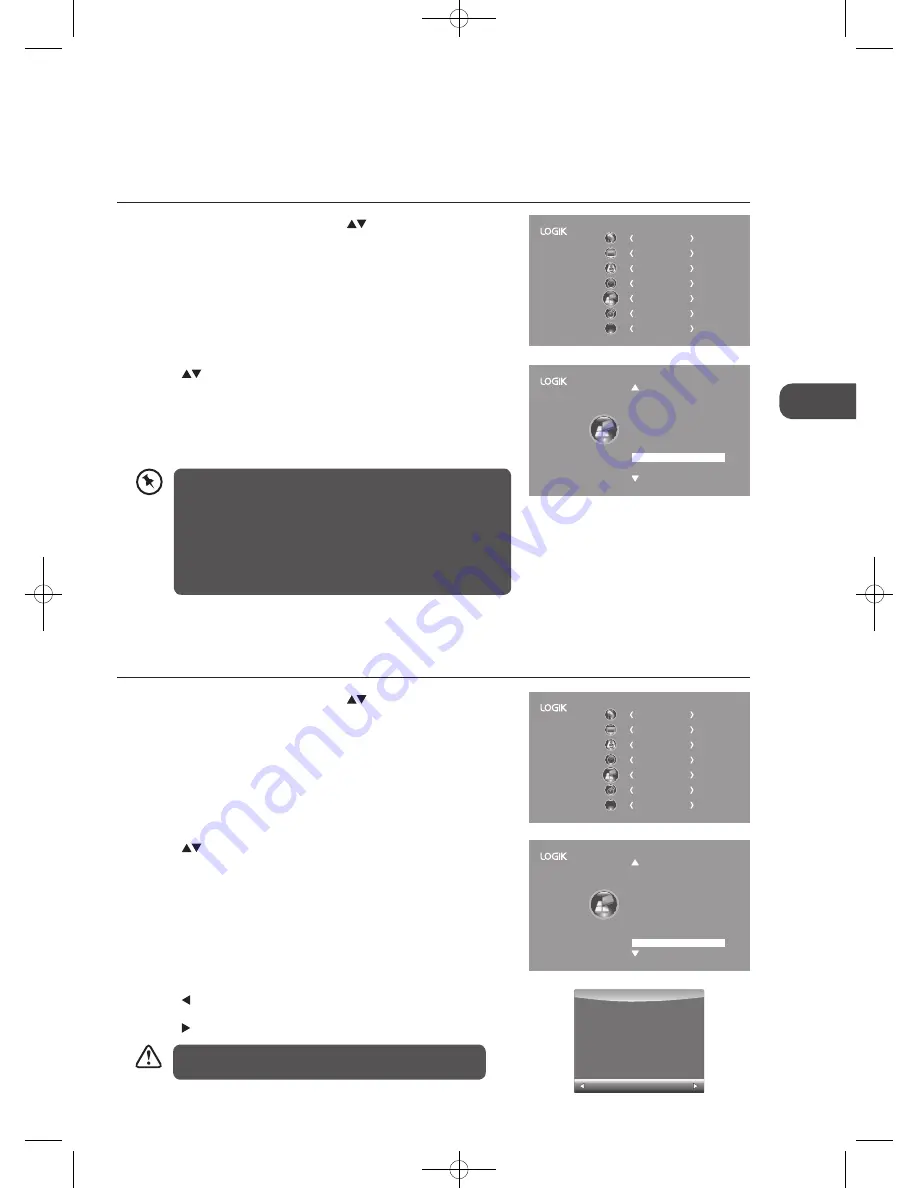
2.. Press the 

 buttons to select CEC and then press the OK button to 

select On./.Off.

3.. Press the BACK button to return to the previous menu or press the 

MENU button to return back to the main menu.

4.. Press the EXIT button to exit the menu.

CEC.(Consumer.Electronics.Control)

Allows you to command and control two or more CEC-enabled devices, that are connected through HDMI, by using only one of 
the TV remote controls (e.g. controlling a TV set, set-top box and DVD player using only the remote control of the TV). CEC also 
allows individual CEC-enabled devices to command and control each other without user intervention.

1.. Press the MENU button and then press the 

 buttons to select the 

OPTION menu and then press the OK button.

OSD Language
Audio Language

Hearing Impaired
Country
PVR File System

CEC Off

Restore Factory Default

Subtitle Language

CHANNEL


PICTURE

SOUND

TIME

OPTION

LOCK

EXIT

EXIT

Restore.Factory.Default

Restores all settings to the factory defaults.

1.. Press the MENU button and then press the 

 buttons to select the 

OPTION menu and then press the OK button.

CHANNEL


PICTURE

SOUND

TIME

OPTION

LOCK

EXIT

EXIT

3.. Press the   button to select “Yes”. The TV will turn off and restart after a 

few seconds. 
Press the   button to select "No" to cancel and return to the main menu.

2.. Press the 

 buttons to select Restore.Factory.Default and then press 

the OK button.

Hearing Impaired

PVR File System
CEC

Restore Factory Default

OSD Language
Audio Language

Country

Subtitle Language

Yes

                            No

Are you sure?

•  This unit can only communicate with HDMI-CEC compatible 

devices.

•  To be sure that the HDMI-CEC device has this feature, check to 

see if there is HDMI-CEC compatible logo on it.

•  You can connect to the HDMI-CEC device using a HDMI cable. 

Some HDMI cables may not support HDMI-CEC functions.

•  HDMI-CEC function only works when the AV device supporting 

CEC is turned on.

All channel and user settings will be lost and the TV will 
revert to "First Time Installation".

L19DIGB11_IB_110315_Annie.indd   33

11年3月15日   上午11:33

Summary of Contents for L19DIGB11

Page 1: ...19 HD Ready Digital LCD TV Instruction Manual L19DIGB11 L19DIGB11_IB_110315_Annie indd 1 11 3 15 11 32...

Page 2: ...L19DIGB11_IB_110315_Annie indd 2 11 3 15 11 32...

Page 3: ...Channel Information 18 Volume Adjustment 18 Using the Features 19 Customising the Channel Setting TV DTV or Radio Mode 19 Auto Tuning 19 DTV Manual Tuning 20 ATV Manual Tuning 20 Channel Edit ATV DTV...

Page 4: ...via USB Port 41 My Photo 41 My Music 41 My Movie 42 My Text 43 PVR Personal Video Recorder 44 DVR Digital Video Recorder 44 Time Shift Function 44 Recording DTV Programme onto a USB Storage Device 44...

Page 5: ...Logik 19 HD Ready Digital LCD TV Your new TV has many features and incorporates the latest technology to enhance your viewing experience We recommend that you spend some time reading this instruction...

Page 6: ...ge 13 16 for details before mounting on to the wall screw unscrew Installing Removing the Base Stand Screws x 3 P N xxxxxxxxxxx 100 mm 100 mm Four mounting holes size M4x12 screw Please read this inst...

Page 7: ...select among different input signal sources DTV ATV SCART YPbPr PC HDMI AV DMP Confirmed the selection on OSD menu 4 MENU Displays the OSD on screen display menu 5 CH Press to select a channel or sel...

Page 8: ...the insertion of a Common Access Module Refer to page 23 for details 6 VIDEO AUDIO L R To connect to the Composite VIDEO and AUDIO L R output sockets on external video devices 7 Y PB PR AUDIO L R To...

Page 9: ...tery type indicated in this manual When the batteries are exhausted the remote will not function Replace both batteries at the same time with new ones Do not install new batteries with used ones and d...

Page 10: ...n various formats Auto 4 3 16 9 Zoom Subtitle Smart Zoom 12 GUIDE Displays the EPG electronic Programme guide DTV mode TITLE Displays the DVD title content DVD mode 13 P MODE Select picture mode Stand...

Page 11: ...itles on the DVD DVD mode 25 REC Record the current programme DTV mode ZOOM Zoom in on the displayed frame DVD mode 26 Allows you to navigate the DVD menu and adjust the system settings to your prefer...

Page 12: ...e playback rapidly INDEX To select the page number of the index from teletext ATV mode 35 Coloured buttons Access the TELETEXT items or channel edit when using Digital Freeview TV Channels ATV DTV mod...

Page 13: ...tton to confirm Making Video and Audio Connections Not all AV devices have the ability to connect to a TV please refer to the owner s manual of your AV device for compatibility and connection procedur...

Page 14: ...ket 2 Plug the connected devices into the mains socket before switching on the TV 3 Press the button on the side panel of the TV or on the remote control to turn on your TV 4 Press the INPUT button to...

Page 15: ...T input socket to an external AV device s SCART output socket 2 Plug the connected devices into the mains socket before switching on the TV 3 Press the button on the side panel of the TV or on the rem...

Page 16: ...ed make sure its mains adapter is connected to the mains supply If a USB hub is used make sure its mains adapter is connected to the mains supply as the total current consumption may exceed 500mA The...

Page 17: ...anguage OK Magyar Nederlands Norsk Polski English Cesky E k Espanol Fran ais Portugues Pycck France Greece UK Australia Austria Czech Denmark Finland Country OK Belgium Bulgaria Croatia Hungary Italy...

Page 18: ...lected channel If a blocked channel is selected the password screen will be displayed Press the 0 9 buttons to enter the password the channel will then be unlocked refer to page 21 22 for details on C...

Page 19: ...the button and then press the buttons to select the country where you will operate the TV Press the OK button to confirm 2 Press the buttons to select Auto Tuning and then press the OK button Customi...

Page 20: ...DTV mode 1 Press the MENU button and then press the buttons to select the CHANNEL menu and then press the OK button CHANNEL PICTURE SOUND TIME OPTION LOCK EXIT EXIT CHANNEL PICTURE SOUND TIME OPTION L...

Page 21: ...nual fine tuning adjustments Frequency Displays the current tuned frequency 4 After finishing the manual tuning adjustment of a channel press the RED button to save your channel before tuning the next...

Page 22: ...T button to exit the menu 3 Press the BACK button to return to the previous menu or press the MENU button to return back to the main menu 4 Press the EXIT button to exit the menu Signal Information DT...

Page 23: ...t the CHANNEL menu and then press the OK button 2 Press the buttons to select CI Information and then press the OK button CI Common Interface DTV Mode The common interface allows the use of a Common A...

Page 24: ...to ignore this upgrade EXIT Download 20 Software Update OAD 71 6 If you select Yes the over air download will start Press the EXIT button if you want to stop the download and exit the menu 7 When the...

Page 25: ...r mode Sharpness Adjusts the level of crispness in the edges between light and dark areas of the picture for User mode Tint For NTSC format Adjusts the balance between red and green levels Tint is onl...

Page 26: ...you to zoom in the picture without any alternation while filling the entire screen with subtitles shown at the bottom of the screen This selection will allow you to zoom in the picture without any al...

Page 27: ...eveloped by SRS Labs that provides an enhanced listening experience unlike any other technology that has been offered for a two speaker playback environment TruSurround HD builds upon its predecessor...

Page 28: ...D button In mono reception the clarity of sound is improved To switch back to stereo press the AD button again Language selection for dual language broadcast If a programme can be received in two lang...

Page 29: ...egins to count down from the number of minutes selected Alternative 1 You may press the SLEEP button repeatedly to select the number of minutes OFF 10 20 180 240 min directly 2 To cancel the sleep tim...

Page 30: ...he Primary Secondary Audio Language Press the button and then press the buttons to select your desired audio language Press the OK button to confirm 4 Press the BACK button to return to the previous m...

Page 31: ...then press the OK button to select On Off 3 Press the BACK button to return to the previous menu or press the MENU button to return back to the main menu 4 Press the EXIT button to exit the menu Hear...

Page 32: ...Warning All data will be lost Start Exit Format disk Format disk File System Size PVR File System Type PVR File System Size Duration 104 Mins FAT32 All MENU Do not unplug USB device Formatting please...

Page 33: ...EXIT Restore Factory Default Restores all settings to the factory defaults 1 Press the MENU button and then press the buttons to select the OPTION menu and then press the OK button CHANNEL PICTURE SOU...

Page 34: ...n press the buttons to select the LOCK menu and then press the OK button CHANNEL PICTURE SOUND TIME OPTION LOCK EXIT EXIT Lock System Set Password Block Channel Parental Guidance Off 4 Press the butto...

Page 35: ...s to select Lock System and then press the OK button 5 Use the 0 9 buttons to input the old password and then input the new 4 digit password Re enter new password for confirmation 4 Press the buttons...

Page 36: ...lock the programme Press the GREEN button again to unblock 6 Press the MENU button once to return to the previous menu Press the MENU button again to return back to the main menu 7 Press the EXIT butt...

Page 37: ...you to set up blocking schemes to block specific channels and ratings This TV is programmed to remember which option it was last set to even if you switch the TV off When a programme is locked or rat...

Page 38: ...erimposed over the TV programme Press the MIX button again to return to the text page Double height text If you have difficulty reading the text on the TV you can double the height of the text Press t...

Page 39: ...ramme Guide EPG to help you navigate through all the possible viewing options The EPG supplies information such as programme listings start and end times for all available services In addition detaile...

Page 40: ...turn to the EPG BLUE Remind Press the BLUE button while on the selected programme the Reminder setting menu will be displayed Press the buttons to adjust the settings and then press the OK button to c...

Page 41: ...T button to return back to the previous menu 3 Press the buttons to select your storage device and then press the OK button My Music 1 Press the INPUT button then press the buttons to select the DMP m...

Page 42: ...tton then press the buttons to select the DMP mode and then press the OK button 2 Press the buttons to select MOVIE and then press the OK button 5 Press the buttons to navigate in the music folder Sel...

Page 43: ...ton to select the function Prev page Next page Prev Next Stop Music Playlist Info 6 Press the EXIT button to return back to the previous menu 3 Press the buttons to select your storage device and then...

Page 44: ...rently watching 2 Press the REC button again the recording progress bar will disappear 3 Press the Stop button to stop recording Recording will stop automatically when the disk is full The PVR Time Sh...

Page 45: ...3 After finishing all the recorder adjustments press the OK button to confirm your settings Timer Programming This function is used to perform scheduled recording 1 Press the GUIDE button on the remo...

Page 46: ...dy INDEX SORT Programme 3 Press the buttons to select your storage device and then press the OK button Method 2 1 Press the INPUT button then press the buttons to select the DMP mode and then press th...

Page 47: ...ct your recorded programme and then press the PLAY button to view 5 Press the i button to display the function bar 6 Press the buttons and then press the OK button to select the function Pause FB FF P...

Page 48: ...witching on your TV The remote control does not work Check to see if there are any objects between the TV and the remote control causing an obstruction Ensure that you are pointing the remote control...

Page 49: ...al box or TV Don t worry it easy to do And once you ve done it you should get all the Freeview channels available to you If problems persist you may need to get your aerial checked Talk to your retail...

Page 50: ...0 x 576 50 576P 720 x 576 720P 1280 x 720 50 60 1080I 1920 x 1080 50 60 1080P 1920 x 1080 50 60 VGA Mode Please check the display settings of your computer before connecting to the TV If the display s...

Page 51: ...DK SEACAM L BG DK Brightness 250 cd m2 Contrast Ratio 1000 1 Inputs Output SCART 1 HDMI 1 VGA 1 PC AUDIO 1 YPbPr 1 Common Interface 1 AV 1 USB 1 Aerial 1 Speaker Power 3 W 3 W Power Source 100 240V 50...

Page 52: ...moving the unit Unplug the unit from the mains socket during a lightning storm Mains Cable Make sure the unit or unit stand is not resting on top of the mains cable as the weight of the unit may damag...

Page 53: ...yone especially children push anything into the holes slots or any other openings in the case this could result in a fatal electric shock CAUTION RISK OF ELECTRIC SHOCK DO NOT OPEN The lightning flash...

Page 54: ...ly are prohibited Restriction on Use Rovi Trade Mark Rights Use of the copyright protection technology contained in this product must be authorised by Rovi Corporation and is intended for home and oth...

Page 55: ...L19DIGB11_IB_110315_Annie indd 55 11 3 15 11 33...

Page 56: ...L19DIGB11_IB_110315_Annie indd 56 11 3 15 11 33...

Reviews: