background image

7

INSTALLING THE 

KB3D.EXE

 UTILITY PROGRAM

The first step in using the 

KB3D.EXE

 utility program is to copy the

program to your hard drive.

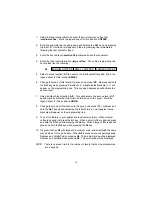
1.

Insert the KB3000 utility software into drive A or B.

2.

Type MD KB3 at the “C>“ prompt to make a directory named KB3.

3.

Type CD KB3 to make the KB3 directory active.

4.

Type COPY A:*.*   If the disk was inserted into drive A then all files

will be copied into the hard drive’s directory (KB3).  If drive B is used
then you must type COPY B:*.*

STARTING THE 

KB3D.EXE

 PROGRAM

This program can be used with or without the keypad being attached to the
computer.  

Note that the PC must be booted up in DOS before starting

the 

program.  It will not run properly under Windows DOS prompt.

     
If the Windows version do not provide option to boot up computer in DOS,
a DOS boot up diskette created from another computer will be required to 
boot up the computer.

Refer to Windows user manuals for further details.

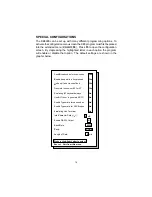
To start the program, type KB3D and press ENTER.  When the program
is up, it will automatically display the graphic screen on next page.


Summary of Contents for KB3000

Page 1: ...Model KB3000 Programmable Keypad 176 Programmable Keys USER MANUAL...

Page 2: ...and if not installed and used in accordance with this manual may cause interference to radio communications It has been tested and found to comply with the limits for a Class A digital device pursuan...

Page 3: ...INSTALLING THE KB3000 EXE UTILITY PROGRAM 7 STARTING THE KB3000 EXE PROGRAM 7 PROGRAMMING THE KB3000 KEYPAD 9 ADVANCED PROGRAMMING 10 SPECIAL FEATURES OF THE KB3000 12 INTER STRING DELAY 12 MULTI LEVE...

Page 4: ...th standard spacing of 0 75 between keys Records and plays back up to 120 alphanumeric characters per key Provides true keyboard wedge function that operates with or without the normal computer keyboa...

Page 5: ...usable legend sheet inserted under the keypad cover sheet 5 IBM 101 type legend sheet 6 User s manual KB3000 R9 1 POS keyboard Model KB3000 R9 2 Interface cable 3 RS232C Interface cable 4 Utility soft...

Page 6: ...ation then no connections are made to J5 NOTE Before making any connections it is always advisable to turn off the computer A Connecting the KB3000 to an IBM101 PC XT AT or Clone computer s keyboard p...

Page 7: ...dered from the manufacturer C Connecting the KB3001 R9 to a computer terminal 1 Connect J6 of the KB3001 R9 to a RS232 port of the computer terminal using the RS232C interface cable supplied NOTE 1 J1...

Page 8: ...o connect the KB3000 to your computer 2 Turn on your computer 3 Press the upper left corner key of the keypad intersection of Row 1 and Column A 4 The keypad is working correctly when the words LOGIC...

Page 9: ...te without entering the KB3000 EXE utility program Simply add the KB3 directory to the path statement of the autoexec bat file When you want to change the stored program simply type thedownload comman...

Page 10: ...rive B is used then you must type COPY B STARTING THE KB3D EXE PROGRAM This program can be used with or without the keypad being attached to the computer Note that the PC must be booted up in DOS befo...

Page 11: ...use NOTE The KB3000 EXE utility can be used to program any keypad manufactured by Logic Controls There will be different programming graphics for each type of keypad or keyboard 8 Alt D Delay S Separ...

Page 12: ...ic characters that can be programmed for any one key is 120 NOTE The maximum number of alphanumeric characters that can be programmed per keypad is 1856 3 Press F2 to call up the DataTransfer Menu The...

Page 13: ...and C Caps Lock changes to A Shift Func NOTE The scan code mode will only be active for this cell You must select F8 for each cell you want to program with scan code information 4 Under the scan code...

Page 14: ...sing F9 on the keyboard will change the cell s mode to ASCII code mode Changing modes in a cell that has been previously programmed will erase all the information in that cell The complete standard 10...

Page 15: ...s DEF You can use more than one delay per location and the delay can have different times 4 Exit the KB3 program by pressing F10 followed by the letter Y 5 Press the location key where the time delay...

Page 16: ...Select another blank location A8 This will become the second level shift position will activate the third level of information on the keys Mark the legend sheet for this position LARGE 8 Change the mo...

Page 17: ...ank location A8 This will become the second level shift position will activate the third level of information on the keys Mark the legend sheet for this position LARGE 8 Change the mode of this locati...

Page 18: ...e self programming information V1 2 The information to be entered into this location will be the download command plus the name of the file to be loaded into the keypad For example if you want to chan...

Page 19: ...that option The default settings are shown in the graphic below Send Break codes for scan codes Enable beep while a key pressed No beep if a key is undefined Translate to code set 2 for AT Emulating...

Page 20: ...I Enables or disables the ability to use the ALT key along with the numeric keyboard to generate ASCII codes Enable typematic for scan codes Enables or disables keys programmed with scan code informat...

Page 21: ...otocol settings must be set to mirror the application software Baud Rate This option selects 2400 4800 9600 and 19 200 baud rates Parity This option selects ODD EVEN or NO parity Length of data This o...

Page 22: ...computer s volatile RAM memory The same template can then be written W into the non volatile memory of the KB3000 This process as an example allows a restaurant to change from a breakfast menu to a lu...

Page 23: ...s Spacing Standard 0 75 inches between keys ELECTRICAL Input Voltage from comp 5VDC Current 25 ma ENVIRONMENTAL Operating Temperature 0 to 50oC Storage Temperature 20 to 70oC Relative Humidity Operati...

Page 24: ...DC 6 No Connection Requires an AT to PS 2 adapter to work with PS 2 computer J5 DIN 5F to 101 Keyboard 1 Keyboard Clock 2 Data 3 No Connection 4 Ground 5 5VDC J6 DB9F RS232C 1 DCD 2 Receive Data from...

Page 25: ......

Page 26: ......

Reviews: