9
5 Care and Maintenance
5.1 Care
Pay attention to the safety instructions in section 1.4 “For your Safety”:
Before servicing the spray applicator
– Disconnect it from the material supply and
– Release air pressure.
Otherwise ejected elements can cause danger.
To clean the applicator, spray solvent until pure solvent leaves nozzle. Do not
submerge entire applicator in solvent. At longer working interruptions it is advisable
to clean air cap and nozzle by putting these parts only into solvent. If necessary,
use soft brush. To clean small drill holes, use our special nozzle cleaning needles
(Sealing and Repair Kit 97730). Moving parts and threads should always be
greased slightly.
5.2 Changing
Nozzle
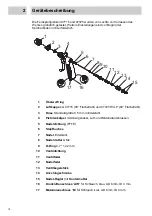
A nozzle set includes needle
7
, nozzle
3
and air cap
2
. If nozzle size is to be
changed, always change all three parts. Change the complete set also if only one of
the parts is defect.
*
•
Remove screw
14
.
•
Pull out valve spring
11
.
•
Pull out needle/valve cartridge.
•
Unscrew the protection ring
1
, remove air cap
2
.
•
Unscrew nozzle
3
.
•
Re-assemble in reverse order.
5.3 Disassembling
Valve-Needle
•
Remove screw
14
.
•
Pull out valve spring
11
.
•
Pull out needle/valve cartridge.
•
Unscrew valve lock
13
.
•
Pull out needle spring
12
.
•
Pull out needle
7
.
•
Re-assemble in reserve order.
Needle nuts
8
must be counter-screwed in such a position where “pre-“ and
“purging-air” work.
The correct position of needle nuts
8
on needle or extension needle is
8.8 – 9.0 mm from the end of the
needle and both nuts are countered
against each other firmly.
That applies also if extensions are
built-in additionally.
8.8 - 9.0 mm
.346" - .354"


