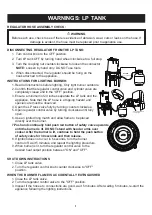
LOCO COOKERS LCPTFK Assembly Instructions & User Manual Download Page 9

WARNINGS: LP TANK

INSTRUCTIONS FOR LIGHTING BURNER:

1. Read all instructions before lighting. Only light burner outdoors.

2. Confirm that the regulator control valve and cylinder valve are

completely closed and in the “OFF” position.

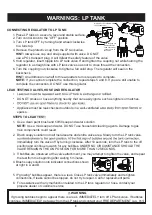
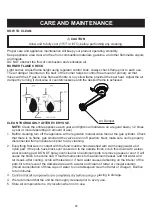
3. Ensure a minimum of 24 inches separate the LP tank and the 

appliance. Note that the LP hose is a tripping hazard and 

special care must be observed.

4. Open the LP tank valve fully by turning counter clockwise.

5. Open regulator control valve by turning clockwise until fully 

open.

6. Use an ignited long match and allow flame to be placed 

directly over the burner.

7.Push and continually hold push red button of safety valve upwards

    until the burner is lit. DO NOT stand with head or arms over

    cooker. After the burner is lit, continue to hold the push button

    of safety valve for 30 seconds and then release.   

8. If ignition does not occur in 5 seconds, turn the burner

control off, wait 5 minutes, and repeat the lighting procedure.

9. When burner is lit, turn the regulator control valve to the

    desired heat output position between "ON" and "OFF".

SHUT DOWN INSTRUCTIONS

2. Turn the regulator control knob counter clockwise to "OFF"

position.

1. Close LP tank valve.

WHEN THE BURNER FLAME IS ACCIDENTALLY EXTINGUISHED

1. Close the LP tank valve.

2. Turn the regulator control valve to the "OFF" position.

3. Inspect if the hose etc. connections are good, wait 5 minutes. After waiting 5 minutes, re-start the

appliance following the lighting instructions.

REGULATOR HOSE ASSEMBLY CHECK:

 WARNING

Before each use, check to see if there is evidence of abrasion, wear, cuts or leaks on the hose. If 

damage is evident, the hose must be replaced prior to appliance use.

DISCONNECTING REGULATOR FROM THE LP TANK:

1. Turn control knob to the OFF position.
2. Turn LP tank OFF by turning hand wheel clockwise to a full stop.
3. Turn the coupling nut counterclockwise to loosen the connector.

NOTE:

 Loosen by hand only. DO NOT use tools.

4. When disconnected, the regulator should be hung on the

hook attached to the appliance.

Push red button of 
safety valve

WARNING

Hose is a trip hazard

24”

9

Summary of Contents for LCPTFK

Page 1: ...ual for future reference READ INSTRUCTION MANUAL BEFORE ATTEMPTING TO ASSEMBLE OR OPERATE THIS PRODUCT Adult assembly required Keep screws and parts out of reach of children Customer Service 800 391 0...

Page 2: ...d always be observed Read and understand the meaning of these symbols before assembling and using this appliance SAFETY SYMBOLS DANGER Indicates a hazardous situation which if not avoided will result...

Page 3: ...7 Care and Maintenance 18 19 Warranty Information 20 NOTE Before beginning assembly of product make sure all parts are present Compare parts with package content list and hardware contents If any part...

Page 4: ...e instruction manual contains important information necessary for the proper assembly and safe use of the appliance Read and follow all warnings and instructions before assembling and using the applia...

Page 5: ...d toed shoes should always e wo n du ing ope ation o this appliance te when u T This appliance is NOT The installation must con o m with local codes o in the a sence o local codes with the National ue...

Page 6: ...for proper installation and use of the thermomet thermometer supplied with this fryer or boiler has been lost thermometer must be the one specified by the appliance manufacturer sel Overweight turkey...

Page 7: ...inder must be stored outdoors out of the reach of children NEVER store the cylinder in enclosed spaces such as a garage carport covered porch or any other structure 5 6 Storage of an appliance indoors...

Page 8: ...p and water solution NOTE Use a mild soap and water DO NOT use household cleaning agents Damage to gas train components could result 2 Brush soapy solution onto all metal seams and entire valve area S...

Page 9: ...ighting procedure 9 When burner is lit turn the regulator control valve to the desired heat output position between ON and OFF SHUT DOWN INSTRUCTIONS 2 Turn the regulator control knob counter clockwis...

Page 10: ...injur the appliance move everyone to safety and immediately contact CO2 extinguisher or preferably a Class K extinguisher Special care must be taken to understand the manufacturers instructions and be...

Page 11: ...i r c s e D t r a P 1 d i L 1 3 1 e l d n a H t e k s a B r e n i a r t S 2 1 t e k s a B r e n i a r t S NOTE Wash all parts that will come in contact with food or water with warm soapy water rinse...

Page 12: ...Q e g a m I n o i t p i r c s e D t r a P Match Lighter Burner Mounting Plate Connecting piece Heat Shield Burning system Hanger Thermometer 6 7 8 9 10 11 12 1 1 1 1 1 1 1 Poultry Stand 13 1 PARTS LIS...

Page 13: ...ttach the burner fixing plate 7 to the stand 5 with four M4 x 10 bolts BB STEP 2 Take down the nut from burner store the nut for next procedure use Put the protruding bolt on the burner through the ho...

Page 14: ...olt BB STEP 3 Put the hole on the upper of the connecting piece 8 through the protruding bolt on the burner tighten them with the nut which took down in step 3 STEP 5 Attach the match lighter 6 to the...

Page 15: ...ice from any source into the oil grease may cause overflow and severe burns from hot oil and water splatter When frying with oil grease all food products MUST be completely THAWED and towel DRIED befo...

Page 16: ...his is very important as it reduces the splattering of oil Afte r patting the turkey dry add herb rubs or seasonings to the skin Step 4 Place seasoned turkey horizontally in strainer basket Wearing pr...

Page 17: ...of Stainer basket Only use the Turkey Hanger provided with your fryer kit Use of any other item or hanger could lead to personal injury WARNING Always remove the Turkey SLOWLY from cooking vessel to a...

Page 18: ...the gas cylinder Check that there is no flame gas smell and the valves are in off position Next make sure unit is properly disconnected from propane tank prior to any cleaning 2 Everything that was i...

Page 19: ...and water in unit Ensure inside of cooking pot is completely dry before adding any liquids DANGER NEVER insert any tool or foreign object into the valve outlet or safety relief valve You may damage er...

Page 20: ...covered by this warranty This warranty shall be effective from the date of purchase as shown in the purchaser s receipt This warranty is valid for the original consumer purchaser only and excludes in...

Reviews: