Document Part # 7904-03 (Rev 022019)
Page 3 of 6
7.
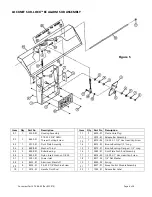
Install outside keypad (figure 1, item #11). Connect the wiring harness installed
from step 3 to the keypad. While holding the keypad against door, use the screw
holes in keypad as a guide and drill two (2) 1/8" holes in the door. Secure the
keypad to the door with the screws supplied.
8.
With the door closed, slide the latch (figure 2, item #20) over the locking rod
making sure the door latches. Holding the latch against the door frame, mark
around the outside of the latch; open the door; remove the paper backing from
the adhesive tape on the back of latch and position the latch on the door frame,
aligning it with the marks made earlier; attach the latch to the frame through the
two (2) slotted holes in latch using torx self-drilling screws. DO NOT YET TIGHTEN
SECURELY. Make any final adjustments so the door closes and locks securely.
Now tighten the screws. Finish securing the latch by installing torx self-drilling
screws (contained in figure 2, item #20) in the four (4) corner holes.
9.
Secure the 12 volt DC power cable to door and connect to 12V DC power supply.
10.
Install the lock
’s
front covers (figure 1, item #12 and item #14) using torx security
screws (figure 1, item #13).
11.
Complete the installation of the keyless entry package (DKYSLRH or DKYSLLH),
making sure to follow the installation instructions accompanying that kit. Then
return to this document and proceed with the next steps.
12.
Test the device for proper operation.
13.
Check the door closer as it may need to be adjusted.
14.
Use exterior silicon caulk to seal around the outside edge of the stainless steel
plates to prevent water from getting between the door and the door plates.
NOTICE
: The Sur-Lock
™
is preset during manufacturing to meet specified code
compliance. Any alteration or re-adjustment of internal operational components other
than what is described in this manual may void all code compliance and its warranty.
For Assistance, Contact LockNet Immediately At (800) 887-4307


