background image

IMPGD778F20200820

We’re here to help!

Email: [email protected]

LOCKLY.com/help

For the most up to date version of this guide please visit:

PRO

Summary of Contents for PGD778F

Page 1: ...HOOK SMART LOCK MORTISE EDITION INSTALLATION GUIDE PRO...

Page 2: ...nstallation to watch a video version of this installation guide Download the BILT app in the Apple or Google Play store for step by step interactive 3 D walk through installation instructions Availabl...

Page 3: ...meetlockly LOCKLY Connect with us...

Page 4: ...ough step by step how to install and get your LOCKLY Pro up and running Installation generally takes less than 30 minutes If you have any questions please reference our online sup port at LOCKLY com s...

Page 5: ...OVERVIEW AND PARTS LIST Parts List Labeled As Description A Keys B Exterior Assembly C Exterior D Mounting Plate E F G H I J Deadbolt K KA3 5 20MM Screw L Strike Plate N Dust Box W V U TF Card U LOCKL...

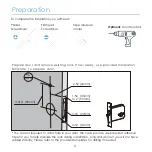
Page 6: ...ll a hole in your door We have provide double sided adhesive tape for you to help stabilize the lock during installation Only drill a hole if you wish to have added stability Please refer to the provi...

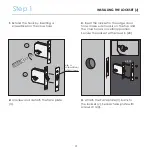
Page 7: ...e make sure hook is on the top and the cross hole is on vertical position Secure the lockset with screws K 2X K 2X 1 2 2 Unscrew and detach the face plate V 4 Attach the Face plate V back to the locks...

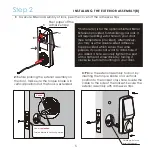
Page 8: ...ting on your door M O B Peel paper off the Adhesive tape 3 Place the exterior assembly to door by inserting the torque blade on a vertical position to the lockset cross hole Guide the cable to the sid...

Page 9: ...the cable to the opening ear on the side of mounting plate and make sure the torque blade is at the center of the mounting plate 2X If you have drilled a hole on the top please secure the hole with sc...

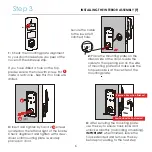
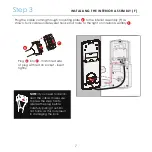
Page 10: ...right on interior assembly Plug into match red side of plug with red on socket insert tightly 7 INSTALLING THE INTERIOR ASSEMBLY F Step 3 X X Y Y E F NOTE If you need to discon nect the cable make su...

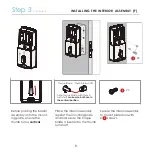
Page 11: ...ical Place the interior assembly against the mounting plate and make sure the torque blade is inserted to the thumb turn shaft Secure the interior assembly to mount platedoor with 2 screws I Torque Bl...

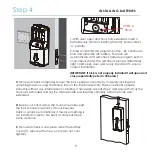
Page 12: ...screen keypad the lock should close lock If hook bounces back or unlocks automatically it means something is not installed correctly Go back and repeat step 2 same as above 5 Once self check is comple...

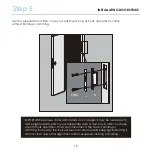
Page 13: ...ry in design it may be necessary to make slight adjustments to your strike plate and or dust box in order to ensure smooth hook operation This is very important If the hook is binding or catching in a...

Page 14: ...LOCKLY com app Congratulations You have completed the LOCKLY physical lock installation To complete your setup download the LOCKLY app from the iOS or Google Play app Store and follow on screen instru...

Page 15: ...12 PRO IMPGD778F20200820 We re here to help help LOCKLY com...

Page 16: ...13 PRO For the latest version of this manual please visit the link below http LOCKLY com help...

Page 17: ...te the equipment FCC Radiation Exposure Statement Vision Connect complies with FCC radiation exposure limits set forth for an uncontrolled environment It should be installed and operated with minimum...

Page 18: ...IMPGD778F20200820 We re here to help Email help LOCKLY com LOCKLY com help For the most up to date version of this guide please visit PRO...

Reviews: