background image

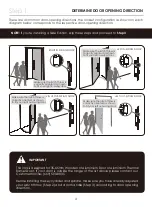
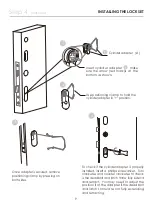
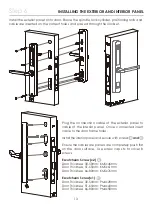
While you are inside the house, try to close and open the door. Check if the deadbolt and 

latchbolt fits the door frame holes and the door closes properly.

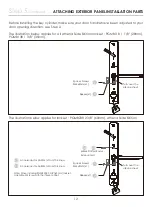
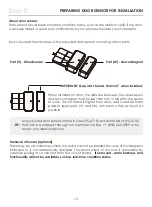
INSTALL DOOR FRAME AND STRIKE 

Step 7

14

Allen wrench 2.5mm (x1)

When the strike plate is fixed on the door frame, the 2 screws should be adjusted to the inner 

side of the unlocking hook about 1-2mm.  After the screws are locked, the surface of the 

exposed screws should not be lower than the surface of the strike plate.

Wood door frame or non-broken bridge aluminum 

metal door frame require drilling drilling template. see 

illustration on the left for locksets: PGMG118 1-1/8" 

(30mm), PGMG118H 1-1/8" (30mm), PGMG138 1-3/8" 

(35mm), PGMG138H 1-3/8" (35mm)

Wood/aluminum door frames requires drilling. Use 

template to drill holes and install the strike plate.  

secure the strike with screws.

Broken bridge aluminum do not require drilling to 

nistall strike plate, directly install onto door frame 

and secure with screws.

Door Frame

Door Frame

Door Frame

Z

J

KA4x16mm Screws(X4)

KA4x16mm Screws(X4)

I

Strike Plate

Strike Plate

J

L

KA4x16mm Screws(X4)

KA3x16mm Screws(X4)

I

I

K

I

K

Summary of Contents for ATHENA 228SL

Page 1: ...SLIDE SWING EDITION ATHENA 228SL 228SW FOR COMMERCIAL USE PROFESSIONAL INSTALLATION WWW LOCKLYPRO COM PGD228W INSTALLATION GUIDE...

Page 2: ......

Page 3: ...Prepare door remove existing deadbolt or use provided template to bore new holes Installation template Baseline approximately 1 meter from the ground 25 Door Handle Hole 3 Preparation...

Page 4: ...stomer hotline 669 500 8835 Before installing the key cylinder and spindle make sure you have already adjusted your Latch throw Step 2 and door handle Step 3 according to door opening direction IMPORT...

Page 5: ...3 8 35mm PGMB158 1 5 8 40mm PGMB134 1 3 4 45mm PGMB238 2 3 8 60mm NOTE If you re installing a Slide Edition skip this step and proceed to Step 3 If you re installing a Multi Point Lockset for a Swing...

Page 6: ...p direction to adjust the lockset for LEFT IN SWING or RIGHT OUT SWING DOORS FOR MULTI POINT LOCKSET MODELS PGMB138H 1 3 8 35mm PGMB158H 1 5 8 40mm PGMB134H 1 3 4 45mm ADJUSTING THE LATCH THROW Make s...

Page 7: ...le Rotate handle 180 and fasten the screw inside the handle to secure Rotate handle 180 and fasten the screw inside the handle to secure CHANGING HANDLE FOR RIGHT OR LEFT SWING DOORS Step 3 Loosen the...

Page 8: ...s prepared for installation If you need to drill new holes please use the supplied template for drilling holes Before installing the Lockset S confirm the door opening direction Step 1 and ensure latc...

Page 9: ...g on both sides Use positioning clamp to hold the cylinder adapter in position 3 1 2 4 To check if the cylinder adapter is properly installed insert a phillips screwdriver Turn clockwise and counter c...

Page 10: ...f door thickness is between 35 45mm cut off and discard this portion 3rd scale to end 1rd 2rd Lock Cylinder X1 KM4X6mm Screws x2 If door thickness is more than 45mm you don t need to cut the blade PGD...

Page 11: ...N PARTS M2 M4 Accessories for 35 55mm Door Thickness M3 M4 Accessories for 56 80mm Door Thickness Other door thickness accessories need to be customized Before installing the key cylinder make sure yo...

Page 12: ...Edition lockset PGMB118 1 1 8 28mm PGMB138 1 3 8 35mm The illustration below applies for lockset PGMB238 2 3 8 60mm Athena Slide Edition Step 5 continued Note When installing PGMB238 2 3 8 60mm lockse...

Page 13: ...the interior panel Once connected insert cable to the door frame holes Install the interior panel and secure with screws B and C Ensure the cables are panels are completely plush flat on the door sur...

Page 14: ...the strike plate Wood door frame or non broken bridge aluminum metal door frame require drilling drilling template see illustration on the left for locksets PGMG118 1 1 8 30mm PGMG118H 1 1 8 30mm PGM...

Page 15: ...is not aesthetically desirable The sensor wired to the lock is removable by carefully pulling its connector from the circuit board If removed some features and functionality will not be available such...

Page 16: ...ued 1 Peel off the paper layer of the adhesives from the back of the wired sensor 3 Close the door Before you peel off the paper layer of the adhesives from the sensor magnet align the arrow with the...

Page 17: ...cover to secure the battery compartment and fasten with screw Tighten the front and rear panel fixing screws B and fasten the silicone plugs N Note Please confirm that the installation is successful a...

Page 18: ...ed the Lockly Guard physical lock installation To complete your setup download the LocklyPro app from the iOS or Google Play app Store and follow on screen instructions Scan or visit Locklypro com app...

Page 19: ...e the equipment FCC Radiation Exposure Statement Lockly Guard Link complies with FCC radiation exposure limits set forth for an uncontrolled environment It should be installed and operated with minimu...

Page 20: ...PM4x28mm Door Thickness 51 65mm PM4x43mm Door Thickness 66 80mm PM4x58mm C D Cotter Pin X1 E Cylinder Adapter Clamp x1 F Adapter Positioning Screw x1 G KM4X6mm Screws x2 H KM4x25mm Screws x2 I Wooden...

Page 21: ...x1 Escutcheon Screw Cotter Pin x1 77mm Spindle x1 KM5x61mm x2 Escutcheon Screw PM4x32mm x1 Escutcheon Screw Cotter Pin x1 D Key Cylinder x1 Keys x5 KM4X6mm Screws x2 G O For PGMB238 2 3 8 60mm Lock B...

Page 22: ...n Door Frame Strike Plate Kit Aluminum Door Frame Strike Plate Kit Aluminum Thermal Barrier Door Strike Plate Kit H KA4X25mm Screws X3 H KA4x25mm Screws x3 Z Strike Plate x1 I KA4X16mm Screws x4 I KA4...

Page 23: ......

Page 24: ...The Bluetooth word mark and logos are registered trademarks owned by the Bluetooth SIG Inc and any use of such marks by Lockly is under license Other trademarks and trade names are those of their resp...

Reviews: