background image


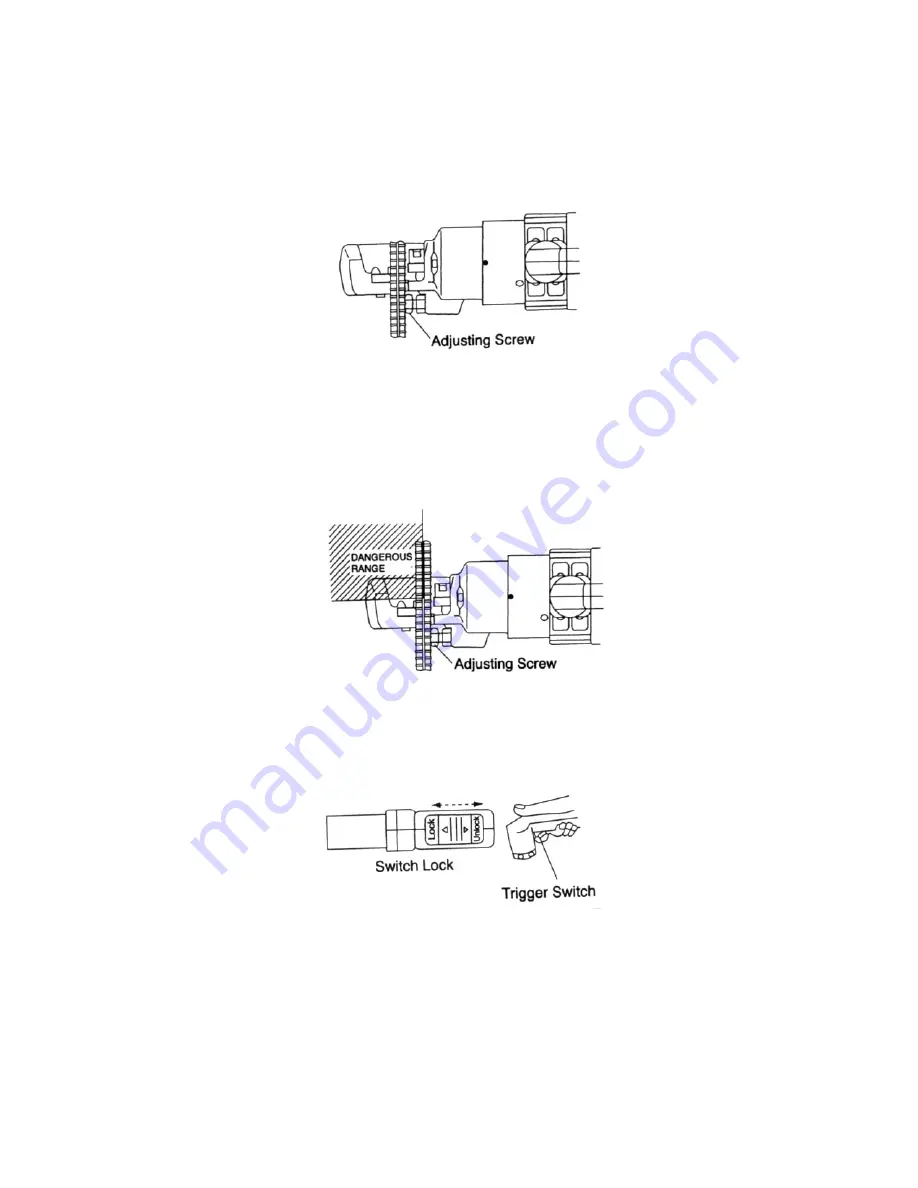
3.  Position the rebar to be cut at a right angle to the tool head and secure by 

adjusting the adjusting screw.  This will hold the rebar at a right angle to the 
cutting direction. 


4.  Confirm where the dangerous range is.  Cut pieces may fly off with 

tremendous force within the dangerous range as shown.  Operate only after 
confirming that no one is located in the area of the dangerous range.  Avoid 
cutting material too short. 


5.  Unlock the switch lock if it is locked.  Hold the tool firmly and press the trigger 

switch.  The moving cutting blade will advance to cut the rebar. 


6.  The moving cutting blade will automatically retract once fully extended.  

Release the trigger switch after fully extended and the moving blade will 
return to the starting position.  The tool is now ready for the next cut. 


Summary of Contents for EH-19PCU

Page 1: ...a Rd Sauk City WI 53583 Phone 608 643 6678 Fax 608 643 2682 www fascut com Specifications and prices shown in this document are subject to change at any time For the latest detailed information please contact Fascut Industries Max Cutting Capacity 6 3 4 Grade 60 rebar Voltage 110 120 Volts AC 50 60 Hz Power Consumption 800 Watts 7 2 amps Weight 22 pounds Dimensions L x W x H 17 x 4 x 8 ...

Page 2: ...Store tool properly When not in use store tool in a dry location out of children s reach 6 Do not use tool for purposes other than designed for 7 Wear proper apparel Do not wear loose clothing or jewelry that can get caught in moving parts Wear gloves and nonskid footwear Wear protective hair covering for long hair 8 Think Safety Use goggles to comply with ANSI Z87 1 Also use a face or dust mask i...

Page 3: ...lt in a risk of accident such as fire electric shock or personal injury 18 Return tool to Fascut Industries for repair Other than the remedies shown in the Trouble Shooting table do not attempt to disassemble or repair the tool Do not modify the tool Any modifications will void the warranty and may cause a hazardous situation FOR ELECTRO HYDRAULIC REBAR CUTTERS WARNING Indicates a potentially haza...

Page 4: ...its motor 13 Be sure to hold the tool tightly during operation Parts Identification 1 Cutter Head 7 Oil Cap 13 M5 Hex Key 2 Cutting blades 8 Motor 14 M6 Hex Key 3 M6 Cap screw 9 Brush Cap 15 Open end wrench 4 Adjusting Screw 10 Power cord 16 Spring Plate 5 Piston 11 Trigger Switch 17 Handle 6 Release Valve 12 Switch Lock Check Points for Operation 1 Safe Work Area Environment Never use this power ...

Page 5: ... is in good electrical condition AWG Size of Cord 16 14 Max Length of Cord 15 feet 25 feet Operation Procedure 1 Below 32 F the movement of the cutting blade will be slow and sluggish Keep the tool in a warm room at 60 or above for about one hour before use An alternative is to carry out a warming up procedure To do this use the Spring Plate part 16 to continuously run the tool for about 5 minutes...

Page 6: ...shown Operate only after confirming that no one is located in the area of the dangerous range Avoid cutting material too short 5 Unlock the switch lock if it is locked Hold the tool firmly and press the trigger switch The moving cutting blade will advance to cut the rebar 6 The moving cutting blade will automatically retract once fully extended Release the trigger switch after fully extended and t...

Page 7: ... Securely retighten the valve Strictly avoid the following 1 Do not point the head towards any person during operation Do not touch the blades during operation Do not cut materials too short Do not cut materials having a hardness exceeding the maximum cutting capacity 2 Do not operate or rest the tool upright on a work surface The tool can easily fall over and result in injury or tool damage Block...

Page 8: ...han long Sparks will be generated and the motor will be damaged if operated with bad carbon brushes 3 Check the oil every six months Only use hydraulic oil with a VG 46 weight rating If not available in your area order from Fascut Industries a Make certain moving cutting blade is fully retracted b Unplug the tool and position so the oil cap faces upward c Remove the oil cap using an M8 Hex Key Wre...

Page 9: ...breaker 2 Replace power cord 3 Replace trigger switch 4 Replace carbon brushes Moving blade does not return to the starting position 1 Moving blade has not reached fully extended position 2 Chip contaminants are jammed in the blade area 3 Moving blade is broken or damaged 4 Oil piston is bent 1 Pull trigger again until fully extended then release trigger 2 Remove blades and clean the blade area an...

Page 10: ......

Page 11: ... 25607 16 38 1 18 Magnet 25608 5 19 1 19 Washer Plate 25609 4 00 1 20 Bearing Needle 25610 39 38 1 21 Screw Hex Socket Button Head M10x16 20362 2 40 1 22 Washer Sealing 25591 4 80 1 23 Motor Housing Unit includes 61 63 28079 157 00 1 24 Oil Tank 25613 19 03 1 25 Cylinder Cap 25614 3 78 3 26 O ring P 7 10149 0 73 1 27 Spring Exhaust Valve 25615 0 96 3 28 Exhaust Valve 25616 8 82 3 29 Spring Plunger...

Page 12: ...Locknut 19mm 25778 15 14 1 60 Carbon Brush 28063 18 00 2 61 Carbon Brush holder part of 23 28064 15 50 62 Carbon Brush Cap 12879 2 85 2 63 Screw Socket Set M5x6 25676 0 25 2 64 Fan Guide 28066 12 90 1 65 Rubber Pin 24322 1 50 1 66 Armature 120 volts 40353 496 00 1 67 Bearing Ball 6301VV 28069 23 40 1 68 Bearing Ball 608ZZ 24294 12 18 1 69 Stator 120 volts 40357 172 00 1 70 Screw Stator M4x80 w loc...

Page 13: ...27 12 1 87 O ring Oil Tank P 32 25813 3 20 1 88 Oil Seal 12 28 7 28071 13 28 1 89 Washer M5 28032 0 10 4 90 Screw Socket Head Cap M5x30 w lock 28033 0 50 4 91 Trigger Switch Spring Plate 26698 8 10 1 92 Grab Handle 40627 44 80 1 93 Oil 12 oz ISO 46 Oil48 9 00 ...

Reviews: