11
GB/IE/NI
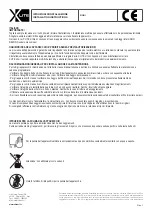
Initial use / Installing the LED strip
+12 V, blue, red, green <> +12 V, blue, red,
green; 14125206LE: +, - <> +, -) (see Fig. C).
Then press one end cap
9
at a time onto the
ends of the connector
8
(see Fig. C).
Check the correct positioning.
Be sure to cover the open end of the LED tape
3
with the adhesive strip
18
if you do not wish
to connect the end after trimming the tape (see
below Fig. 1–4).
+
12V
BLUE
RED
GREEN
+
12V
BLUE
RED
GREEN
+
12V
BLUE
RED
GREEN
+
12V
BLUE
RED
GREEN
1.
2.
3.
4.
18
Installing the LED strip
Note:
Ensure that the installation area is clean,
grease-free and dry. Otherwise the functionality of
the adhesive strip may be impaired.
Note:
Ensure that a plug socket is located in close
proximity to the installation area.
Note:
Light incidence affects the sensor unit
17
(14125206LE).
14125106LE (see Fig. A):
Connect the mains cable
1
with the music
sensor
5
by inserting the plug
7
directly into
the socket
6
on the music sensor
5
, if it has
not been pre-installed. Then connect the music
sensor
5
to the LED strip
3
.
Ensure the correct polarity of the connector
when connecting the LED strip
3
(see below,
<> + 12 V, blue, red, green).
14125206LE (see Fig. A):
Using the plug
7
, connect the mains cable
1
directly with the socket
6
on the the sensor
17
and the LED strip
3
.
Choose a suitable installation area.
Note (14125206LE):
Foreign sources of
light e.g. street lights interfere with the twilight
sensor.
Both models:
Remove the protective film from the reverse side
of the LED strip
3
(see fig. B).
Stick the LED strip
3
with the adhesive strip
onto the installation area and press it on firmly
(see fig. B).
Remove the protective foil
10
(see Fig. D) from
the reverse side of the cable holder
11
.
Stick the cable holder
11
onto the desired
position (see Fig. D).
Remove the protective film from the reverse side
of the music sensor
5
/ sensor
17
.
Stick the sensor
17
(14125206LE) / the music
sensor
5
(14125106LE) onto the desired
location.
Screw down the music sensor
5
using the
screws (14125106LE).
Insert the mains cable
1
into the cable holder
11
(see fig. D).
Insert the mains adapter
2
into the plug socket.
Your light is now ready to use.
Switching the LED strip on / off
14125106LE:
Press the ON button on the remote control
4
,
to switch on the LED strip
3
. Press the OFF
button on the remote control
4
, to switch off
the LED strip
3
.
Note:
The OFF button on the remote control
4
is only suitable to temporarily switch off the
LED strip
3
. Unplug the mains adapter
2
Safety / Initial use
Summary of Contents for 14125106LE
Page 14: ...14...