background image

1

2

3

4

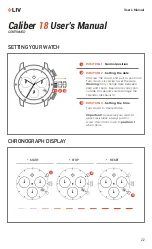
Unscrew crown and

pull it twice to position III.

Hold both top and bottom 

buttons until the second


hand of the chronograph


does a complete turn indicating 

you are in set up mode.

Use the top button to adjust 

any of the chronograph hands. 

Use the bottom button to switch 

between the different hands.

To leave set up mode, push the crown back to position I and tightly screw it back in.* 

*Failure to tightly screw it back in may result in water damage.

ADJUSTING THE CHRONOGRAPH HANDS

23

User’s Manual

CONTINUED

Caliber 

18 

User’s Manual

2

1

3

4

Summary of Contents for Ronda 4120.B

Page 1: ...User s Manual DARE TO LIV...

Page 2: ...00 1 ETA 2824 2 PAGE 4 Caliber 12 Sellita SW500 ETA 7750 PAGE 6 Caliber 14 Ronda 4120 B PAGE 10 Caliber 15 Ronda 515 24H GMT PAGE 12 Caliber 16 Ronda Z60 PAGE 14 Caliber 17 Sellita SW280 1 PAGE 19 Cal...

Page 3: ...the calendar mechanism Pull crown to position 3 and turn to desired time Once time is set push crown back to position 1 DESCRIPTION Made in Switzerland Ronda Powertech Caliber 515 Powered by a battery...

Page 4: ...attery powered automatically with the movement of your arms PERFORMANCE Balance frequency of 28 800 vibrations per hour 4 Hz Power reserve of 38 hours DISPLAY Hours minutes seconds Date window PARTS O...

Page 5: ...te correction outside this period could damage the calendar mechanism SETTING YOUR WATCH 2 1 3 2 1 3 4 POSITION 4 Setting the time Turn crown to desired time Important To preserve your watch s water r...

Page 6: ...ve of 48 hours DISPLAY Hours minutes seconds 60 second chronograph 30 minute counter 12 hour counter Date and day in window or date in window varies by model PARTS OF YOUR NEW WATCH 2 5 Hour hand Minu...

Page 7: ...Warning Do not change date between 8pm and 2am Rapid date correction during this period could damage the calendar mechanism SETTING YOUR WATCH 2 1 3 2 1 3 4 POSITION 4 Setting the time Turn crown to d...

Page 8: ...otal measured time Caution Before each timing the hands must be at zero If necessary press button B Start 1st time button A START CHRONOGRAPH DISPLAY 2 1 3 Stop 1st time button A STOP Read 1st time 4...

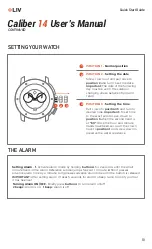
Page 9: ...display Caliber 14 User s Manual 4 2 5 4 1 3 1 3 Alarm Button THE MOVEMENT DESCRIPTION Made in Switzerland Ronda startech Caliber 4120 B Analog Alarm Powered by a battery PERFORMANCE Standard battery...

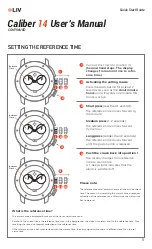
Page 10: ...een set push the crown back to position 1 and screw down to preserve the water resistance SETTING YOUR WATCH 2 1 3 2 1 3 Setting Alarm 1 Activate alarm mode by holding button A for 2 seconds until the...

Page 11: ...es correction of the reference time If the reference time is not synchronized with the current time the alarm signal will sound at a different time than the set alarm time Quick Start Guide Caliber 14...

Page 12: ...d RONDA powertech Caliber 515 24H Powered by a battery PERFORMANCE Standard battery life of 45 months DISPLAY Hours minutes seconds Date window 24 hour hand GMT function 12 PARTS OF YOUR NEW WATCH 2 5...

Page 13: ...ween 10pm and 12am The date of the next day must be set because no automatic date change takes place at midnight Quick change correction for 24 hour display Pull the crown to position 2 then turn coun...

Page 14: ...yes Chronograph Center stop second 1 1 sec 30 minute counter ADD and SPLIT functions Day indicator Date Small second in subdial 14 PARTS OF YOUR NEW WATCH 2 5 Hour hand Minute hand Chronograph seconds...

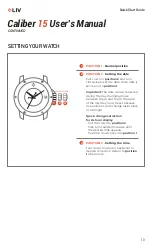
Page 15: ...and 12 00 pm the date must be set to the date of the next day SETTING YOUR WATCH 2 1 3 2 3 POSITION 3 Setting the time Pull crown to position 3 and turn to desired time Important To set time to the e...

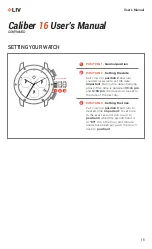
Page 16: ...he crown to position III the watch stops Turn the crown anticlockwise until the correct date 23 and day of the week THU appears Continue to turn the crown anti clockwise until the correct time 8 35 PM...

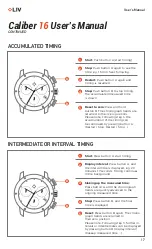
Page 17: ...be continued by pressing button A Restart Stop Restart Stop 5 INTERMEDIATE OR INTERVAL TIMING Start Press button A start timing 2 1 3 Display interval Press button A and the interval time is displayed...

Page 18: ...n set up mode Use the top button to adjust any of the chronograph hands Use the bottom button to switch between the different hands Toleave set up mode push the c rown back to position I and tightly s...

Page 19: ...NCE Self winding Frequency 28 800 vibrations per hour DISPLAY Hours minutes seconds Instantaneous date and moonphase indicators in window with quick corrector PARTS OF YOUR NEW WATCH 2 5 Hour hand Min...

Page 20: ...must be set because no automatic date change takes place at midnight In position 2 turn the stem until the full moon appears in the middle of the opening Determine the date of the last full moon with...

Page 21: ...op second 1 1 sec 1 10 seconds up to 30 minutes 30 minute counter 10 hour counter ADD and SPLIT functions Date window Small seconds in subdial PARTS OF YOUR NEW WATCH 2 5 Hour hand Minute hand Chronog...

Page 22: ...10pm Rapid date correction outside this period could damage the calendar mechanism SETTING YOUR WATCH 2 1 3 2 3 POSITION 3 Setting the time Turn crown to desired time Important To preserve your watch...

Page 23: ...n set up mode Use the top button to adjust any of the chronograph hands Use the bottom button to switch between the different hands Toleave set up mode push the c rown back to position I and tightly s...

Page 24: ...s and the bracelet Condensation Water Resistance Some condensation may form under the crystal of your watch due to a sudden temperature change This will disappear by itself and does not impact the wat...

Page 25: ...id letting these watch straps get into contact with water Please note that no matter how careful you are with leather it is a living material and its color will naturally slightly fade or darken over...

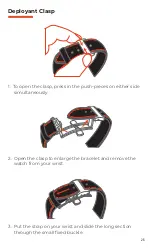
Page 26: ...he push pieces on either side simultaneously Deployant Clasp 2 Open the clasp to enlarge the bracelet and remove the watch from your wrist 3 Put the strap on your wrist and slide the long section thro...

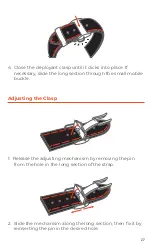
Page 27: ...the long section through the small mobile buckle Adjusting the Clasp 1 Release the adjusting mechanism by removing the pin from the hole in the long section of the strap 2 Slide the mechanism along t...

Page 28: ...ect of the luminescence on my watch In order to get the full effect of the luminescence the watch needs to be in direct sunlight for at least 3 hours What does fully wound mean on my automatic watch L...

Page 29: ...S Each watch has its maximum charge meaning that the mainspring power source can only hold so much charge Overwinding a watch could damage it so it is always recommended to follow the instructions for...

Page 30: ......

Page 31: ...W W W L I V WAT C H E S C O M DARE TO LIV...

Reviews: