background image

47

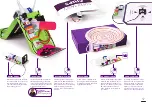
FOLD THE EDGES OF TEMPLATE B. THIS WILL BE THE BACK OF YOUR BUMPERBALL.

ATTACH BUMPERBALL TEMPLATES A AND C TO BUMPERBALL TEMPLATE B BY 
SLIDING THE TABS INTO THE MATCHING SLOTS.

8

9

USE TAPE

WANT TO CUSTOMIZE 

YOUR BUMPERBALL? 

NOW'S THE TIME!

Summary of Contents for a10

Page 1: ...i GIZMOS GADGETS KIT INVENTION GUIDE...

Page 2: ......

Page 3: ...spin on an old arcade favorite the pinball machine BITBOT Invent a rover that roams your world wirelessly CHALLENGE Challenges get you to flex your creative muscles They start with an open ended probl...

Page 4: ...assistance may be required for safe use of components BUILD PLAY WITH THIS CIRCUIT FIRST 1 TURN POWER ON 2 SLIDE THE DIMMER BACK AND FORTH 3 EXTEND YOUR CIRCUIT WITH A WIRE 4 WATCH THE BARGRAPH LIGHT...

Page 5: ...T BOTTOM BIT NAME TOP BITSNAPS X ICONS OPEN HARDWARE SYMBOL LITTLEBITS LOGO MAGNET MAGIC Bits snap together with magnets The magnets are always right you can t snap them together the wrong way 3 ARROW...

Page 6: ...DC motor a7 adhesive shoes a10 motorMate a19 servo hub a22 ball caster a23 mechanical arm a24 servo mount a25 wheel a26 mounting board 05 POWER INPUT WIRE OUTPUT ACCESS ORIES 06 07 08 09 10 12 13 14 1...

Page 7: ...nd shine The power Bit converts the 9 volts of electricity in the battery to the 5 volts that littleBits circuits run on The power Bit also sends a signal through your circuit Controlling this signal...

Page 8: ...g with the slide dimmer that waves a flag back and forth How could you change the speed it waves When the slider is all the way to the left it s sending an off or 0 volt signal When the slider is all...

Page 9: ...ighter more signal passes through it making lights brighter or motors turn faster In DARK mode the signal increases as it gets darker Use the purple screwdriver to turn the dial and adjust how much li...

Page 10: ...ke connections that can twist turn and spin The wire doesn t change the signal in any way it just carries it over from one Bit to another EXTENSION CORD POWER LINES STRING OF LIGHTS p1 POWER w1 WIRE o...

Page 11: ...g two motors The flexible wires on the split also allow you to place your Bits farther apart and position them how you like The split divides the incoming signal and sends it to the two output bitSnap...

Page 12: ...eive a signal from your smart device using Bluetooth Low Energy wireless technology up to a distance of about 80ft 25m indoors To use the Bluetooth Low Energy Bit you first need to connect it to your...

Page 13: ...ls between your device and the Bluetooth Low Energy Bit __ 30 TOUCH SCREEN Send signals to your Bluetooth Low Energy Bit with on screen buttons sliders and other controls MOVEMENT The accelerometer an...

Page 14: ...t receives into a vibration which creates a buzzing sound The higher the signal it receives the more intense the vibration and the louder the sound is DOORBELL CAR ALARM WASHING MACHINE p1 POWER i5 SL...

Page 15: ...t to the bargraph more LEDs will shine MINI CHALLENGE Can you invent a way to measure your mood REAL WORLD ANALOGIES SAMPLE CIRCUIT HOW IT WORKS The bargraph shows you how much signal the Bit is recei...

Page 16: ...osition of the hub try using a slide dimmer to set the angle you want In SWING mode the servo will move back and forth on its own like a pair of windshield wipers the input signal controls the speed o...

Page 17: ...pinning visuals Inside the fan is a tiny motor When it receives a signal it spins The more signal it receives the faster it spins LEAF BLOWE R PERSONAL FAN AIRPLANE PROPELLER p1 POWER i5 SLIDE DIMMER...

Page 18: ...rclockwise When the switch is in VAR variable mode the amount of signal the motor receives from previous Bits allows you to control the speed and direction clockwise or counterclockwise of its motion...

Page 19: ...d onto any surface paper cardboard plastic you name it Just peel the adhesive backing off and stick it on Bit feet go in the shoes NOTE The shoe adhesive is for one time use only MEET THE ACCESSORY HO...

Page 20: ...permanently attached by using a small screw in the center hole Use the included 6 screws with any of these eight outer holes USE A PHILLIPS HEAD SCREWDRIVER BE SURE TO ALIGN THE TEETH ON THE SHAFT WIT...

Page 21: ...the DC motor line up the flat edge of the DC motor shaft with the flat edge of either of the flat edged holes on the mechanical arm The two large holes on the end are perfect for holding pens and mar...

Page 22: ...HE FLAT EDGE OF THE CENTER HOLE IN THE WHEEL 025DCmotor CW DCmotor Closeup Use the included 6 screws in any of the holes to permanently attach to any surface a26 MOUNTING BOARD MEET THE ACCESSORY HOW...

Page 23: ...rst prototype of a Bit was made with cardboard copper tape and a few electronic components like LEDs Here s some of our favorite stuff to work with HELPFUL TOOLS MATERIALS scissors Phillips head screw...

Page 24: ...at help you explore your ideas and develop your invention DO I HAVE TO GO THROUGH THE LITTLEBITS INVENTION CYCLE EXACTLY IN ORDER Nope If you want you can remix while you play or share while you creat...

Page 25: ...o turn the dial on the Bit all the way counterclockwise PRO TIPS Keep your eyes open for these bits of littleBits wisdom These tips will help build your inventing skills and level up your inventions E...

Page 26: ...DIZZILY ON YOUR DESK Create this versatile invention and let your imagination run wild 15 MINUTES MINIMUM a1 battery cable a26 mounting board Glue Dots a25 wheel masking tape decorating materials not...

Page 27: ...25 BUILD YOUR CIRCUIT 1 o25 DC MOTOR p1 POWER i5 SLIDE DIMMER...

Page 28: ...ATTACH A WHEEL TO THE DC MOTOR PRESS YOUR CIRCUIT ONTO THE MOUNTING BOARD 2 3 LINE UP THE FLAT EDGE OF THE DC MOTOR SHAFT WITH THE FLAT EDGE OF THE CENTER HOLE IN THE WHEEL 025DCmotor CW DCmotor Close...

Page 29: ...27 PRESS YOUR DC MOTOR ONTO THE MOUNTING BOARD ATTACH THE BATTERY TO THE MOUNTING BOARD 4 5 USE GLUE DOTS USE TWIST TIES OR RUBBER BANDS ON DC MOTOR FOR EXTRA SECURITY...

Page 30: ...HE DC MOTOR TO VAR VARIABLE MODE SPIN IT Set the wheel on a flat surface turn power on and move the slide dimmer to set the turn direction and speed 6 7 DIRECTION VAR 025DCmotor VAR TEST YOUR CIRCUIT...

Page 31: ...oard is your canvas Make it useful playful or just plain weird using the provided stickers or any materials you d like 8 SPIN YOUR HEART OUT Set the wheel of your Spinmate on any flat surface and let...

Page 32: ...d direction is dependent upon how much signal it receives from the slide dimmer If the slide dimmer is in the middle the wheel should be stopped A full signal from the slide dimmer will make the wheel...

Page 33: ......

Page 34: ...B...

Page 35: ...C G I Z M O S G A D G E T S 2 N D E D I T I O N...

Page 36: ...D WE INVENT THE WORLD WE WANT TO LIVE IN...

Page 37: ...to bring it to life SPIN A NEW STORY Use the two sides of the mounting board to animate an image tell a story or wave a flag TURN IT UP Add the bargraph and other Bits to make your Spinmate even more...

Page 38: ...Slowly move the slide dimmer to control how quickly the bubble grows Can you make the ultimate bubble 30 MINUTES MINIMUM a1 battery cable a26 mounting board Bubblebot template Glue Dots tape plate bub...

Page 39: ...33 o9 BARGRAPH BUILD YOUR CIRCUIT 1 p1 POWER o13 FAN i5 SLIDE DIMMER...

Page 40: ...34 PRESS YOUR CIRCUIT ONTO THE MOUNTING BOARD 2 ATTACH THE BATTERY TO THE MOUNTING BOARD NEXT TO THE POWER BIT 3 USE GLUE DOTS...

Page 41: ...AND TEST YOUR CIRCUIT When you slide the dimmer the bargraph should light up and the fan should spin PRESS THE FAN ONTO THE MOUNTING BOARD 5 4 POWER ON TEST YOUR CIRCUIT THE FAN SHOULD BE BLOWING AWAY...

Page 42: ...36 ASSEMBLE BUBBLEBOT TEMPLATE 6 DETAIL VIEW WANT TO CUSTOMIZE YOUR BUBBLEBOT NOW S THE TIME...

Page 43: ...37 SLIDE THE TEMPLATE ONTO THE FAN TAPE THE TEMPLATE ONTO THE FAN 7 8 USE TAPE...

Page 44: ...MPLETELY OFF dip the tip of the Bubblebot template into the bubble solution When you lift the tip of the bubble tube you should see a thin film of bubble solution covering the opening 9 10 THE FAN MUS...

Page 45: ...9 WITH POWER ON slowly use the slide dimmer to turn the fan on and start blowing bubbles BECOME A MASTER BUBBLE CRAFTER Can you release the bubble from the tube so it floats through the air 11 POWER O...

Page 46: ...ntrols how much signal moves through to the bargraph and fan More LEDs on the o9 BARGRAPH light up as more signal passes through The o13 FAN receives signal from the bargraph The more signal it receiv...

Page 47: ...e house Explore whether a yogurt cup works better than a milk carton MODIFY THE BUBBLE TUBE Cut fringe into the edge of the bubble tube This helps it hold more bubble solution SWITCH IT UP Which other...

Page 48: ...unce and bump all over the box like it s out of control 30 MINUTES MINIMUM a1 battery cable a26 mounting board a22 ball caster screws 2 Bumperball templates A B and C Phillips head screwdriver tape de...

Page 49: ...43 BUILD YOUR CIRCUIT 1 o11 SERVO p1 POWER i5 SLIDE DIMMER...

Page 50: ...44 PRESS THE SERVO HUB ONTO THE SERVO PRESS YOUR CIRCUIT ONTO THE MOUNTING BOARD 2 3 YOU CAN SECURE THE HUB ON THE SERVO WITH THE INCLUDED SMALL SCREW THROUGH THE CENTER HOLE...

Page 51: ...O THE SERVO S BODY AS SHOWN 5 4 USE PHILLIPS HEAD SCREWDRIVER SLIDE DIMMER MUST BE AT HALF WAY FOR THE BUMPERBALL TO WORK MODE TURN i12 temp sensor Fahrenheit mode i13 light sensor light mode o11 serv...

Page 52: ...O YOUR GIZMOS GADGETS 2ND EDITION BOX Make sure it is centered TAKE SOME PRACTICE SWINGS Moving the slide dimmer should make the mechanical arm rotate side to side 6 7 USE GLUE DOTS DETAIL VIEW TEST Y...

Page 53: ...TEMPLATE B THIS WILL BE THE BACK OF YOUR BUMPERBALL ATTACH BUMPERBALL TEMPLATES A AND C TO BUMPERBALL TEMPLATE B BY SLIDING THE TABS INTO THE MATCHING SLOTS 8 9 USE TAPE WANT TO CUSTOMIZE YOUR BUMPER...

Page 54: ...LL CASTER FOLD THE BUMPERS ON YOUR TEMPLATE These will bounce the ball towards the mechanical arm when you play 10 12 11 FOLD THE SEMI CIRCULAR TABS ON THE TEMPLATES INWARDS These will rest on the top...

Page 55: ...49 BUMP IT UP What s your high score Challenge your friends to see who can get the most points in a minute ATTACH YOUR TEMPLATE TO THE TOP OF YOUR BOX 13 USE GLUE DOTS USE TAPE 100 75 25...

Page 56: ...ugh the circuit The i5 SLIDE DIMMER controls how much power moves through to the servo Since the o9 SERVO is in TURN mode the position of the mechanical arm depends on how much signal it receives from...

Page 57: ...ard CREATE OBSTACLES Use thumbtacks rubber bands and everyday objects to enhance your game MAKE AN AUTOMATIC SCOREBOARD Connect the Bluetooth Low Energy Bit and light sensor to your circuit to make a...

Page 58: ...52...

Page 59: ...our bidding from your smart device Use this versatile vehicle to prank your pets set up a snack delivery system for Mom or turn your room into a race track TURN YOUR BITBOT INTO A DRAWBOT 30 MINUTES M...

Page 60: ...ess your extraordinary awe inspiring battery powered menagerie of animatronic creatures Q HOW HAS LITTLEBITS IMPACTED YOU CREATIVELY MYA littleBits has enabled me to make things that not only look coo...

Page 61: ...ANGE THE COLOR ADD FUR OR USE LIGHT TO CHANGE THE APPEARANCE Can you use sound to help your character talk or make noises Can you use motion to help your character dance fly or hug someone Can you use...

Page 62: ...ls Put a tiny figurine on the board and try to keep it standing as you steer the bot from your phone SWING O MATIC Invent a machine that mimics your moves and helps you improve your baseball golf or t...

Page 63: ...silly pics with your friends FAN OF FORTUNE A spinning fan can do more than blow air Could yours predict the future Just shake your phone to activate the spinner and let fate decide your future Ask t...

Page 64: ...This is the second phase of the littleBits Invention Cycle where you test your prototype for the first time POWER The energy used to do work PROTOTYPE A model designed to test an idea REMIX This is th...

Page 65: ...ts securely snapped to each other You can also try gently wiping down the ends of the bitSnaps with a soft cloth like your sleeve Sometimes dust gets in the way of a strong connection Try unsnapping c...

Page 66: ...This device complies with the limits for a Class B digital device pursuant to Part 15 of the FCC rules Operation is subject to the following two conditions 1 This device may not cause harmful interfe...

Page 67: ......

Page 68: ...RVO MOUNT i13 LIGHT SENSOR i5 SLIDE DIMMER o11 SERVO w1 WIRE o9 BARGRAPH o6 BUZZER a19 SERVO HUB o25 DC MOTOR ADDITIONAL ACCESSORIES ball caster Glue Dots 24 mechanical arm motorMates 2 mounting board...

Reviews: