background image

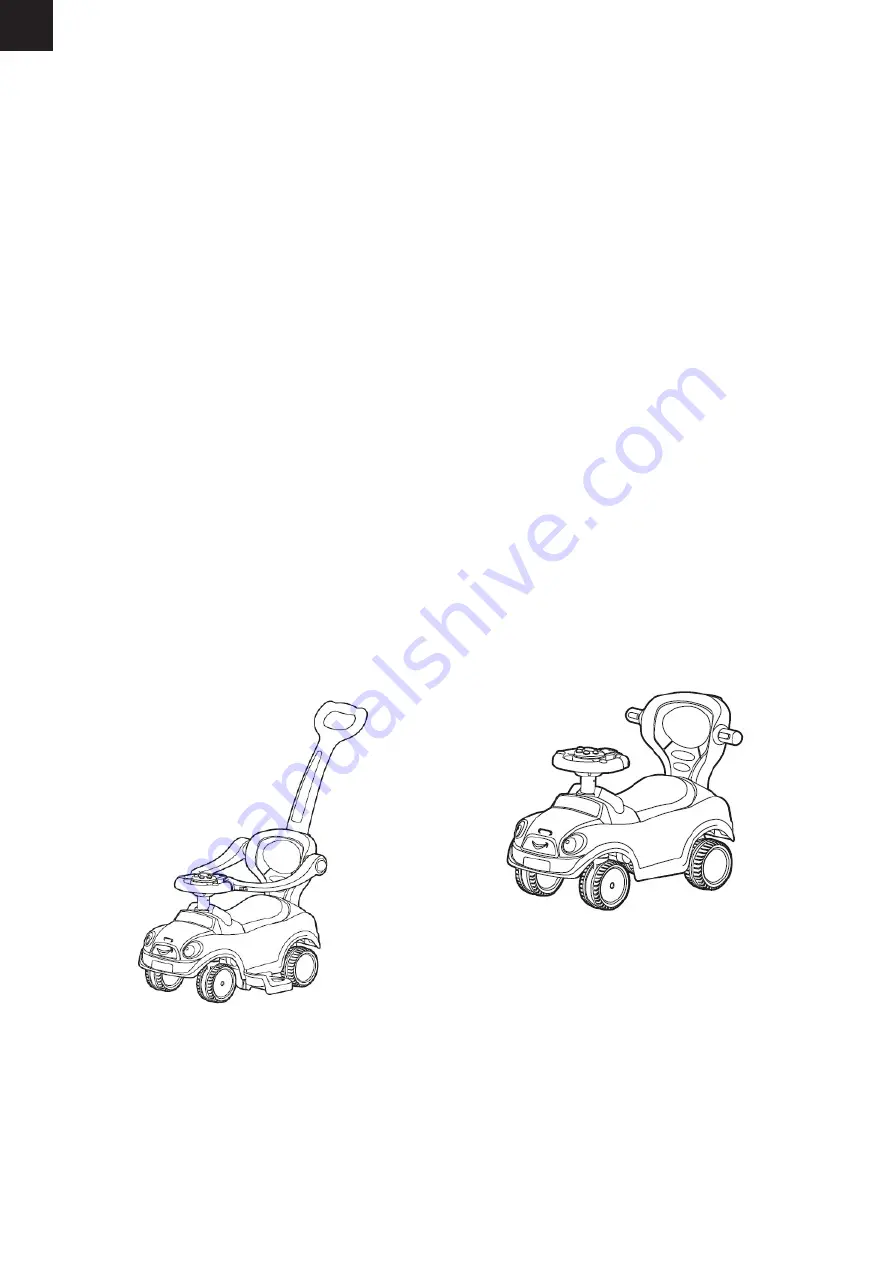
Riding car: After disassembling  pedal (part 4), 

push knob (part 7) and armrest guardrail (part 5) 

according to the operating function Figure 3,4,5, 

a riding car which move with feet will be shown.

Stroller

Riding car

Caution! 

When installing new batteries, dangers such as damage, heat, liquid leakage etc. might happen, 

please pay attention to the following cautions:

1.   This product should use NO.5 AA batteries (2 pieces).

2.   Please ask adults for replacing new battery.

3.   Install the new batteries correctly; and pay special attention to the positive pole and negative  

      pole.

4.   The batteries are not chargeable and should not be disassembled, heated and put into fire, 

      which are to avoid direct short.

5.   Non-chargeable batteries should not be charged, chargeable batteries should only be charged 

      under the guidance of adults. Chargeable batteries should be taken out from the toy before 

      charging.

6.   Please do not mix different type batteries, used batteries and new batteries; mixed battery use  

      would affect the operational life span of batteries, and used batteries would have the danger of  

      liquid leakage and damage etc. Thus the batteries should be replaced entirely.

7.   When the electric power of battery is insufficient, the audio would be muted, and the music 

      could not keep pace with the rhythm. Under which condition new batteries should be installed.

8.   If the batteries are not being used for a long time, please take batteries out to avoid liquid 

      leakage. Please take batteries out when out of electric power.

9.   The power supply terminals should not be direct short.

10. Different types of batteries are not to be mixed.

11. Exhausted batteries are to be removed from the toy.

Item transformation function

GB

Summary of Contents for 5705858711690

Page 1: ...to floor Little Tikes G bil Little Tikes G bil Little Tikes Potkuauto Little Tikes Art no 805 775 EAN 5705858711690 Size 84 5 x 45 5 x 84 7 cm Imported by Importeret af NSH NORDIC A S Virkefeltet 4 D...

Page 2: ...GB Installation and Operating Instructions Our products are suitable for ASTM F963 GB6675 EN71 and EN62115 standard Please read the installation instructions carefully before use...

Page 3: ...NSIONS Components list 1 Semi assembled main body 5 Armrest guadrail 9 Steering wheel screw cap 2 Steering wheel 6 Backrest 10 Steering wheel fixed tube 3 Easy wheel x2 7 Push knob 4 Pedal 8 Steering...

Page 4: ...assigned location of car bottom 4 Insert the brackrest into the assigned location of the car rear end 5 Insert the armrest guardrail into the assigned location of both ends of the backrest spin forwar...

Page 5: ...ing wheel battery cover find the positive pole and negative pole and put 2AA batteries into the compartment properly then close the battery cover and fix it with the screw as shown in the Figure Opera...

Page 6: ...he pedal buckle push them backward along with the direction of arrow and lift upward the pedal can be removed Push the switch of the armrest guardrail and spin it backward the armrest guardrail can be...

Page 7: ...batteries should only be charged under the guidance of adults Chargeable batteries should be taken out from the toy before charging 6 Please do not mix different type batteries used batteries and new...

Page 8: ...e children themselves or others may be hurt 2 Some possible sharp edge cuspidal points or small parts may be on the toy before assembly so the toy should be assembled by adult 3 Don t ride the car in...

Page 9: ...DK Montering og betjeningsvejledning Vores produkter opfylder f lgende standarder ASTM F963 GB6675 EN71 og EN62115 standard L s betjeningsvejledningen grundigt f r anvendelse af produktet...

Page 10: ...DK M l p bilen Delliste 1 Delvist samlet karrosseri 5 Arml n beskyttelsesramme 9 M trik til rat skruen 2 Rat 6 Rygl n 10 Styr til rattet 3 Forhjul x 2 7 Skubbestang 4 Fodst tte 8 Rat skrue...

Page 11: ...el 3 p som vist p tegningen 4 S t rygl net del 6 p som vist p tegningen og tryk ned 5 Is t arml nene del 5 som vist p tegningen og sving dem fremad og klik dem fast til rattet 6 Is t skubbestangen del...

Page 12: ...lken knap der v lges ben batteri d kslet p rattet Is t batterierne 2 x AA v r opm rksom p polaritet p s t d kslet igen og stram skruen som vist p tegningen Operating function ben s det og opbevaringsr...

Page 13: ...ion og anvendelse Tr k op i sp ndet p fodst tten og tr k fodst tten bagl ns i pilens retning og tag fodst tten af Tryk p knappen p arml net og sving arml net tilbage Nu kan arml net tages af Sp nde Tr...

Page 14: ...ikke opladelige 5 Fors g ikke at oplade ikke opladelige batterier 6 Miks ikke forskellige typer batterier Det v re sig gamle og nye batterier eller typer m rker Forskellige batterier kan forkorte lev...

Page 15: ...er voksen opsyn og instruktion ellers kan barnet skade sig selv eller andre 2 Potentielle skarpe kanter spidser eller sm dele kan v re p ved bilen f r denne er komplet samlet derfor skal bilen samles...

Page 16: ...SE Monterings och instruktionsmanual V ra produkter f ljer f ljande standarder ASTM F963 GB6675 EN71 och EN62115 standard L s instruktionsmanualen noggrant innan produkten anv nds...

Page 17: ...SE M tt p bilen Delliste 1 Delvist monterad kaross 5 Armst d skyddsram 9 Mutter till rattskruven 2 Ratt 6 Ryggst d 10 Styre till ratten 3 Framhjul x 2 7 Skjutst ng 4 Fotst d 8 Rattskruv...

Page 18: ...el 3 som visat p teckningen 4 S tt p ryggst det del 6 som visat p teckningen och tryck ner 5 S tt i armst den del 5 som visat p teckningen och sv ng fram dem och klicka fast dem till ratten 6 S tt i s...

Page 19: ...p som v ljs ppna batteriluckan p ratten S tt i batterierna 2xAA var uppm rksam p polaritet s tt p luckan igen och sp nn t skruven som visat p teckningen Funktioner ppna s tet f r att anv nda f rvaring...

Page 20: ...n och anv ndning Dra upp t i sp nnet p fotst det och dra fotst det bakl nges i pilens riktning och ta av fotst det Tryck p knappen p armst det och sv ng armst det bak t Nu kan armst det tas av Sp nne...

Page 21: ...ksam p polaritet 4 Batterierna f r inte vara laddningsbara 5 F rs k inte att ladda icke laddningsbara batterier 6 Blanda inte olika sorters batterier Vare sig gamla och nya batterier eller typer m rke...

Page 22: ...n uppsyn och instruktion annars kan barnet skada sig sj lv eller andra 2 Potentiella skarpa kanter spetsar eller sm delar kan vara p vid bilen innan denna r helt monterad d rf r ska bilen monteras av...

Page 23: ...FI Asennus ja k ytt ohjeet Tuotteemme t ytt v t seuraavat standardit ASTM F963 GB6675 EN71 ja EN62115 standardi Lue k ytt ohje huolellisesti ennen tuotteen k ytt...

Page 24: ...on mitat Osaluettelo 1 Osittain koottu kori 5 K sinojat suojakehys 9 Mutteri ohjauspy r n ruuviin 2 Ohjauspy r 6 Selk noja 10 Ohjauspy r n tanko 3 Etupy r x 2 7 Ty nt varsi 4 Jalkatuki 8 Ohjauspy r n...

Page 25: ...illa osat 8 ja 9 3 Napsauta etupy r t osa 3 paikalleen kuvan osoittamalla tavalla 4 Kiinnit suojakehykset osa 5 kuvan osoittamalla tavalla ja k nn ne eteenp in ja napsauta kiinni ohjauspy r n 5 Paina...

Page 26: ...tery cover find the positive pole and negative pole and put 2AA batteries into the compartment properly then close the battery cover and fix it with the screw as shown in the Figure K ytt toiminnot Av...

Page 27: ...minta ja k ytt Ved jalkatuen solkia yl s ja ved jalkatuki taaksep in nuolen osoittamaan suuntaa ja irrota jalkatuki Paina suojakehysten nappeja ja py r yt k sinojat takaisin Nyt voit poistaa solki ved...

Page 28: ...adattavia 5 l yrit ladata ei ladattavia paristoja 6 l sekoita erityyppisi paristoja kesken n Tarkoittaa vanhoja ja uusia paristoja tai tyyppej ja tuotemerkkej Eri paristot voivat lyhent k ytt aikaa Va...

Page 29: ...tteen k ytt 1 Lasten tulee leikki autolla vain aikuisen valvonnassa ja ohjauksessa muuten lapsi saattaa itse n tai muita 2 Voi sis lt pieni ja ter vi osia Aikuisen koottava pid lapset poissa kunnes tu...

Page 30: ......

Page 31: ......

Page 32: ......

Reviews: