background image

Treated properly it should be a faithful servant for years - and we hope you get the 
same amount of pleasure from it.  Before you do

l

please take a few minutes to read these instructions

l

we suggest you carefully unpack everything, lay it out on a clean, flat floor and 
identify everything on the parts list in these instructions. Do not throw away any 
packaging until you are sure you have all the parts. 

If you have any problems assembling the product please call our customer services 
on 01985 300588 and we will try and help. If for any reason you wish to return the 
product, you must disassemble the product and pack in the original packaging. 

Taking care of your product 

Your furniture should require no more than a regular dust off with a soft cloth. If the furniture is 
not painted  then a superior wood polish can be used - but never use polishes containing 
silicone. 
If necessary it can be cleaned with a damp cloth with a mild detergent solution - and then 
dried with a lint-free cloth. Never clean with abrasives or chemical cleaners. 
Direct sunlight or heat from a radiator can stain, discolour warp or crack furniture. 
We know furniture can be heavy but try not to drag furniture across the floor as this can 
damage it. 

Thank you for buying a 


PRODUCT SAFETY

piece of furniture

If you have any problems please do contact us for help on e 
mail [email protected] or phone our

CUSTOMER SERVICES  01985 300588

The recommended size of the mattress is 183cm x 76cm (6` x 2`6)
Periodically check all fittings to ensure that none have come loose.
Keep away from direct sources of heat, such as electric, gas or coal fires.
Do not allow children to Climb on the furniture.
Using this furniture other than for its intended purpose could cause damage to 
the structure or serious injury to your child.
The Bed should not be used if any structural part is broken or missing.
If you can manage it, please try to persuade your children not to bounce on the 
bed.
Warning: The child`s bed should not be placed too close to other furniture or 
windows, blind cords, curtain pulls or other strings or cords, and should be placed 
either tight to any wall or have a gap of 300mm between the wall and the side of 
the bed.

Summary of Contents for SBD007

Page 1: ...PLEASE READ CAREFULLY KEEP FOR FUTURE REFERENCE Code SBD007 Classic Day Bed ...

Page 2: ...brasives or chemical cleaners Direct sunlight or heat from a radiator can stain discolour warp or crack furniture We know furniture can be heavy but try not to drag furniture across the floor as this can damage it Thank you for buying a PRODUCT SAFETY piece of furniture If you have any problems please do contact us for help on e mail customerservices littlefolksfurniture co uk or phone our CUSTOME...

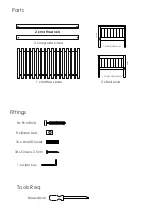
Page 3: ...ver 1 x Allen Key Parts 1 x mattress base 2 x Bed ends 16 x small Dowels 2 x mattress rails 8 x 9cm Bolts 8 x Barrel Nuts 34 x Screws 3 5cm 2 x mattress rails 2 x long safety rails 1 x left hand end 1 x right hand end front front ...

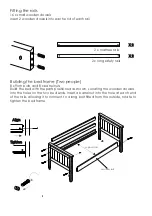
Page 4: ... barrel nuts Build the bed with the parts positioned as shown Locating the wooden dowels into the holes on the two bed ends Insert a barrel nut into the hole at each end of the rails allowing it to connect to a long bolt fitted from the outside rotate to tighten the bed frame mattress rail Align Tighten 2 x mattress rails 2 x long safety rails support rail ...

Page 5: ...ght to the bed end frames Now screw down every mattress slat making sure the bed remains parallel some light pressure might be needed to push the siderail inwards at the middle of the rail Locate the bed into it s final position and fit the mattress onto the bed Please take a few minutes to look over the bed to ensure that the fittings are securely fastened and the product is stable push push ...

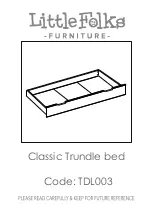
Page 6: ...Code TDL003 Classic Trundle bed ...

Page 7: ...abrasives or chemical cleaners Direct sunlight or heat from a radiator can stain discolour warp or crack furniture We know furniture can be heavy but try not to drag furniture across the floor as this can damage it Thank you for buying a PRODUCT SAFETY piece of furniture If you have any problems please do contact us for help on e mail customerservices littlefolksfurniture co uk or phone our CUSTOM...

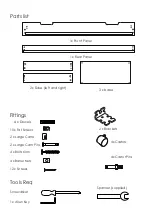
Page 8: ...q Screwdriver 1x Front Panel 1x Rear Panel 2 x Sides left and right 4 x Dowels 2 x Large Cam Pins 2 x Large Cams 4 x Barrel Nuts 4 x Bolts 6cm 2 x Brackets 4x Castors 4x Castor Pins 10 x Fat Screws 12 x Screws 1 x Allen Key Spanner supplied ...

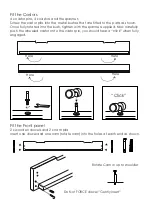
Page 9: ... dowel Gently insert Rotate Cam in up to shoulder Click Fit the Castors 4 x castor pins 4 x castors and the spanner Screw the castor pins into the metal bushes that are fitted to the parts as shown Once fully rotated into the bush tighten with the spanner supplied Now carefully push the wheeled castor onto the castor pin you should hear a click when fully engaged ...

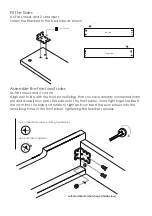
Page 10: ...already connected cam pin and dowel now press the side onto the front panel once tight together insert the cam into the hole and rotate to tighten Now insert the euro screws into the remaining holes in the front panel tightening the bracket securely Left hand bed corner shown inside view Left side Right side Left hand bed corner shown inside view step 1 directional arrow pointing towards pin step ...

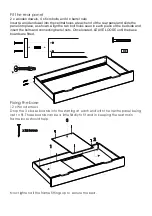
Page 11: ...piece of the bed side and insert the bolts and connecting barrel nuts Once located LEAVE LOOSE until the base boards are fitted Fixing the base 12 x Wood screws Drop the 3 x base boards into the starting at each end with the centre panel being last to fit These boards can be a little fiddly to fit and in keeping the rear main frame loose should help x 12 Screws Now tighten all the frame fittings u...

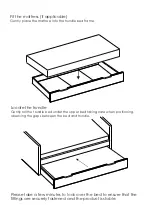
Page 12: ...bed frame Locate the trundle Gently roll the trundle bed under the upper bed taking care when positioning observing the gaps between the bed and trundle Please take a few minutes to look over the bed to ensure that the fittings are securely fastened and the product is stable ...

Reviews: