L I T E W E R K S G M B H
|
+ 4 9 ( 0 ) 7 5 3 1 / 9 4 5 2 5 2 5
|
I N F O @ L I T E B L O X . D E
L I T E W E R K S G M B H
|
+ 4 9 ( 0 ) 7 5 3 1 / 9 4 5 2 5 2 5
|
I N F O @ L I T E B L O X . D E
49
48
5 | B A T T E R Y U S E
5 | B A T T E R Y U S E
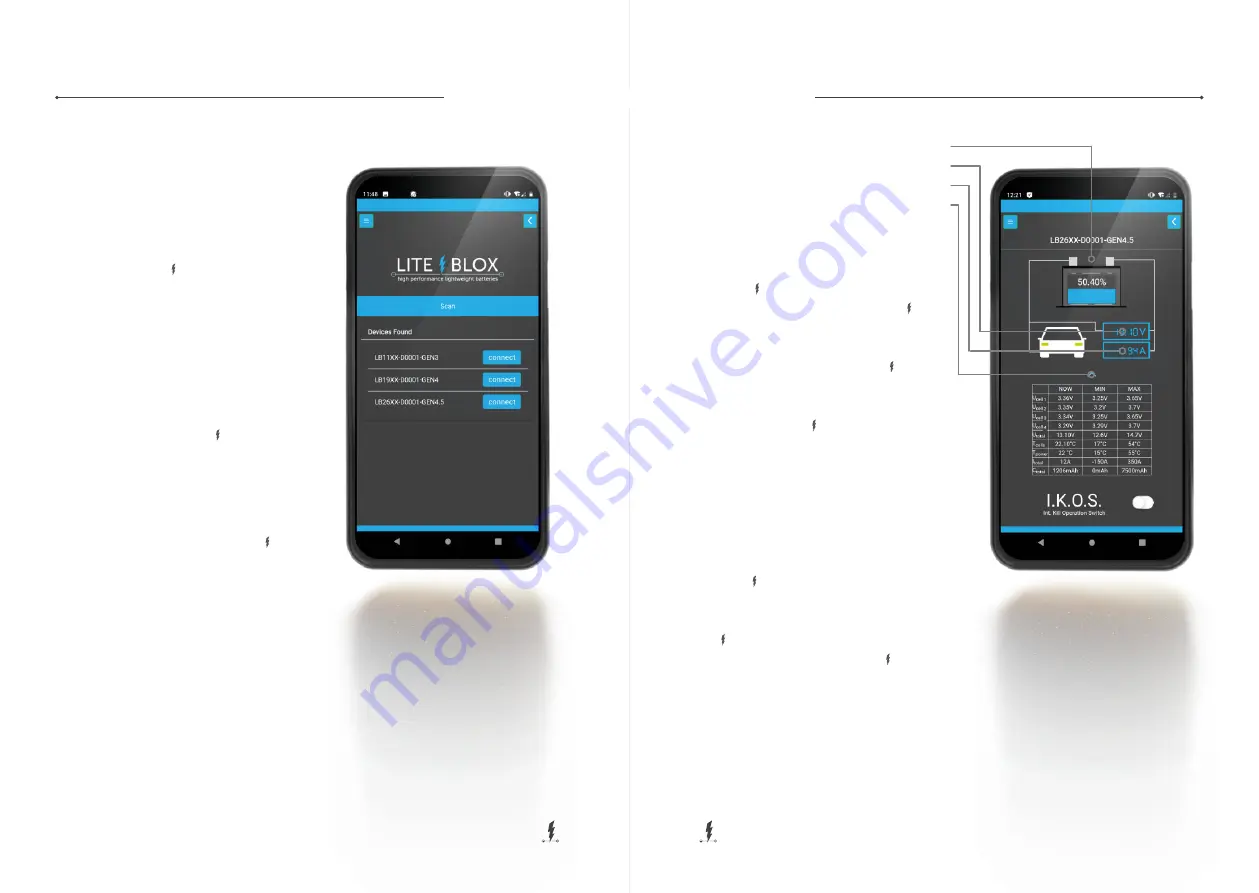
5.6.2 CONNECTING
To connect to your
LITE BLOX
, proceed as follow-
ing:
1 By pressing the
SCAN
-button as described in
5.6.1 a list of various Bluetooth devices near you
might appear.
2 By pressing „
CONNECT
“ next to the battery se-
rial number, a connection between the mobile
device and the respective
LITE BLOX
model will
be established, followed by a dialog box, re-
questing a password (may pop up in the back-
ground).
3 Enter the 6-digit password (in the packaging
box as well as on the bottom of your
LITE BLOX
)
and press „
OK
“. The device is now connected,
enabling full remote operation (within max. 5
meters of distance).
SOC feedback
Voltage
Ampere meter
Open / close table
5.6.3 STATUS DISPLAY
The main screen of the APP is showing the status
of your
LITE BLOX
battery The battery element at the
top gives a graphical feedback of the
LITE BLOX
’s
SOC in % plus the condition of the four single bat-
tery cells (blue / yellow / red). The car symbol indi-
cates the operation mode of your
LITE BLOX
(see
below). The display element is the voltage- / am-
pere-meter indicating the system voltage / current
drawn from your
LITE BLOX
. By clicking on the
white arrow below these three elements, a table
containing the following information is opened:
Voltage:
the voltage of the single cell banks and
the total voltage of the battery pack are displayed.
Temperature:
the temperature inside the housing
of the
LITE BLOX
and on the BMS are displayed.
Current:
the current drawn from or supplied to the
LITE BLOX
is displayed. A minus symbol indicates,
that the current is supplied to the
LITE BLOX
, thus
that it is being charged.
For all parameters the momentary (‘CURRENT’) as
well as the lowest recorded value (‘MIN’) and the
highest recorded value (‘MAX’) are displayed.
Fig 17: App – Connecting
Fig 18: App – Status display


