background image

Page 10 of 11

FA69387–2 English

Jun 2013

11

How To

Use the 7900 Food Grade 
Printer

Li

nx 7900

6

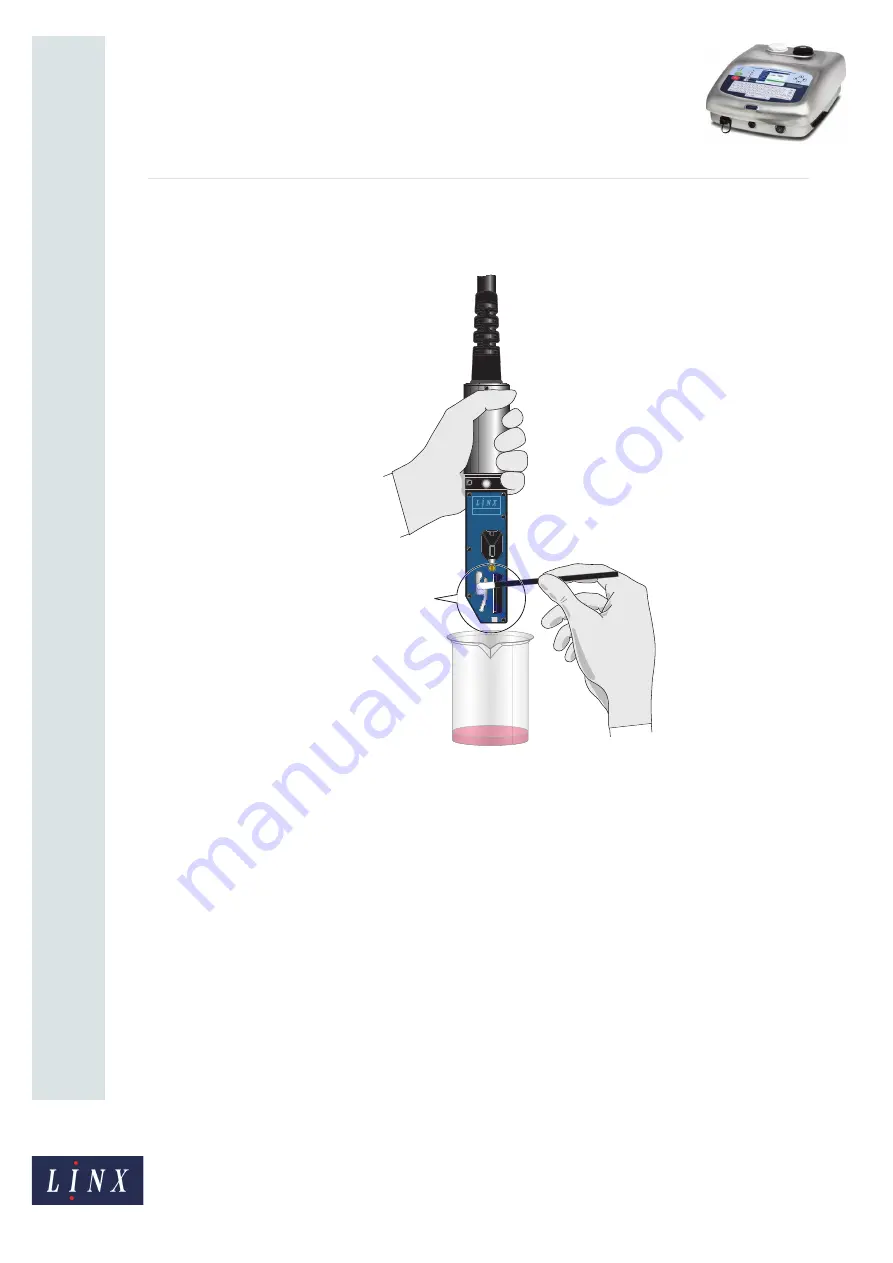
Apply more solvent to the area shown with a circle in Figure 4 on page 8. Before the 
solvent dries, use a foam swab to carefully remove any ink deposits from the 
components identified in Figure 5 on page 9, as shown in Figure 6.

Figure 6. Clean the printhead components

Clean the following components:

The reverse side of the EHT plate

The EHT plate mounting pillars

The DPP mounting pillars (on the side opposite the EHT plate)

Continue until any ink deposits that remain are removed.

7

Apply more solvent to the components. Before the solvent dries, use a foam swab to 
carefully remove any ink deposits from the following components:

The DPP

The EHT plate

The PCB (in the area shown with a circle in Figure 4 on page 8)

Continue until any ink deposits that remain are removed.

68780

THOROUGHLY 

CLEAN 

ALL THESE 

COMPONENTS 

MIDI

MIDI

62

62

 EC

 EC

Bluehorse   Wh86 181 6857 5767  Email:[email protected]

Bluehorse   Wh86 181 6857 5767  Email:[email protected]

Bluehorse   Wh86 181 6857 5767  Email:[email protected]

Bluehorse   Wh86 181 6857 5767  Email:[email protected]

Bluehorse   Wh86 181 6857 5767  Email:[email protected]

Bluehorse   Wh86 181 6857 5767  Email:[email protected]

Bluehorse   Wh86 181 6857 5767  Email:[email protected]

Bluehorse   Wh86 181 6857 5767  Email:[email protected]

Bluehorse   Wh86 181 6857 5767  Email:[email protected]

Bluehorse   Wh86 181 6857 5767  Email:[email protected]

Bluehorse   Wh86 181 6857 5767  Email:[email protected]

Bluehorse   Wh86 181 6857 5767  Email:[email protected]

Bluehorse   Wh86 181 6857 5767  Email:[email protected]

Bluehorse   Wh86 181 6857 5767  Email:[email protected]

Bluehorse   Wh86 181 6857 5767  Email:[email protected]

Bluehorse   Wh86 181 6857 5767  Email:[email protected]

Bluehorse   Wh86 181 6857 5767  Email:[email protected]

Bluehorse   Wh86 181 6857 5767  Email:[email protected]

Summary of Contents for 7900 Food Grade

Page 1: ...6 7 E m a i l s a l e s c h B l u e h o r s e W h a t s a p p 8 6 1 8 1 6 8 5 7 5 7 6 7 E m a i l s a l e s c h e e f c n B l u e h o r s e W h a t s a p p 8 6 1 8 1 6 8 5 7 5 7 6 7 E m a i l s a l e...

Page 2: ...re 7 3 2 To clean the printhead 8 3 2 1 Event messages 11 u e h o r s e W h a t s a p p 8 6 1 8 1 6 8 5 7 5 7 6 7 E m c h e e f c n a i l s a l e s c h e e f c n e e f c n B l u e h o r s e W h a t s...

Page 3: ...900 7900 Quick Start Guide u e h o r s e W h a t s a p p 8 6 1 8 1 6 8 5 7 5 7 6 7 E m c h e e f c n a i l s a l e s c h e e f c n e e f c n B l u e h o r s e W h a t s a p p 8 6 1 8 1 6 8 5 7 5 7 6 7...

Page 4: ...e information NOTE This option requires a configuration code that is set at the factory A service engineer can change the set code When you press the stop key the printer shutdown is delayed if necess...

Page 5: ...time that remains before the printer starts normally During this period the printer status is Idle If the warm up time has expired when you press the start key the printer starts normally The printer...

Page 6: ...plays a message to indicate the time that remains before the delayed shutdown automatically occurs This message is displayed for approximately five seconds Figure 2 Shut Down page After this message h...

Page 7: ...omatically First the printer displays the message You have 10 secs to cancel the power down The displayed number decreases every second 9 8 7 until it reaches 1 If you do not press a key the printer t...

Page 8: ...FA69034 and Linx Food Grade solvent 6600 must be used to clean the printhead Other materials or fluid can cause damage to the printer and invalidate its Food Grade status 3 1 About the procedure NOTE...

Page 9: ...dry before the printer is started 3 2 To clean the printhead 1 Stop and power down the printer as shown on page 4 2 Loosen the securing screw of the printhead cover tube then slide the cover off 3 Mo...

Page 10: ...r and Phase Plate E and mounting pillars F Face plate D The printed circuit board PCB to which these components are attached the area shown with a circle in Figure 4 on page 8 68711 A B C E F D u e h...

Page 11: ...arefully remove any ink deposits from the following components The DPP The EHT plate The PCB in the area shown with a circle in Figure 4 on page 8 Continue until any ink deposits that remain are remov...

Page 12: ...the printhead cover tube and tighten the securing screw 3 2 1 Event messages If the printer fails with the following event messages use the procedure described above to clean the printhead 2 02 Phase...

Reviews: