background image


43


Smart Surveillance

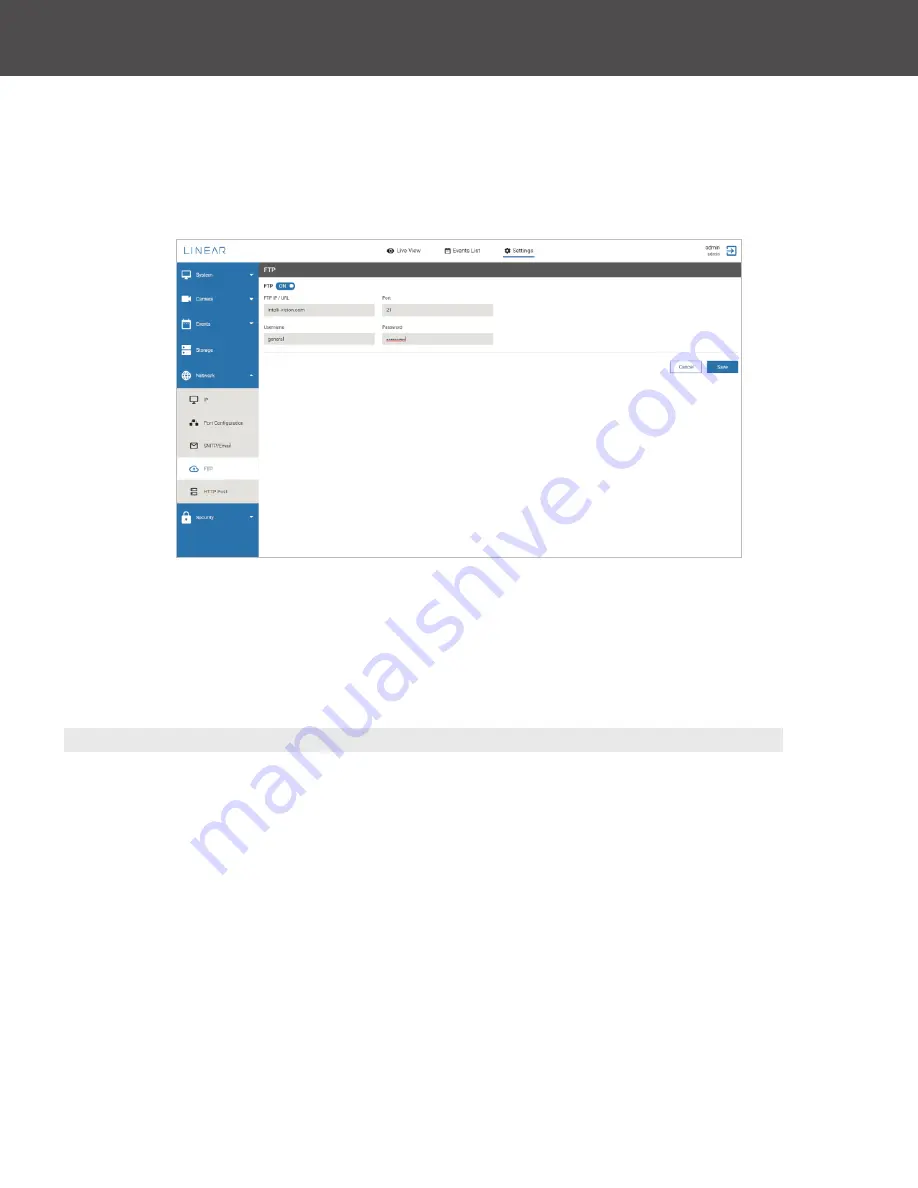
Figure 54: Network-FTP

FTP

This feature allows you to send video (events data) to an FTP Server whenever any event is 
generated by the IV400 camera. Also new folder (Folder Name: Mac ID of IV400 Camera) gets 
created on FTP server which will have recorded event data as per ‘<Date><Timestamp> with 6 
seconds .mp4 clips each.
End user needs to add require FTP login details as below example.

To configure the FTP for IV400 Camera, follow below steps:

1. 

Enter all required data.

2. 

Click 

Save

.

All event alert or data will be uploaded on the FTP Server. 

NOTE

: Use the FTP server to store event data only when the SD Card feature is disabled.

FTP IP / URL

: Enter the FTP server URL.

Port

: Enter manually required valid port number associated with FTP server.

Username

: Enter the FTP account user name.

Password

: Enter the FTP account password.

Summary of Contents for Nice 5MP Series

Page 1: ...User Manual IV400 Smart Surveillance Cameras 5MP SERIES Motorized Varifocal Lens Bullet Camera Fixed Lens Bullet Camera Fixed Lens Motorized Varifocal Lens Dome Camera...

Page 2: ...e tasks to be done with the application based on IV400 It will also help you learn some key concepts In this document you will learn about different events and settings An overview of the Artificial I...

Page 3: ...for Illustration 10 Motorized Varifocal Lens Bullet Camera Images for Illustration 11 2 5 Software Specifications 12 3 Getting Started 12 3 1 Accessing the IV400 camera in any Web Browser using HTTPS...

Page 4: ...ct Left Removed Detector 36 Object Classification 37 7 5 Storage 38 7 6 Network 39 Static Setting 39 DHCP Dynamic Host Configuration Protocol Settings 40 Port Configuration 41 SMTP Email 42 FTP 43 HTT...

Page 5: ...e settings to default values Reboot Shuts down and restarts the camera Restore Default Used to reset all the settings to default value except for network settings HTTPS Security protocol designed to f...

Page 6: ...dents with a powerful video surveillance system Video surveillance can help enormously with crowd control as well as prevent crime It equips security staff with real time images from an event Advance...

Page 7: ...mm Fixed 2 8 12 mm MFZ 2 8 mm Fixed 2 8 12 mm MFZ Field of view for h v d 103 79 134 88 30 65 23 115 38 103 79 134 88 30 65 23 115 38 Ethernet RJ 45 l0 l00Base T RJ 45 l0 l00Base T RJ 45 l0 l00Base T...

Page 8: ...focal Dome Fixed Bullet and Motorized Varifocal Bullet Fixed Dome Camera Images for Illustration Figure 1 Fixed Lens Dome Camera The following figure shows front view and rear view of the camera Figur...

Page 9: ...a Images for Illustration Figure 4 Motorized Varifocal Lens Dome Camera The following figure shows front view and rear view of the camera Figure 5 Front View of Motorized Varifocal Lens Dome Camera Fi...

Page 10: ...Camera Images for Illustration Figure 7 Fixed Bullet Camera The following figure shows front view and rear view of the camera Figure 8 Front View of Fixed Lens Bullet Camera Figure 9 Rear View of Fixe...

Page 11: ...mages for Illustration Figure 10 Motorized Varifocal Lens Bullet Camera The following figure shows front view and rear view of the camera Figure 11 Front View of Motorized Varifocal Lens Bullet Camera...

Page 12: ...he IV400 camera in any Web Browser using HTTPS or HTTP Protocol 1 Start your computer system and launch any installed browser 2 Enter the IV400 camera IP in the address bar to access its web UI for ex...

Page 13: ...rough LAN WAN network with POE Switch or NVR Make sure the IV400 camera firmware is up to date and the camera is powered on The default static IP for the IV400 Camera is 192 168 0 230 In the Mozilla F...

Page 14: ...s 2 Click Update Figure 17 Update Password Notes Be certain the Password entries match If needed click the icon to confirm If the new password is rejected a prompt will be displayed Confirm that all p...

Page 15: ...ouse to the top of the screen and click the X icon press the Esc key or click extreme bottom right side of screen 3 Speaker Adjust speaker volume Minimum to Maximum level using a slider Click the spea...

Page 16: ...ocus Adjust camera focus by Increasing or Decreasing Once the Focus is set a few seconds must pass before the new Zoom view will appear on live streaming 8 Auto Focus Click Autofocus to allow the came...

Page 17: ...ply Only selected events type will be displayed Figure 22 Settings System Information 6 Settings Configure various system settings to customize the live streaming experience 6 1 System Information 1 D...

Page 18: ...Camera Name pop up appears on screen Enter the new name and then click Save 2 FDFR License Validation Enter a FDFR License key then select Submit to validate the license Once validated the camera s F...

Page 19: ...ting a time zone DST will be set to Enable by default if applicable to the location Click Disable to turn off DST NTP Server URL For each region an IP address or domain name for the timeserver can be...

Page 20: ...nize the camera s date and time with the computer s operating system Select Save to keep the updated date and time settings Figure 26 Set Date and Time Manually Figure 27 System Maintenance 6 3 System...

Page 21: ...Unpacking Validating firmware files Upgrading camera with new firmware Rebooting the camera If the upgrade is successful An Upgrade Successful message will appear on screen Click OK to validate the u...

Page 22: ...the password from default 4 Reboot This feature allows you to reboot the Network Camera taking about 1 2 minutes to complete Click Reboot then click Yes to confirm If the network connection fails aft...

Page 23: ...ay live streaming on third party media player like VLC RTSP Real Time Streaming Protocol controls the delivery of streaming media By default the port number is set to 554 If you want to use an VLC pla...

Page 24: ...during live streaming 1 Mic Gain Adjust microphone volume level by moving slider from 1 100 2 Mic Mute Disable the Network Camera s microphone 3 Speaker Volume Adjust speaker volume level by moving s...

Page 25: ...x surrounding a recognized face displays the known person s name Unknown State will be displayed for unknown detected faces Flip Action flip Live View Options include None Rotate Vertical and Horizont...

Page 26: ...mber setting sharpens an image Keep in mind that increasing video sharpness increases video noise 5 Noise Filter This noise filter is used to reduce visible noise 6 Saturation Adjust the color intensi...

Page 27: ...erything else It evaluates a single zone cell and calculates exposure based on that single area Center Evaluates the light in the middle of the frame and its surroundings It ignores the corners Averag...

Page 28: ...depends on grid frequency North and South America 60Hz Europe and Asia 50Hz 13 WDR Wide Dynamic Range Strength Sometimes part of image is extremely dark and the other part is extremely light This make...

Page 29: ...ect the mode as Standard Advanced or Ultimate Standard Background is clear Advanced Background is blurred or not clear Ultimate Background is blurred or not clear It s more effective than the Advanced...

Page 30: ...Click the toggle switch to ON to activate Ignore Area The visible area is displayed in grid format B Perform any one of the following procedures Select Grid Size Select one of the grid sizes availabl...

Page 31: ...ble in the dropdown Select Area Using this option select required number of cells from the grid for motion event detection Select Area All Using this option select entire grid for motion event detecti...

Page 32: ...ght ON and Light OFF events are generated according to the light condition in the scene Figure 36 Camera Tamper Detector To enable camera tamper detection 1 To enable camera Tamper Detection and Light...

Page 33: ...the new zone simply drag drop to a new position in scene Edit Zone Clicking the Edit icon adjacent to the zone to be edited Select and drag the corners of a zone to set exact intrusion areas Click the...

Page 34: ...To enable Line Cross Detector 1 Click the Line Cross Detector toggle switch to the ON setting 2 Perform any one of the following procedures Draw Line Add a horizontal or vertical line in the scene Li...

Page 35: ...ly created zone Rectangle will be listed under Zones list in a unique color To move the new zone simply drag drop to a new position in scene Edit Zone Clicking the Edit icon adjacent to the zone to be...

Page 36: ...Object Removed can detect and alert when a specific object has been removed from the scene To configure Object Left Removed settings for camera click the checkbox for Object Left Detector or Object R...

Page 37: ...hen an object of interest is detected According to motion of any object Human Vehicle or Pet an event is generated To enable Object Classification To configure Object Classification settings for camer...

Page 38: ...y the events generated in front of IV400 Camera are recorded Event data is stored in mp4 format to the selected directory path For each event detected a folder is created with the combination of Date...

Page 39: ...successful network communications Default static IP for an IV400 camera is 192 168 0 230 Figure 50 Network Static IP Address Select DHCP or Static IP as required The IP address will be displayed in I...

Page 40: ...rnet Protocol IP address to any device or node on a network so they can communicate using IP Select this option to obtain an available dynamic IP address assigned for the IV400 Camera DHCP can be used...

Page 41: ...new port for RSTP to perform live streaming using third party media player like VLC instead of default ports To configure Network Port Configuration settings 2 Enter valid port in HTTP HTTPS and RSTP...

Page 42: ...ive recipient email address SMTP Email Enter the valid sender email address SMTP Username Enter the user name of the email account SMTP Password Enter the password of the email account SMTP Server Ent...

Page 43: ...ds mp4 clips each End user needs to add require FTP login details as below example To configure the FTP for IV400 Camera follow below steps 1 Enter all required data 2 Click Save All event alert or da...

Page 44: ...user change user passwords or delete users There are three types of users Administrator Operators and User Admin Role No restriction to create modify or remove any camera settings Operator Role Has l...

Page 45: ...ck Add User 2 Enter the Username 3 Select User Type Admin Operator or User 4 Enter Password 5 Click Save The newly added user will be listed on the user list see Figure 57 next page Add User Admin can...

Page 46: ...and 1 numeric character 3 Confirm New Password 4 Click Save to complete the password change process Delete User Admin can delete an existing user by following these steps 1 Click the Delete icon asso...

Page 47: ...0 Camera has a Self signed HTTPS certificate by default To upload a valid SSL Certificate 1 Select the Upload Certificate option is available on Web UI 2 Click Browse then locate the certificate file...

Page 48: ...and replace the existing HTTPS certificate 4 Access the IV400 Camera to apply the new certificate NOTE The country name should be in standard Alpha 2 code Access List 1 Enable Access List by selecting...

Page 49: ...tected in Events List tab next to Live View Question What is intrusion detection Answer Intrusion detection monitors activity within a defined area within the cameras field of view and issue alerts wh...

Page 50: ...ensitivity Question Why large objects are not detected by camera Answer Please check if maximum width height are set properly Question Why many false objects are detected Answer Try reducing the sensi...

Reviews: