background image

23

DO216SV

www.domo-elektro.be

EN

2

1

 · Always use the appliance on a steady, dry and level surface.
 · Only use the appliance for domestic use. The manufacturer can not be held responsible for 

accidents that result from improper use of the appliance or not following the instructions 
described in this manual. 

 · All repairs should be carried out by the manufacturer or its aftersales service. 
 · Never immerse the appliance, the cord or the plug in water or any other liquid. 
 · Make sure that children do not touch the cord or appliance.
 · Keep the cord away from sharp edges and hot parts or other heat sources. 
 · Before use, remove all packaging materials and any promotional stickers.  
 · Do not use the vacuum cleaner to vacuum up detergents, liquids, needles, matches and 

other similar liquids, sharp objects or flammable objects. 

 · Do not use the vacuum cleaner to vacuum up cement, powder and other small particles. 

Also avoid vacuuming up large objects. The vacuum cleaner could be clogged, the motor 
could overheat or other damage may occur. 

 · Make sure that the air intake or the floor suction opening do not become blocked. 
 · Make sure that the machine does not come into contact with liquids. 
 · First charge a new battery up completely. 
 · Pull the plug from the outlet when the vacuum cleaner is fully charged. 

PARTS

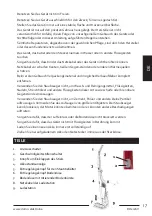
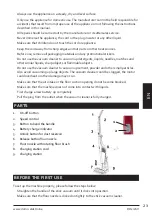
1.  On-off button
2.  Speed control
3.  Button to bend the handle 
4.  Battery charge indicator
5.  Unlock button for dust reservoir 
6.  Release button floor nozzle 
7.  Floor nozzle with rotating floor brush 
8.  Charging station cord 
9.  Charging station

BEFORE THE FIRST USE

To set up the machine properly, please follow the steps below:

 · Straighten the handle of the stick vacuum until it clicks into position. 
 · Make sure that the floor nozzle is clicked on tightly to the stick vacuum cleaner. 

Summary of Contents for DOMO DO216SV

Page 1: ...g Steelstofzuiger Mode d emploi Aspirateur balai Gebrauchsanleitung Stielstaubsauger Instruction booklet Stick vacuum cleaner Manual de instrucciones Aspirador escoba Návod k použití Tyčový vysavač Návod na použitie Tyčový vysávač ...

Page 2: ...instructions carefully save this instruction manual for future reference Lea detenidamente todas las instrucciones Conserve este manual para futura referencia Před použitím si důkladně přečtěte tento manuál manuál si uschovejte i pro případ budoucího nahlédnutí Pred použitím si dôkladne prečítajte tento manuál manuál si uschovajte aj pre prípad budúceho nahliadnutie NL Nederlands 3 FR Français 9 D...

Page 3: ...en of gerepareerd worden De garantieperiode van 2 jaar zal op dit moment niet terug beginnen maar loopt verder tot 2 jaar na de aankoop van het toestel De garantie wordt verleend op basis van het kassaticket Indien je apparaat defect is binnen de garantietermijn van 2 jaar dan mag je het toestel samen met het originele kassaticket binnenbrengen in de winkel waar je het toestel hebt aangekocht De g...

Page 4: ...terne timer of een aparte afstandsbediening Lees alle instructies voor gebruik Kijk voor gebruik na of het voltage vermeld op het toestel overeenkomt met het voltage van het elektriciteitsnet bij je thuis Laat het snoer niet op een heet oppervlak of over de rand van een tafel of aanrecht hangen Gebruik het toestel nooit wanneer het snoer of de stekker beschadigd is na een slechte werking van het t...

Page 5: ...rdelen of andere warmtebronnen Verwijder voor het eerste gebruik alle verpakkingsmaterialen en eventuele promotionele stickers Gebruik de stofzuiger niet om detergenten vloeistoffen of andere gelijkaardige vloeistoffen naalden lucifers scherpe voorwerpen of brandbare voorwerpen op te zuigen Gebruik de stofzuiger niet om cement poeder en andere kleine deeltjes op te zuigen Vermijd ook het opzuigen ...

Page 6: ...t 5 Tijdens het opladen kan het toestel niet gestart worden GEBRUIK Druk op de aan uitschakelaar op de steel om het toestel aan te zetten Het indicatielampje van de batterij is groen en geeft het batterijniveau aan Als de batterij bijna leeg is zal dit lichtje aan en uit knipperen Wanneer je het toestel aanzet zal de roterende vloerborstel onderaan de vloerzuigmond beginnen te draaien Hierdoor zal...

Page 7: ...TEL PROPER MAKEN 1 Verwijder de vloerzuigmond van de steelstofzuiger Druk hiervoor de ontgrendelknop boven de vloerzuigmond in en trek deze uit het toestel 2 Open het slotje aan de linkerzijde van de vloerborstel en klik het klepje los 3 Neem de roterende vloerborstel uit de vloerzuigmond 4 Verwijder haren en ander vuil die zich rond de vloerborstel gewikkeld hebben Wanneer de vloerborstel niet re...

Page 8: ...CHTLIJNEN Dit symbool op het product of op de verpakking wijst erop dat dit product niet als huishoudafval mag worden behandeld Het moet naar een plaats worden gebracht waar elektrische en elektronische apparatuur wordt gerecycleerd Als je ervoor zorgt dat dit product op de correcte manier wordt verwijderd voorkom je mogelijk voor mens en milieu negatieve gevolgen die zich zouden kunnen voordoen i...

Page 9: ...de fonctionnement matériel ou de fabrication Si un tel problème survient l appareil sera remplacé ou réparé La période de garantie de 2 ans ne reprend pas à zéro mais se poursuit jusqu à 2 ans à compter de la date d achat de l appareil La garantie est accordée sur la base du ticket de caisse Pour les accessoires et les éléments d usure une garantie de 6 mois s applique La garantie et la responsabi...

Page 10: ...uillez lire toutes les instructions avant d utiliser l appareil Vérifiez avant usage si la tension indiquée sur l appareil correspond à la tension du réseau électrique de votre domicile Ne laissez pas le cordon pendre sur une surface chaude ou sur le rebord d une table N utilisez jamais l appareil lorsque le cordon ou la fiche sont endommagés après un mauvais fonctionnement de l appareil ou lorsqu...

Page 11: ...ets tranchants ou inflammables N utilisez pas l aspirateur pour aspirer du ciment de la poudre ou d autres petites particules Évitez également d aspirer de grands objets Ils pourraient bloquer l aspirateur le moteur pourrait surchauffer ou d autres dégâts pourraient se produire Veillez à ce que l arrivée d air ou le suceur pour sols ne soient pas bloqués Veillez à ce que l appareil n entre pas en ...

Page 12: ... batterie Quand la batterie est presque déchargée ce témoin se mettra à clignoter Lorsque vous allumez l appareil la brosse rotative pour sols située à la partie inférieure du suceur pour sols commencera à tourner Par ce mouvement la saleté sera envoyée dans l ouverture et aspirée de la sorte Appuyez sur le régulateur de vitesse pour augmenter ou diminuer la puissance d aspiration L appareil est m...

Page 13: ...ur pour sols et retirez celui ci de l appareil 2 Ouvrez le fermoir situé à gauche de la brosse pour sols et déclipsez le clapet 3 Retirez la brosse rotative du suceur pour sols 4 Enlevez les cheveux et autres saletés qui se sont enroulés autour de la brosse de sols Si vous ne nettoyez pas régulièrement la brosse de sols elle peut s endommager et rendre l appareil inutilisable 5 La brosse de sols r...

Page 14: ...a batterie MISE AU REBUT Ce symbole sur le produit ou son emballage indique que ce produit ne peut être traité comme déchet ménager Il doit plutôt être remis au point de ramassage concerné se chargeant du recyclage du matériel électrique et électronique En vous assurant que ce produit est éliminé correctement vous favorisez la prévention des conséquences négatives pour l environnement et la santé ...

Page 15: ...ionsfehler zurückzuführen sind Wenn derartige Mängel auftreten wird das Gerät wenn nötig ausgetauscht oder repariert Die Garantiezeit von 2 Jahren beginnt in diesem Moment nicht erneut sondern sie läuft bis 2 Jahre nach dem Kaufdatum weiter Die Garantie wird auf der Grundlage des Kassenbons gewährt Die Garantie auf Accessoires undVerschleißteile beträgt 6 Monate Die Garantie und dieVerantwortung H...

Page 16: ...te alle Anweisungen vor dem Gebrauch durchlesen Vor der Benutzung prüfen ob die Spannung die auf dem Gerät angegeben ist mit der Spannung Ihres Stromnetzes übereinstimmt Lassen Sie das Netzkabel nicht über denTisch oder die Anrichte hängen oder in Kontakt mit heißen Oberflächen kommen Benutzen Sie das Gerät niemals wenn die Kabelschnur oder der Stecker beschädigt ist nach beeinträchtigtem Funktion...

Page 17: ...rauchVerpackungsmaterial und möglicheWerbeaufkleber komplett entfernen Verwenden Sie den Staubsauger nicht umWasch und Reinigungsmittel Flüssigkeiten Nadeln Streichhölzer und andere Flüssigkeiten dieser Art sowie scharfe oder brennbare Gegenstände einzusaugen Verwenden Sie den Staubsauger nicht um Zement Pulver und andere kleine Partikel aufzusaugen Vermeiden Sie das Aufsaugen von größeren Objekte...

Page 18: ...ist Nach einiger Zeit erlischt diese Anzeige 5 Während des Ladevorgangs kann das Gerät nicht eingeschaltet werden GEBRAUCH Betätigen Sie den Ein Ausschalter um das Gerät einzuschalten Die Kontrollleuchte der Batterie ist grün und zeigt den Ladezustand an Wenn die Batterie fast leer ist blinkt diese Leuchte Wenn Sie das Gerät einschalten beginnt sich die rotierende Bodenbürste im unteren Teil der B...

Page 19: ...fernen Sie die Bodendüse vom Stielstaubsauger Drücken Sie dazu den Entriegelungsknopf oberhalb der Bodendüse nach unten und ziehen sie diese aus dem Gerät 2 Öffnen Sie dieVerriegelung an der linken Seite der Bodenbürste und entfernen Sie die Klappe 3 Nehmen Sie die rotierende Bodenbürste aus der Bodendüse 4 Entfernen Sie Haare und anderen Schmutz der sich rund um die Boden bürste gewickelt hat Wir...

Page 20: ...estsitzende Haare aus den Bürsten ENTSORGEN Dieses Symbol auf dem Produkt oder seinerVerpackung weist darauf hin dass dieses Produkt nicht als normaler Haushaltsabfall zu behandeln ist sondern an einem Sammelpunkt für das Recyling von elektrischen und elektronischen Geräten abgegeben werden muss Durch Ihren Beitrag zum korrekten Entsorgen dieses Produkts schützen Sie die Umwelt und die Gesundheit ...

Page 21: ...ong use not following the instructions or repairs executed by a third party The guarantee is issued with the original till receipt All parts which are subject to wear are excluded from the warranty If your device breaks down within the 2 year warranty period you can return the device together with your receipt to the shop where you purchased it The guarantee on accessories and components that are ...

Page 22: ...annot be used with an external timer or a separate remote control Read all instructions before use Before use check if the voltage stated on the appliance corresponds with the voltage of the power net at your home Do not let the cord hang on a hot surface or on the edge of a table or counter top Never use the appliance when the cord or plug is damaged after malfunction or when the appliance itself...

Page 23: ...objects or flammable objects Do not use the vacuum cleaner to vacuum up cement powder and other small particles Also avoid vacuuming up large objects The vacuum cleaner could be clogged the motor could overheat or other damage may occur Make sure that the air intake or the floor suction opening do not become blocked Make sure that the machine does not come into contact with liquids First charge a ...

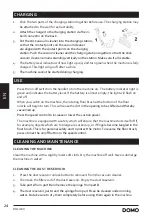
Page 24: ...d off When you switch on the machine the rotating floor brush at the bottom of the floor nozzle will begin to turn This will cause the dirt in the opening to be shifted and thereby vacuumed up Press the speed control to increase or lower the suction power The machine is equipped with a safety which will ensure that the machine shuts itself off if for example objects which are too large are sucked ...

Page 25: ...e unusable 5 The rotating floor brush may be rinsed off under running water Make sure that it is completely dry before using it 6 Place the floor brush back into the floor nozzle when it is clean 7 Click the closure valve back into place to close it Close the release button 8 Push the nozzle back onto the stick The machine is now again ready for use Stuck hairs can damage the machine or your floor...

Page 26: ...y ensuring this product is disposed of correctly you will help prevent potential negative consequences for the environment and human health which could otherwise be caused by inappropriate waste handling of this product For more detailed information about recycling of this product please contact your local city office your household waste disposal service or the shop where you purchased the produc...

Page 27: ... compra La garantía se concede sobre la base del recibo de caja La garantía de los accesorios y componentes sujetos a desgaste es de 6 meses La garantía y la responsabilidad imputabilidad del proveedor y el fabricante expiran automáticamente en los siguientes casos Cuando no se cumplan las instrucciones que aparecen en este manual En el caso de una conexión inadecuada por ejemplo a una tensión elé...

Page 28: ...istancia separado Lea todas las instrucciones antes del uso Antes de utilizarlo compruebe si el voltaje indicado en el aparato corresponde al voltaje de la electricidad de su casa No permita que el cable cuelgue sobre una superficie o el borde de una mesa o encimera No utilice nunca el aparato si el cable o el enchufe están dañados después de un mal funcionamiento de la unidad o si están dañados L...

Page 29: ...rar cemento polvo y otras partículas finas Evite también la aspiración de objetos grandes La aspiradora se podría bloquear el motor se podría sobrecalentar o se podrían producir otros tipos de daños Asegúrese de que la entrada de aire o la boca de aspiración del suelo no queda bloqueada Asegúrese de que el cable no entra en contacto con líquidos Cargue siempre una batería nueva por completo Descon...

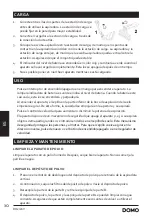
Page 30: ...Al encender el aparato el cepillo en la parte inferior de la boca de aspiración del suelo empezará a girar De esta forma la suciedad se empujará en la apertura y se aspirará Pulse el control de velocidad para aumentar o disminuir la potencia de aspiración El aparato dispone de un mecanismo de seguridad que apaga el aparato p ej si se aspiran objetos demasiado grandes o se introducen dedos en el ce...

Page 31: ...del cepillo y suelte la tapa 3 Saque el cepillo giratorio de la boca de aspiración del suelo 4 Elimine pelos y otra suciedad atrapados alrededor del cepillo Si el cepillo de suelo no se limpia con regularidad puede dañarse por lo que ya no se podrá utilizar el aparato 5 El cepillo se puede limpiar bajo agua corriente En ese caso debe quedar completamente seco antes de volver a colocarlo 6 Vuelva a...

Page 32: ...DIOAMBIENTALES El símbolo en el producto o en el embalaje indica que este producto no puede ser tratado como residuo doméstico Se debe llevar a un lugar en el que se reciclan equipos eléctricos y electrónicos Si se asegura de que este producto se desecha correctamente usted ayudará a evitar posibles consecuencias negativas para las personas y el medio ambiente que serían causadospor un tratamiento...

Page 33: ... mechanické poškození b nesprávné používání v rozporu s návodem k použití 1 záruka zaniká při použití spotřebiče jinak než v domácnosti při provádění opravy nebo změny na spotřebiči osobou jinou než pověřenou naším servisem Na tento spotřebič poskytujeme záruku na nedostatky které jsou označeny jako výrobní chyby nebo chyby materiálu Záruční doba začíná dnem prodeje a je uznána po předložení potvr...

Page 34: ...i důkladně přečtěte tento manuál Pečlivě zkontrolujte zda napětí a frekvenceVaší elektrické sítě odpovídá údajům uvedeným na typovém štítku spotřebiče Zástrčka musí být zapojena do vhodné zásuvky která je nainstalována a uzemněna v souladu se všemi normami a předpisy platnými v dané zemi Přívodní kabel nesmí ležet na horkém povrchu ani viset přes ostré hrany nábytku Nezapojujte přístroj s poškozen...

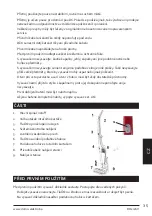
Page 35: ...i jemné prášky Také nevysávejte příliš velké předměty které by vysavač mohly ucpat nebo jinak poškodit Otvor pro vstup vzduchu a sací otvor v hubici musí být vždy dostatečně průchodný Vysavač nesmí přijít do styku s kapalinami proto jej do kapalin neponořujte ani je nevysávejte První dobíjení baterií musí být nabito naplno Až jsou baterie kompletně nabity vypojte vysavač z el sítě ČÁSTI 1 Hlavní s...

Page 36: ...očit rotační kartáč v hubici To proto aby se dosáhlo vynikajícího výsledku vysávání Smetí a nečistoty jsou naháněny do středu hubice a následně vysáty Na rukojeti si můžete navolit rychlost otáčení kartáče a zároveň i sací výkon Vysavač je vybaven bezpečnostní pojistkou která přístroj automaticky vypne v případě zablokování sacího otvoru nebo když se zablokuje rotační kartáč Pojistka slouží kvůlí ...

Page 37: ...vé hubice stiskněte uvolňovací tlačítko a odejměte kryt 3 Z podlahové hubice vyjměte rotační kartáč 4 Z kartáče vyčistěte všechny vlasy a namotané nečistoty Kartáč čistěte pravidelně Pokud nebudete kartáč udržovat čistý může to vést k nadměrnému namáhání a poškození přístroje 5 Samotný rotační kartáč můžete umývat pod tekoucí vodou Před vložením kartáč nechte důkladně vyschnout 6 Čistý a suchý kar...

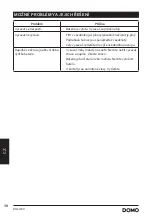
Page 38: ...íku je špinavý zásobník nečistot je plný Podlahová hubice je ucpaná kartáč zaseknutý Celý vysavač vyčistěte dle výše uvedeného postupu Rapidně se zkracuje aktivní doba výdrže baterie Vysavač nebyl nabitý na 100 Nechte nabít vysavač znovu a naplno Zkuste znovu Baterie je buď stará nebo rozbitá Nechte vyměnit baterii V kartáči jsou namotané vlasy Vyčistěte ...

Page 39: ...ístech určených ke sběru a likvidaci elektrických a elektronických zařízení Dodržením tohoto doporučení chráníte životní prostředí a zdraví spoluobčanů Více informací o možnostech likvidace nebezpečného odpadu obdržíte na obecních nebo městských úřadech sběrných dvorech nebo v prodejně kde jste přístroj zakoupili Obalové materiály jsou recyklovatelné nakládejte s nimi podle předpisů pro životní pr...

Page 40: ...škodenie b nesprávne používanie v rozpore s návodom na použitie 1 záruka zaniká Pri použití spotrebiča inak ako v domácnosti Pri vykonávaní opravy alebo zmeny na spotrebiči osobou inou ako poverenou naším servisom Na tento spotrebič poskytujeme záruku na nedostatky ktoré sú označené ako výrobné chyby alebo chyby materiálu Záručná doba začína dňom predaja a je uznaná po predložení potvrdeného tohot...

Page 41: ...OR Prístroj nesmie byť používaný s externým časovačom ani inú neoriginálne súčasťou Pred použitím si dôkladne prečítajte tento manuál Starostlivo skontrolujte či napätie a frekvencia vašej elektrickej siete zodpovedá údajom uvedeným na typovom štítku spotrebiča Zástrčka musí byť zapojená do vhodnej zásuvky ktorá je nainštalovaná a uzemnená v súlade so všetkými normami a predpismi platnými v danej ...

Page 42: ... odlepte všetky reklamné a ochrannej fólie S vysávačom nevysávajte žiadne kvapaliny ihly zápalky ani iné podobné ostré alebo horľavé predmety S vysávačom nevysávajte cement ani jemu podobné veľmi jemné prášky Tiež nevysávajte príliš veľké predmety ktoré by vysávač mohli upchať alebo inak poškodiť Otvor pre vstup vzduchu a sací otvor v hubici musí byť vždy dostatočne priechodný Vysávač nesmie prísť...

Page 43: ...hvíli zhasne 5 Pri priebehu nabíjania nie je možné vysávač zapnúť POUŽITIE Pre spustenie stlačte hlavné tlačidlo on off na rukoväti vysávača Svetelná kotrolky by mala svietiť na zeleno a ukazovať stav nabitia Vo chvíli keď bude batéria takmer vybitá začne kontrolka blikať a následne zhasne Po zapnutí vysávača sa začne točiť rotačná kefa v hubicu To preto aby sa dosiahol vynikajúceho výsledku vysáv...

Page 44: ...ČISTENIE PODLAHOVÉ HUBICA 1 Vysávač obráťte a vysuňte podlahovú hubicu Najskôr musíte stlačiť uvoľňovacie tlačidlo v zadnej časti hubice a následne hubicu odňať 2 Na ľavej strane podlahovej hubice stlačte uvoľňovacie tlačidlo a odstráňte kryt 3 Z podlahovej hubice vyberte rotačná kefa 4 Z kefy vyčistite všetky vlasy a namotané nečistoty Kefa čistite pravidelne Ak nebudete kefa udržiavať čistý môže...

Page 45: ...v zásobníku je špinavý zásobník nečistôt je plný Podlahová hubica je upchaná kefa zaseknutý Celý vysávač vyčistite podľa vyššie uvedeného postupu Rapídne sa skracuje aktívnu doba výdrže batérie Vysávač nebol nabitý na 100 Nechajte nabiť vysávač znova a naplno Skúste znova Batéria je buď stará alebo rozbitá Nechajte vymeniť batériu V kefe sú namotané vlasy Vyčistite ...

Page 46: ... na zber a likvidáciu elektrických a elektronických zariadení Dodržaním tohto odporúčania chránite životné prostredie a zdravie spoluobčanov Viac informácií o možnostiach likvidácie nebezpečného odpadu obdržíte na obecných alebo mestských úradoch zberných dvoroch alebo v predajni kde ste prístroj zakúpili Obalové materiály sú recyklovateľné nakladajte s nimi podľa predpisov pre životné prostredie ...

Page 47: ...47 DO216SV www domo elektro be SK ...

Page 48: ...cessoires en onderdelen online via of scan hier COMMANDEZ d authentiques accessoires et pièces Domo en ligne sur ou scannez ici BESTELLEN SIE die Domo Original Zubehör und Ersatzteile online über oder hier scannen ORDER the original Domo accessories and parts online at or scan here webshop domo elektro be Webshop ...

Reviews: