background image

Speaker connection

WARNING: Make sure that the device is not plugged into the mains before making any connections. It is also 

recommended to turn off or disconnect all other devices associated while making connections to the product. 

Check the impedance of your speakers. When using a pair of speakers, you can use speakers with an impedance of 

between 4 and 8 ohms. BE SURE TO USE THE MATCHING TERMINALS.

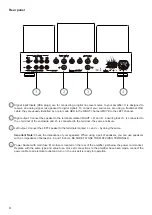
Speaker terminal

Speaker cable or 

U-type terminal

1- Unscrew the terminal by hand.

2- Insert the loudspeaker cable (refer to the diagram below).

3- Screw the terminal.

4- Repeat the same operation for the other 3 terminals.

Connect the speaker cables with the amplifier after they have been connected to with the speakers.


Please notice the polarity of the cable and do not mix up the positive and the negative ends.

l

l

Never operate the amplifier without having first connect the loudspeakers. The operation of a tube amplifier tube is 

different from transistor amplifier; without speakers connected, energy is dissipated through the transformers of the 

amplifier which will damage the product and reduce it’s useful life.

Make  sure  that  no  wires  can  short  the  speaker  outputs.  Make  sure  that  the  speaker  terminals  are tight enough to 

ensure a good electrical connection. If the terminal screws are not tight enough, the sound quality may be affected. 

Use only dedicated wire to connect the speakers. A section of 1.5 mm² or more is recommended if the cable length is 

greater than 3m. 

10

Summary of Contents for LM-150IA

Page 1: ......

Page 2: ...LM 150IA OWNER S MANUAL ...

Page 3: ... operation In order to prevent damage during transportation the amplifier and its tubes are packed with protective foam please remove these foam pieces before operating your amplifier to avoid any risks Table of contents 2 Package contents 3 Product features 3 Specifications 4 Safety instructions 4 Recommendations 5 Recycling product 5 Glossary 5 Location and precautions 5 Power sources 6 Warranty...

Page 4: ...ee pairs of Line inputs One Pre In and speaker terminals for 4 8 16 ohm speakers are located on the back panel Different from other inputs Pre In offers you a possibility to connect to some other Preamplifier so that you can regard the LM 150IA as a power amplifier RCA terminals are specially designed by Line Magnetic for the amplifier It can reduce the signal loss during transition and guarantee ...

Page 5: ...rong shocks Unplug the power cord if you are not going to use the product for an extended period of time or during lightning storms Take great care of electrical connections power cord and plugs In particular do not walk on or press the power cord specifically at plugs power plant and the output of the power supply Be sure to use an appropriate power supply to the power jack on the unit outlet Esp...

Page 6: ...put voltage level of the amplifier is 240VAC 5 and please make sure that your local voltage is the same as indicated on the rear panel A too low or too high voltage can cause serious damage to your amplifier In case you find an improper voltage please contact our company or your local dealer With headphones do not use it to excessive noise Otherwise prolonged listening at high volume levels may ca...

Page 7: ... dealer or the company responsible for the power supply in your area Turn off device if you do not intend to use this unit for a long time In case of prolonged absence from home it is recommended to unplug from the electrical outlet Make sure each cable is correctly inserted To prevent hum or background noise do not mix antenna or other cables with the power cord or speaker wires Keep all packing ...

Page 8: ... IN mode If PRE IN is selected the amplifier will work as a Power Amplifier Selector Source selection among LINE 1 LINE 2 and LINE 3 inputs Volume knob This volume knob adjusts the output volume of the amplifier sent to the loudspeaker Volume up to the right while volume down to the left Mute If it is muted the indicator will twinkle Mute from remote control Front panel Functions descriptions 5 6 ...

Page 9: ...terminal of the enclosure and R is connected to the terminal the same enclosure Left output Connect the LEFT speaker to the terminals marked L and L by doing the same Important Note Check the impedance of your speakers When using a pair of speakers you can use speakers with an impedance of between 4 8 and 16 ohms BE SURE TO USE THE MATCHING TERMINALS Power Socket with main fuse Main fuse is locate...

Page 10: ...the If you have any questions please contact a local maintenance service or your local dealer Bias adjustment for KT150 and KT120 tubes WARNING When making adjustments be careful not to burn yourself with tubes that are very hot Select the tube you want to adjust from V1 to V4 then position the Bias Current and adjust the tube bias with a Note You do not need to perform the bias adjustment when us...

Page 11: ... cables with the amplifier after they have been connected to with the speakers Please notice the polarity of the cable and do not mix up the positive and the negative ends l l Never operate the amplifier without having first connect the loudspeakers The operation of a tube amplifier tube is different from transistor amplifier without speakers connected energy is dissipated through the transformers...

Page 12: ...n manuals 2 Please do not insert the power cord into the main socket until all sources are connected 3 R refers to the Right channel while L represents the Left channel Do not also fasten signal cables together with other cables such as power cables to avoid disturbance Connection of the power cord operation Audio connection Connect to 240V 50HZ 11 ...

Page 13: ... working After 30 seconds the orange led blinking will stabilize to indicate that the amplifier is ready for use Select the source you want to listen to with the SELECTOR button located to the right of the front panel Adjust the VOLUME knob as you like to enjoy your music It is normal that power transformer becomes hot for extended period of operation Unplug the product during lightning storms or ...

Page 14: ...ert them in the correct position 3 Screw the battery cover back into place Replacement of the batteries When the batteries are low please replace them with new ones Do not mix the new batteries with old ones Please use high quality batteries these can prevent leakage of electrolyte l l l Volume button to increases sound level button to decreases sound level Mute To silence the system 13 ...

Page 15: ...aintenance WARNING As a precaution it is best to unplug the unit before handling and ensure the heat generated by the product has been properly dissipated Cleaning 1 Use soft dry cloth to clean the amplifier 2 Refer to the safety precautions if you are going to use chemically treated cloth for cleaning 3 Use a soft cloth with neutral detergent first and then wipe with a dry cloth 14 ...

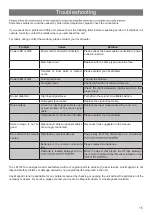
Page 16: ... No reaction to the remote control Disturbed by external devices Keep away from the disturbance ie microwave Batteries of the remote control are low Please replace the batteries Obstacle is located between the re Move the object that blocks the IR rays between the remote control and the IR sensor located on the Sometimes problems could be caused by other related equipment please check the connecti...

Page 17: ...Line Magnetic Australia Pty Ltd Email service line magnetic com au www line magnetic com au ...

Reviews: