background image

User Manual 


English 


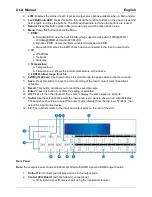
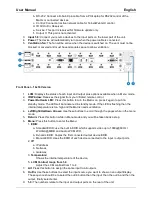
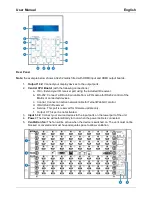
Front Panel 

– 32x32 Version 

1. 

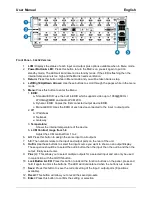
LCM:

 Displays the status of each input and output plus options available when in Menu mode. 

2. 

Power Button & LED:

 Press this button to turn the Matrix on, press it again to put it in 

standby mode. The LED will illuminate red in standby mode. If the LED is flashing then the 
internal temperature is too high and the Matrix needs ventilation. 

3. 

Return:

 Press this button while in Menu mode and you will be taken back a step. 

4. 

Left/Right/Up/Down Arrows:

 Use these buttons to scroll through the pages while in the menu 

mode. 

5. 

Menu:

 Press this button to enter the Menu: 

1. 

EDID:


a.  Standard EDID: use the built in EDID which supports video up to 1080p@60Hz / 

WUXGA@60RB and Audio LPCM 2CH. 

b.  Dynamic EDID: Copies the first connected output device EDID. 
c.  Manual EDID: Uses the EDID of each device connected to the input / output ports. 

2. 

IP: 

a. IP address 
d.  Netmask 
e.  Gateway 

3. 

Temperature:


Shows the internal temperature of the device 

6. 

LCM Contrast range from 1-4


Adjust the LCM contrast from 1 to 4 

6. 

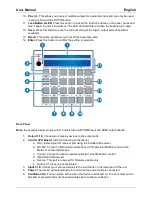
All:

 Press this button to assign the same input to all outputs 

7. 

1-9:

 The numbers relate to the input and output ports on the rear of the unit.  

8. 

Out/In:

 Use these buttons to select the input source you want to show on an output/display. 

The sequence should be to select the out/in button then the input, then the out/in and then the 
output, finally select enter.   

9. 

Plus (+):

 This allows you to select multiple outputs for a selected input and can only be used 

in conjunction with the OUT/IN button.  

10. 

Lock Button & LED:

 Press this button to lock all the function buttons on the panel, press and 

hold it again to unlock the buttons. The LED will illuminate red when the buttons are locked. 

11. 

Save:

 Press this button to save the current setting of the Input / output ports (8 positions 

available). 

12. 

Recall:

 This button will allow you to recall the saved pre-sets. 

13. 

Enter:

 Press this button to confirm the setting or selection 


Summary of Contents for 38258

Page 1: ...LINDY ELEKTRONIK GMBH SECOND EDITION March 2016 Modular Matrix Range User Manual English No 38250 38251 38252 38253 38254 38255 38256 38257 38258 38259 www lindy com Tested to Comply with FCC Standar...

Page 2: ......

Page 3: ...d C6 HDBaseT Features Modular Chassis Supports HDMI 4K C6 HDMI Extender 4K VGA WUXGA and DVI 1080p resolutions Modular input and output boards can be mixed between multiple interfaces Supports Audio p...

Page 4: ...Contrast range from 1 4 6 Left Right Arrows Use these buttons to scroll through the pages while in the menu mode 7 Save Press this button to save the current setting of the Input output ports 8 posit...

Page 5: ...e LED will illuminate red in standby mode If the LED is flashing then the internal temperature is too high and the Matrix needs ventilation 4 Left Right Up Down Arrows Use these buttons to scroll thro...

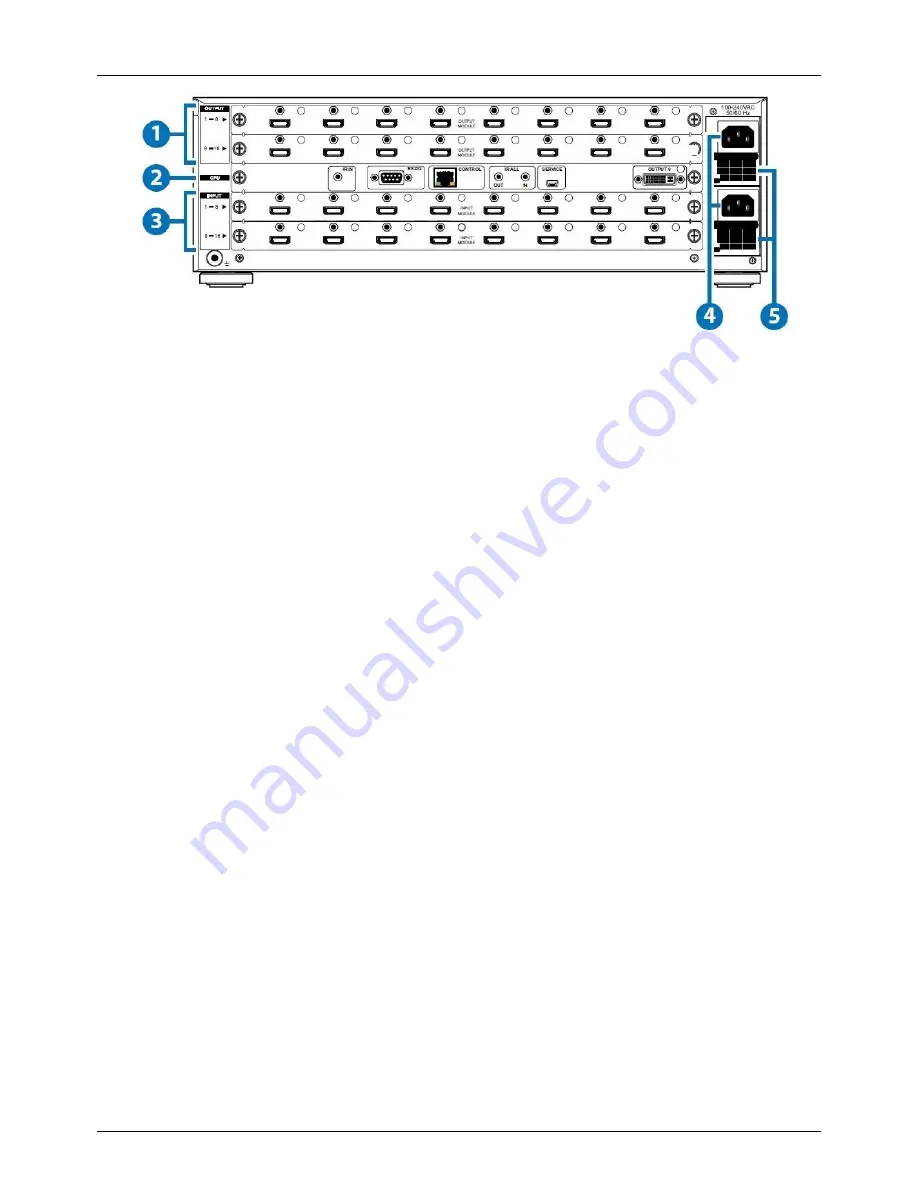
Page 6: ...input and HDMI output boards 1 Output 1 16 Connect your display devices to the output ports 2 Central CPU Board with the following connections a IR In Extend your IR receiver port using the included I...

Page 7: ...IP address d Netmask e Gateway 3 Temperature Shows the internal temperature of the device 6 LCM Contrast range from 1 4 Adjust the LCM contrast from 1 to 4 6 All Press this button to assign the same i...

Page 8: ...2 control of the Matrix or connected devices c Control Connect an active network cable for Telnet Web GUI control d IR All Out In Reserved e Service This port is reserved for firmware update only f Ou...

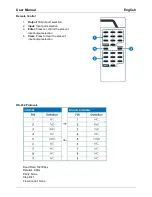
Page 9: ...rt selection 2 Input Input port selection 3 Enter Press to confirm the present input output selection 4 Clear Press to clear the present input output selection RS 232 Protocols Baud Rate 19200bps Data...

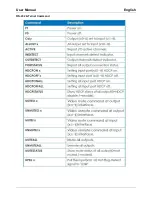
Page 10: ...User Manual English RS 232 Telnet Command...

Page 11: ...User Manual English...

Page 12: ...nnected using an active network To access the telnet control in Windows 8 click on the start menu and type CMD and press enter When using Windows 7 click on the start menu and type CMD in the search f...

Page 13: ...y connected to the Matrix type HELP and press enter to see the available list of commands Type IPCONFIG to show all IP configurations To reset the IP type RSTIP To use a static IP type SETIP The full...

Page 14: ...ontrol and user setting pages Click on the Control tab to control power input output ports EDID Reset mode Click on the User Setting tab to reset the IP configuration The system will require a reboot...

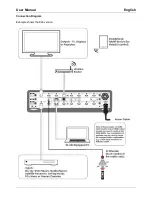
Page 15: ...User Manual English Connection Diagram Example shows the 8x8 version...

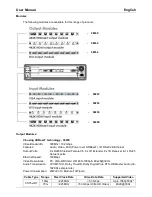
Page 16: ...IR Extender 8 x IR Receiver 1 x RJ45 Network ports Ethernet Speed 100Mbps Video Resolutions PC VGA WUXGA HD 480i 1080p 4Kx2K 30Hz Audio Transmission LPCM7 1CH Dolby TrueHD Dolby Digital Plus DTS HD M...

Page 17: ...HDMI Type A Female Video Resolutions PC VGA WUXGA HD 480i 1080p 4Kx2K 30Hz Audio Transmission LPCM7 1CH Dolby TrueHD Dolby Digital Plus DTS HD Master Audio 32 192KHz sample rate Cable Lengths Maximum...

Page 18: ...K 30Hz Audio Transmission LPCM7 1CH Dolby TrueHD Dolby Digital Plus DTS HD Master Audio 32 192KHz sample rate Power Consumption 45W Cable Type Range Pixel Clock Rate Video Data Rate Supported Video CA...

Page 19: ...terference in a residential installation You are cautioned that changes or modification not expressly approved by the party responsible for compliance could void your authority to operate the equipmen...

Page 20: ...ssen den lokalen Sammelsystemen bzw rtlichen Sammelstellen zugef hrt werden Dort werden sie kostenlos entgegen genommen Die Kosten f r den weiteren Recyclingprozess bernimmt die Gesamtheit der Ger teh...

Reviews: