Lindy 38216 User Manual Download Page 4

User Manual 


English


Overview & Operation 
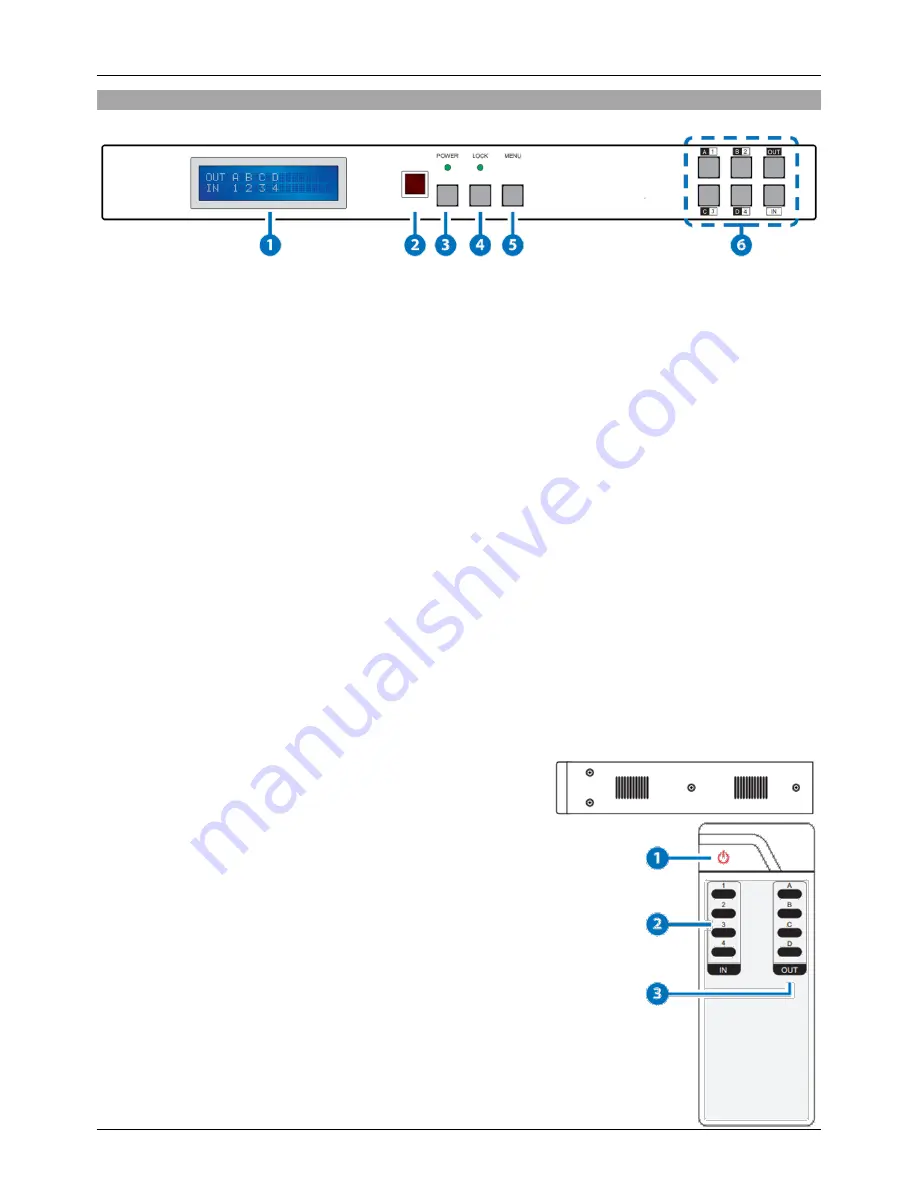
Front Panel 


1 LCD 

Displays the setting information of each input and output setting. 

2 IR Window 

IR Receiver window (accepts the remote control signal of this device only). 

3 POWER 

Press  this button  to  power the device  on/off.  The  LED  will  illuminate  green  when the power  is  on,  red 
when it is in 'Standby' mode. 

4 LOCK 

Press this button to lock all the buttons on the panel; press again to unlock. The LED will illuminate when 
locked. 

5 MENU 

Press to access the menu system for EDID and IP settings, e.g. press once to select EDID setting from 
STD (internal) 1 or TV (external) 2 then press it again to confirm the selection. Press the 

MENU

 button to 

confirm the input or output selection. 

6 IN/OUT and 1 

– 4 / A – D 

Press  the 

OUT

  button  and  then  the  number  buttons  to  select  the  required  output  ports,  and  press 

IN


button  and  then  a  single  number  button  to  select  the  required  input  source,  finally  press  the 

MENU


button to confirm the selection. For example, if Outputs A & B need to be set to Input 1 and Outputs C & 
D need to be set to Input 2, then the following sequence of button presses need to be performed: 
Press: 

OUT

 > 

A

 > 

B

 > 

IN

 > 

1

 > 

MENU

, and then press: 

OUT

 > 

C

 > 

D

 > 

IN

 > 

2

 > 

MENU

Note: If the menu button is not pressed to confirm the selection will not be changed. 

 
Side Panel 


These are fan ventilation areas, DO NOT block these areas or 
cover  them  with  any  object.  Ensure  there  is  adequate  space 
around the unit for air to circulate.


Remote Control 


1 POWER 

Press this button to switch on the device or set it to standby mode. 

2 1 - 4 IN 

Input port selection 1 - 4. 

3 A - D OUT 

Output  ports  selection  A  -  D.  Note:  IR  Matrix  control  from  Zones  only 
require the user to select the desired input. 


Summary of Contents for 38216

Page 1: ...LIMITED LINDY ELEKTRONIK GMBH FIRST EDITION September 2014 C6 HDMI 4x4 Matrix Premium 100m with HDBaseT Technology User Manual English No 38216 www lindy com Tested to Comply with FCC Standards For H...

Page 2: ...IMPORTANT Only use a direct Cat 5e 6 7 cable connection between the HDBaseT ports Do not connect these ports to Network or Ethernet equipment or any active components...

Page 3: ...display and control Retail Sales and demonstration Package Contents C6 HDMI 4x4 Matrix Premium IR Extender Cable IR Blaster Cable 24V 3 75A DC Adapter Remote Control LINDY Manual Specification Input...

Page 4: ...the OUT button and then the number buttons to select the required output ports and press IN button and then a single number button to select the required input source finally press the MENU button to...

Page 5: ...5 CAT5e 6 OUT B D Connect from these CAT outputs to the CAT input port of the receiver units with a single CAT5e 6 7 cable for HDMI Audio Video and IR RS 232 control signal transmission Warning Pleas...

Page 6: ...ote signal functionality connect the included IR Blaster Receiver Cables to the Matrix and Receiver units as required see Connection Diagram 5 At the Matrix side place the IR Blaster in front of the H...

Page 7: ...ivers with HDBaseT Technology such as No 38218 C6 HDMI Receiver Premium Non PoE Receivers such as No 38119 C6 HDMI Receiver and No 38114 C6 HDMI Faceplate Receiver can be used but require an external...

Page 8: ...tch all Outputs to Input 1 4 STORE Store current I O position 01 04 RECALL Recall the stored I O position 01 04 SHOW Show current port s I O position 01 04 NAME Name the stored port 01 04 no more than...

Page 9: ...bring up the Telnet interface for the C6 HDMI Matrix Type to list all the available commands please refer to the RS 232 Telnet Commands section of this manual for a description of each command Type I...

Page 10: ...of the device every time any of the settings are changed The IP address needed to access the Web GUI control will also need to be changed accordingly on the web address entry bar Troubleshooting Ther...

Page 11: ...s for a Class B digital device pursuant to part 15 of the FCC Rules These limits are designed to provide reasonable protection against harmful interference in a residential installation You are cautio...

Page 12: ...m lltonne Diese Ger te m ssen den lokalen Sammelsystemen bzw rtlichen Sammelstellen zugef hrt werden Dort werden sie kostenlos entgegen genommen Die Kosten f r den weiteren Recyclingprozess bernimmt d...

Reviews: