background image

English Manual 


Overview 


The LINDY Crystal Optical Mouse adopts a new revolutionary design, which allows left and right rocking movement 
of the hand for left and right click which eliminates the stress within the fingers.  Due to the optical sensor, which 
has replaced the old standard ball, it has enhanced the performance, therefore, no more moving parts or gathering 
of dust, resulting in a smooth and superior performance.   


Package Contents: 


Œ 

LINDY Crystal Optical Mouse 

Œ 

CD ROM with Drivers and Software 

Œ 

USB + PS/2 Adaptor 

Œ 

This manual 


LINDY Crystal Optical Mouse General Information 


Your PC / Mac must have a PS/2 or USB interface.  The system requirements to ensure full compatibility are as 
follows: 

• 

PC – O/S Win 98/98SE/2000/ME/XP 

• 

Mac – O/S 8.5 or higher


How to use the LINDY Crystal Optical Mouse: 


The LINDY Crystal Optical Mouse adopts a new revolutionary design, which allows left and right rocking movement 
of the hand for left and right click which eliminates the stress within the fingers.   


Installation and Use: 


PC Installation PS/2: 
 

• 

Shut down your PC and connect the PS/2 connector in to the PS/2 port.  Turn on the PC and insert the CD 
and prepare for driver installation. 


PC Installation USB: 
 

• 

Plug the USB connector directly in to an available USB port.  There is no need to Shut Down your PC. 

• 

Insert the CD and follow the set-up instructions, which will appear, on the screen. 


Software Installation for PC users: 


• 

Once the CD has been placed in to the CD reader select “setup.exe” from the CD and then select “OK” 
which will start the installation. 

• 

Choose the desired language from the dialogue box and click next. 

• 

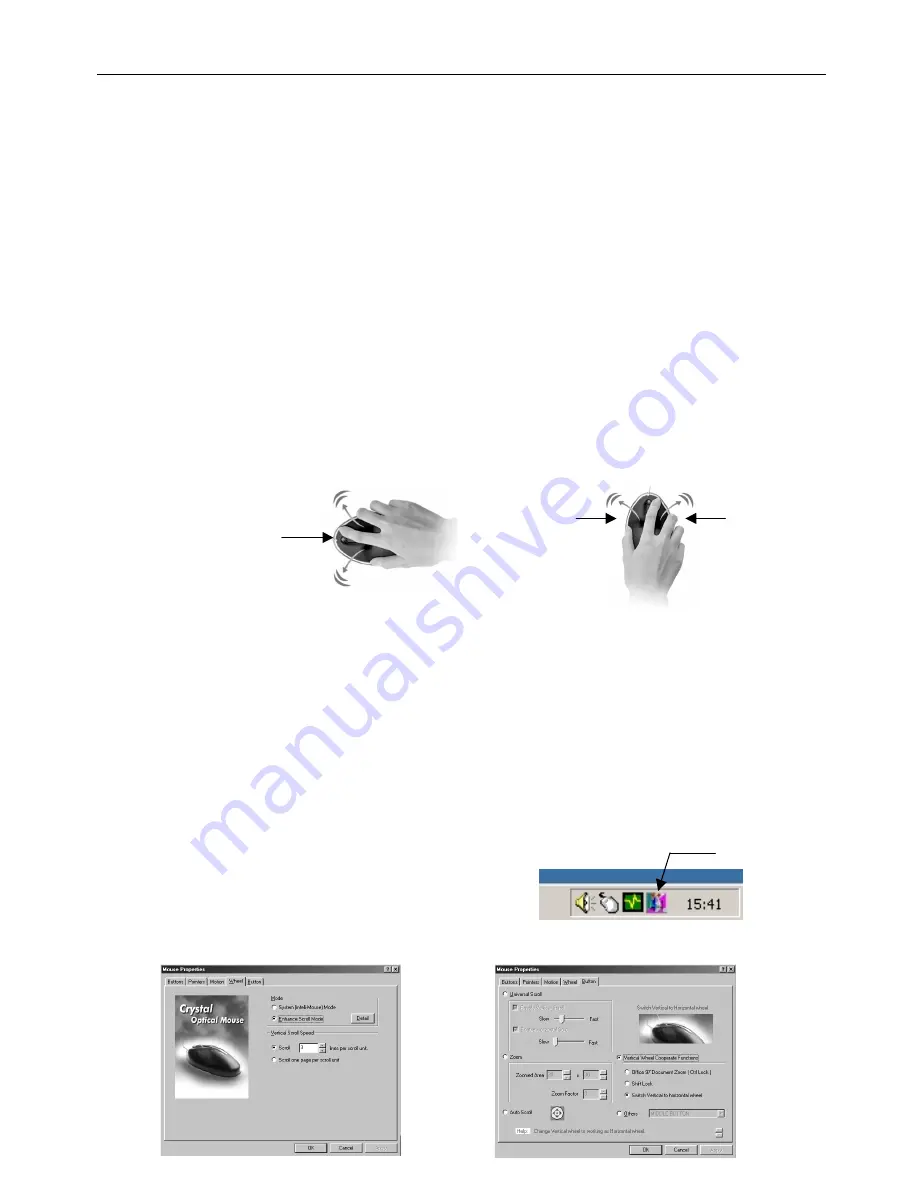
Once the mouse has been installed, activate the LINDY 
Crystal Optical mouse settings by clicking on the Crystal 
Optical Mouse icon in the System Tray (which is shown in 
the diagram on the right) and the following dialogue box 
will appear for the mouse properties.  From here you set 
the mouse to your user preferences. 


Left Button

Right Button 


Scrolling Wheel

Click this Icon twice 


Summary of Contents for 20599

Page 1: ...LINDY ELECTRONICS LIMITED LINDY ELEKTRONIK GMBH FIRST EDITION June 2001 Crystal Optical Mouse Manual English Benutzerhandbuch Deutsch Manuel Fran ais Manuale Uso Italiano LINDY Art Nr 20599...

Page 2: ...ng movement of the hand for left and right click which eliminates the stress within the fingers Installation and Use PC Installation PS 2 Shut down your PC and connect the PS 2 connector in to the PS...

Page 3: ...the CD Rom and choose Crystal Optical Mouse Click on the install button After installing the drivers restart the Mac Applying the Software for Mac users Select the Apple logo and select Control Panel...

Page 4: ...ioniert nach einem v llig neuartigen Prinzip bei dem das Klicken der Maustasten durch eine leichte seitliche Kippbewegung erfolgt Installation und Handhabung PC Installation PS 2 Fahren Sie Ihren Rech...

Page 5: ...dem Mac Schlie en Sie den USB Anschlu der Maus direkt an einem freien USB Port Ihres Mac an Sie m ssen dazu den Mac nicht herunterfahren Legen Sie die CD in das CD ROM Laufwerk und w hlen Sie Crystal...

Page 6: ...sign r volutionnaire qui vous permet de cliquer gauche ou droite en enfon ant la souris vers la gauche ou la droite ce qui limine le stress des doigts Installation et utilisation Installation PC PS 2...

Page 7: ...Mouse Cliquez sur le bouton install Apr s l installation des pilotes red marrez le Macintosh Utilisation du logiciel pour les utilisateurs Mac S lectionnez le logo Apple et s lectionnez Panneau de Co...

Page 8: ...e inoltre essere compatibile con PC O S Win 98 98SE 2000 ME XP Mac O S 8 5 o superiore Come utilizzare il LINDY Crystal Optical Mouse Installazione e uso Su PC porta PS 2 Spegnere il computer e colleg...

Page 9: ...e per Mac Per il collegamento del mouse alla porta USB non occorre spegnere il PC Inserire il CD e seguire le istruzioni di set up sullo schermo Successivamente all installazione riavviare il Mac Appl...

Reviews: