background image

11

Basic Setup Guide

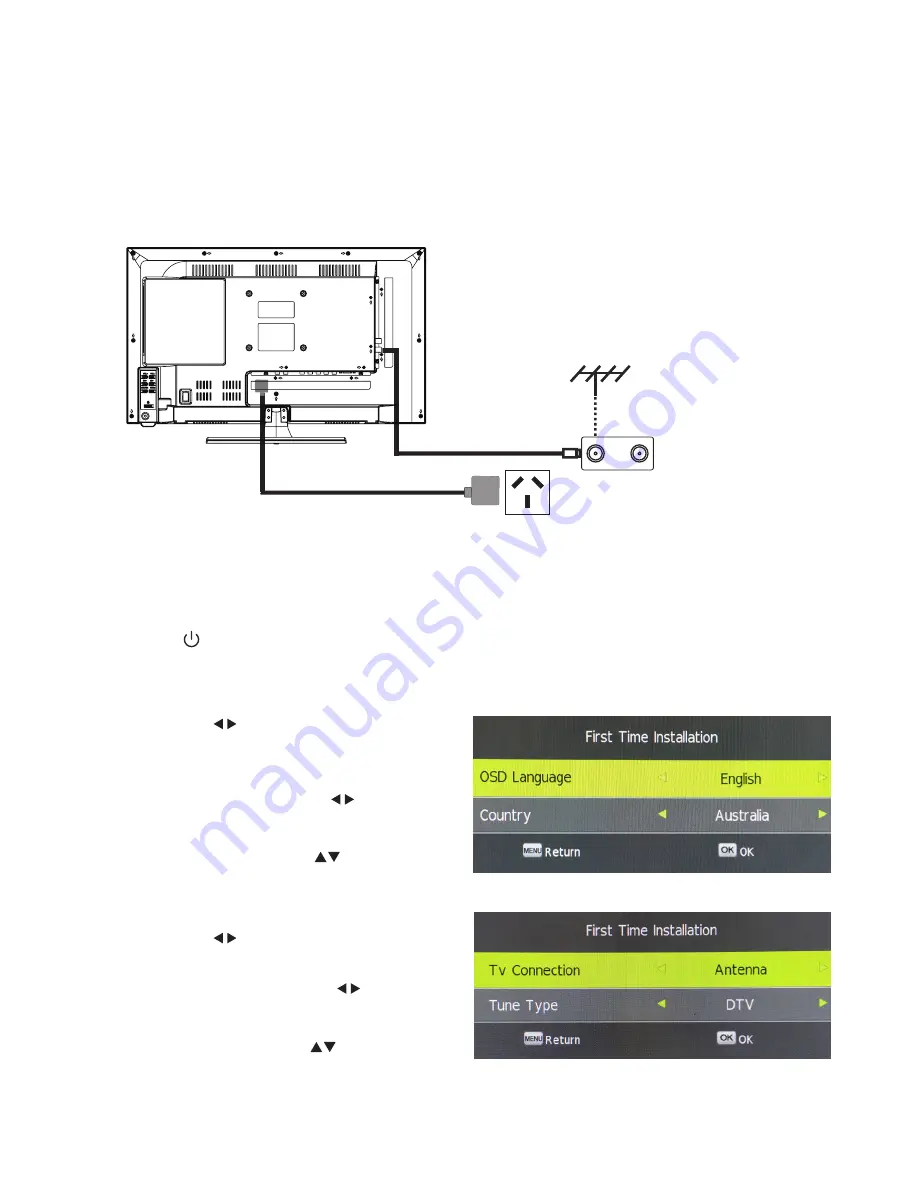
Turning your Television On & First Time Installation

Press the        power button on the remote control to turn your television on. The television screen will 
show the 

First Time Installation

 Menu.

• 

Use the        buttons to select the


OSD


Language

 to be used for On Screen 

Display (OSD).

• 

Scroll down and use the             
buttons to select the 

Country

• 

Scroll down using the          buttons to 
select the

 OK.

Connecting the Antenna and Power

1. Connect one end of the antenna cable to the antenna socket (RF IN) at the back of the television set. 
Please note that the antenna cable is not included with your television.

2. Plug the power adaptor into your nearest 
power outlet. For your safety, we recommend  
using a power outlet with a power surge  
protector.

AC power outlet

TV signal output

• 

Use the        buttons to select the


TV  

Connection 

type.

• 

Scroll down and use the             
buttons to select the 

Tune Type

• 

Scroll down using the          buttons to select 
the

 OK

.

Summary of Contents for L20PTC17a

Page 1: ...19 4 49cm HD LED LCDTV with built in DVD Player Instruction Manual L20PTC17a 24 Month Manufacturer s Warranty...

Page 2: ...ment 12 Connection Overview 13 Input Source 16 Channel Menu 17 Picture Menu 22 Sound Menu 24 Time Menu 26 Option Menu 29 Lock Menu 35 Hotel Mode 38 Media Player Operation 40 Photo Menu 43 Music Menu 4...

Page 3: ...view Back Buttons Back 1 Power Button Turn television on off 2 Menu Enter or exit from Menu Use CH to select an option Use VOL to adjust an item 3 Source Input select 4 CH Select channel 5 VOL Adjust...

Page 4: ...C connection port 9 VGA Input 10 AV Input External AV signal input and relevant right left sound channel inputs 11 ANT 75 Antenna RF connection 12 Earphone Output 13 Coaxial Output Digital Audio outpu...

Page 5: ...iew and select available input sources 12 ENTER and Allows you to navigate the on screen Menus and adjust the system settings to your preference 13 EXIT Exit from the menu or sub menu and cancel the c...

Page 6: ...the hidden words 23 COLOURED BUTTONS In the on screen menus these buttons have different functions as specified by the colours shown on screen 24 CH Scan through channels 25 FAV LIST Open the favourit...

Page 7: ...such as Using a stable and appropriately sized television cabinet Ensure its stability by using a television safety strap to attach the television to the cabinet Use the stand which has been supplied...

Page 8: ...urces such as lit candles on the television 13 WARNING Connect to a suitable 100 240V 50 60 Hz power supply only 14 Use the power cord with care do not dam age the power cord in any way If the power c...

Page 9: ...d Replace only with the same or equiva lent type 25 Batteries battery pack or batteries installed shall not be exposed to excessive heat such as sunshine fire or the like 26 The mains plus is used as...

Page 10: ...3 qty AAA Batteries 2 qty Remote Control MENU SOURCE ENTER EXIT SLEEP P MODE S MODE DISPLAY INDEX REVEAL SIZE TIMESHIFT RECLIST TEXT EPG ASPECT CANCEL FREEZE HOLD TV RADIO SUBTITLE FAV LIST REC REDG...

Page 11: ...nto the bottom of the television base taking note of the screw driver size required for this IMPORTANT Ensure that you do not over tighten the screws Position and Placement Make sure that you place yo...

Page 12: ...ng the buttons to select the OK Connecting the Antenna and Power 1 Connect one end of the antenna cable to the antenna socket RF IN at the back of the television set Please note that the antenna cable...

Page 13: ...friendly method of disposal will ensure that valuable raw materials can be recovered and used again Electrical and electronic appliances contain materials and substances which if handled or disposed o...

Page 14: ...line the basic connection options available with this Linden television Audio Video AV Input Press the SOURCE button using either the remote control or the button located on the side of the televi sio...

Page 15: ...14 Connection Overview PC Input Press the SOURCE button on either the remote control or the button located on the side of the television set and select the PC option...

Page 16: ...ision set and select the appropriate HDMI option For HDMI2 ARC Function please refer to HDMI CEC Section on Page 32 Component Video Input Press the SOURCE button on either the remote control or the bu...

Page 17: ...AV Audio Video Input Source YPbPr Component Video Input Source DVD DVD Input Source PC PC Input Source HDMI1 2 ARC HDMI Input Source Media Player USB Input Source Press SOURCE button to display the i...

Page 18: ...he previous menu A pop up will appear Select the country of television operation Once selected press the ENTER button to begin the auto tuning Auto Tuning Ensure that the Source is set to Antenna prio...

Page 19: ...annel you want to tune then press the ENTER button to manually tune the channel A Signal Strength Indicator is shown along the bottom of the DTV Manual Tuning sub menu Antenna DVB T Manual Tuning DVB...

Page 20: ...e the buttons to select the channel then press the ENTER button to manually tune the channel Channel Menu A pop up will appear showing the progress of the auto tuning will appear Use the buttons to sc...

Page 21: ...he Channel Menu use the buttons to scroll and select Programme Edit then press the ENTER button to enter the Programme Edit sub menu Channel Menu Signal Information This allows you to see the strength...

Page 22: ...hannel Menu use the buttons to select Software Update OAD then press the ENTER button to enter the Software Update OAD sub menu Follow the on screen prompts to install the new software and set it to u...

Page 23: ...he ENTER button to enter the Picture Mode sub menu Alternatively press PMODE button on your remote to enter Picture Mode You can adjust the Picture Mode to Standard Dynamic Mild User You can adjust Co...

Page 24: ...n Off No noise reduction Low Detect and reduce some image noise Middle Detect and reduce moderate image noise High Detect and reduce enhanced image noise Colour Temperature You can adjust the overall...

Page 25: ...etween Standard Produces a balanced sound in most environments Music Preserves original sound Movie Enhances treble and base for a rich sound experience Sport Enhances vocals ideal for sports programm...

Page 26: ...ns to select Surround Sound then press the ENTER button to enter the Surround Sound Level sub menu Use the buttons to turn Surround Sound ON or OFF SPDIF Mode From the Sound Menu use the buttons to se...

Page 27: ...ows you to set the time on your television From the Time Menu use the buttons to select Clock then press the ENTER button to enter the Clock sub menu Use the buttons to set the correct date month year...

Page 28: ...r options Auto Standby and Sleep Timer Differences If you set your television to Auto Standby and use the remote control the timer starts again If you do not use your remote control after you have set...

Page 29: ...ime zone then press ENTER OSD Timer On Screen Display Menu This allows you to set how long your On Screen Display Menu OSD is active before it switches off and returns to the programme you re currentl...

Page 30: ...ress ENTER button to adjust 3 Press MENU button to save your adjustments and return to the previous menu On Screen Display OSD Language This allows you set the language displayed in your On Screen Dis...

Page 31: ...TER to set Hearing Impaired Certain programmes broadcasted have subtitles available for those who are hearing impaired To turn this function on from the Option Menu use the buttons to select Hearing I...

Page 32: ...blems recording check that there is sufficient memory left on the USB storage device If required format the USB storage device by 6 The following progress box will appear 1 Save any data currently sto...

Page 33: ...uttons to select Reset then press the ENTER button to enter the Reset sub menu HDMI CEC HDMI CEC Consumer Electronics Control is a feature of HDMI that allows you to control devices connected to the H...

Page 34: ...to turn Auto TV Power ON or OFF Auto TV On This allows you to turn your television ON when an HDMI CEC capable device is turned ON Use the buttons to turn Auto TV Power ON or OFF Device Control This...

Page 35: ...guage the country and allows you to tune your television ECO Mode This allows you to set your television to change the light output level of the television screen From the Option Menu use the buttons...

Page 36: ...2 Press ENTER and or buttons to adjust 3 Press MENU button to save your adjustments and return to the previous menu Lock System This allows you to lock unlock from making changes in the Lock Menu Fro...

Page 37: ...en press ENTER Enter new password and confirm new password then press ENTER to set new password Use the buttons to select the channel you want to lock Press the button on your remote to lock the chann...

Page 38: ...tons to select Parental Guidance then use the buttons to set the age rating you want to be available to view on your television eg 12 will allow all television programmes with a rating of 12 and under...

Page 39: ...de Setting Use the buttons to select ON or OFF Source Lock This allows you to lock unlock the available Input Source available on the television From the Lock Menu use the buttons to select Hotel Mode...

Page 40: ...o select the default channel Max Volume This allows you to set the maximum volume level on the television From the Lock Menu use the buttons to select Hotel Mode then press the ENTER button to enter t...

Page 41: ...de of your television Press the SOURCE button on your remote control and use the buttons to select Media Player then press ENTER to enter the Media Player menu Media Sub Menu Use the arrows to select...

Page 42: ...m of the screen Copy Delete any file media file on the USB drive as well as format the USB drive from the Media Menu Copy To copy a file select the file you want to copy by using the buttons and press...

Page 43: ...ete a file select the file you want to delete by using the buttons and press ENTER A red tick will appear next to your selected file Press the button to delete the file A confirmation pop up will appe...

Page 44: ...R Use the buttons to select the image file in the Photo sub menu you want to view then press ENTER to select the image A preview of the image will be shown in the centre off the screen Press the or th...

Page 45: ...rive and press ENTER Use the buttons to select the music file in the Music menu you want to listen to then press ENTER to select the music file A preview of the music file will be shown in the centre...

Page 46: ...e the buttons to select the file in the Movie sub menu you want to view then press ENTER to select the movie file A preview of the movie file will be shown to the right of the screen Press the or the...

Page 47: ...and press ENTER Use the buttons to select the file in the Text sub menu you want to view then press ENTER to select the text file A preview of the text file will be shown to the right of the screen Pr...

Page 48: ...me and date and end time and date Electronic Programme Guide EPG Press the EPG button to display the Electronic Programme Guide EPG Recording a Programme Scheduled To set a programme to be recorded in...

Page 49: ...and then press the button The following pop up box will be displayed Electronic Programme Guide EPG Info Press the button and the programme information and synopsis will be displayed The pop up will...

Page 50: ...u are recording a programme only Play and Stop will be available A red circle with a white triangle in the middle will appear on the top left corner indicating that the programme is being recorded To...

Page 51: ...s ENTER to play A white triangle will appear on the top left corner indicating that the programme being played on screen is a recording All the on screen functions will now be available to use while p...

Page 52: ...pause sym bol will appear on the top left hand side of the screen to indicate that the programme has been paused To resume watching press the TIMESHIFT button again The television will resume playing...

Page 53: ...DVD Press to fast forward while playing a DVD Press to return to previous chapter in the DVD Press to skip to the next chapter in the DVD D setup Press enter the DVD setup menu D Menu Press to show t...

Page 54: ...vision menus eg Video Sharpness Brightness etc the television menu settings will override any changes made to the features in DVD mode Press the D setup button on your remote control to enter the DVD...

Page 55: ...ax Resolution 720 x 576 vob MPEG 2 Max Data Rate 40 Mbps rm rmvb RV30 RV40 COOK MP2 Max Resolution 1920 X 1080 Music mp3 MP3 Sample Rate 8K 48KHz Bit Rate 32K 320Kbps wma WMA Channel Mono Stereo m4a a...

Page 56: ...to select other channels to check whether it is the televi sion or just the channel itself which has problems Ensure the television is tuned correctly follow instructions under Channel Menu on Pages 1...

Page 57: ...MHz 230MHz UHF 474MHz 862MHz Video In System PAL SECAM Preset Channels ATV 200 DVB T 500 Antenna Input Impedance 75 Speaker Output 2 x 5W Inputs HDMI x 2 AV Composite VGA D sub YPbPr PC Audio USB Outp...

Page 58: ...finely detailed images Occasionally a few non active pixels may appear on the screen as a fixed point of colour This does not affect the performance of your product This Instruction Manual is for refe...

Page 59: ...stomer care Aus 1300 530 800 customercare lindenproducts com au lindenproducts com au While every effort has been made in the preparation of this instruction manual the publishers cannot be held respo...

Reviews: