background image

7

MBV-160-250-CT-RC

CN

 / CT

LCP-P-T

, LCC-P-T / LKP-P

C

D

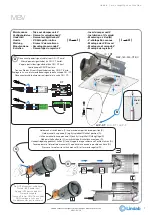
Disconnect power/signal cable from CN / CT card.

Afbryd power/signal kabel fra CN / CT kortet.

Koppla bort ström/signalkabel från CN / CT kort.

Irroita kaapeli CN/CT-kortista.

Trennen Sie das Strom-/Signalkabel von der CN/CT -Karte.

Scollegare il cavo di alimentazione/segnale dalla scheda CN / CT.

Déconnecter câble alimentation/signal de la carte CN / CT.

Click !

x3

Click !

Click !

Click !

B     

-P-T

+

SU

P

G+

G0-

CO

2

G+

G0-

S2

S1

RC LIN

K

RC LIN

K

RC

IN/OU

T

PRES. 

/

TEMP

.

LIN
K

H

C

G0-

G+

COOL

S

G0-

G+

HE

AT

S

G0-

G+

G+

G0-

S

P

DAMPE

R

POWER

BUS-OK

SC

C

ON

12

CT

S

TERA

SHIELD

BUS

SH

G0-

A

B

REGULA CONTROL PASCAL

4

3

2

1

STANDBY

SERVICE

COOL

HEAT

OFF

G+  Load 24V

G0- Neutral 24V

C  Cool Control

H  Heat Control

Link/R

C

H/C/24V

G+  Load 24V

G0- Neutral 24V

S  Control

Cool

Actuato

r

G+  Load 24V

G0- Neutral 24V

S  Control

Heat

Actuato

r

G+  Load 24V

G0- Neutral 24V

S  Control

P  Position

Air flow

Dampe

r

G0- Neutral 24V 

G+ Load 24V

6

RS485 B

RS485 A

Damper Pos 0-10V

Damper Control 0-10V


1

RJ4
5

SH  Shield

G0- Neutral 24V

A

B

BUS

RS48

5

G0- Neutral 24V

G+  Load 24V

Suppl

y

Supply

24V

24V

S1 

DI2

S2 

+24VDC

G0- Neutral 24V

G+  Load 24V

CO

2

Sensor


AO1 

1


AO2 

2


AI2 

3


DI1 

4


+24VDC 

5


DI2 

6

 7

 8

Link RJ4

5


AO1 

1


AO2 

2


AI2 

3


DI1 

4


+24VDC 

5


DI2 

6

 7

 8

Link RJ45

(23) AO1 

1

(24) AO2 

2

(31) AI2 

3


(32) DI1 

4

(40) +24VDC 

5


(33) DI2 

6

(10) G+ Load 24V 

7


(11) G0- Neutral 24V 

8

RC in/out

RJ45


AI1 

1


Signal neutral 

2

 3


DI1 

4


+24VDC 

5


DI2 

6


G+ Load 24V 

7


G0- Neutral 24V 

8

Presence

Temp RJ45

Regula Control Pascal

Pascal

Rc LINK

Rc LINK

CO2 in - S1

CO2 in - S2

CO2 out - N

CO2 out - L

REGULA CONNECT

LINDAB

Presence in - S1

Presence in - S2

Presence out - N

Presence out - L
Damper in - Pos

Damper out - S

Damper out - N

Damper out - L
Heating 0-10V- S
Heating 0-10V- N

Heating 0-10V- L
Supply Link2 - N

Supply Link2 - L

Supply Link1 - N

Supply Link1 - L
Supply in - N

Supply in-24V - L

N = Neutral

L = Load

S = Signal

RC  in / out

SU

P

G+

G0-

CO

2

G+

G0-

S2

S1

RC LIN

K

RC LIN

K

RC

IN/OU

T

PRES. 

/

TEMP

.

LIN
K

H

C

G0-

G+

COOL

S

G0-

G+

HE

AT

S

G0-

G+

G+

G0-

S

P

DAMPER

POWER

BUS-OK

SC

C

ON

12

CT

S

TERA

SHIELD

BUS

SH

G0-

A

B

REGULA CONTROL PASCAL

STANDBY

SERVICE

COOL

HEAT

OFF

G+  Load 24V

G0- Neutral 24V

C  Cool Control

H  Heat Control

Link/RC

H/C/24V

G+  Load 24V

G0- Neutral 24V

S  Control

Cool

Actuato

r

G+  Load 24V

G0- Neutral 24V

S  Control

Heat

Actuator

G+  Load 24V

G0- Neutral 24V

S  Control

P  Position

Air flow

Dampe

r

G0- Neutral 24V 

G+ Load 24V

6

RS485 B

RS485 A

Damper Pos 0-10V

Damper Control 0-10V


1

RJ4
5

SH  Shield

G0- Neutral 24V

A

B

BUS

RS48

5

G0- Neutral 24V

G+  Load 24V

SupplySupply

24V24V

S1 

DI2

S2 

+24VDC

G0- Neutral 24V

G+  Load 24V

CO

2

Sensor


AO1 

1


AO2 

2


AI2 

3


DI1 

4


+24VDC 

5


DI2 

6

 7

 8

Link RJ45


AO1 

1


AO2 

2


AI2 

3


DI1 

4


+24VDC 

5


DI2 

6

 7

 8

Link RJ45

(23) AO1 

1

(24) AO2 

2

(31) AI2 

3


(32) DI1 

4

(40) +24VDC 

5


(33) DI2 

6

(10) G+ Load 24V 

7


(11) G0- Neutral 24V 

8

RC in/out

RJ45


AI1 

1


Signal neutral 

2

 3


DI1 

4


+24VDC 

5


DI2 

6


G+ Load 24V 

7


G0- Neutral 24V 

8

Presence

Temp RJ45

Regula Control Pascal

Pascal

Rc LIN

K

Rc LIN

K

CO2 in - S1 CO2 in - S2 CO2 out - 

N

CO2 out - 

L

REGULA

 CONNEC

T

LINDA

B

Presence in - S1 Presence in - S2 Presence out - 

N

Presence out - 

L

Damper in - Po

s

Damper out - 

S

Damper out - 

N

Damper out - 

L

Heating 0-10

V-

 S

Heating 0-10

V-

 N

Heating 0-10

V-

 L

Supply Link2 - 

N

Supply Link2 - 

L

Supply Link1 - 

N

Supply Link1 - 

L

Supply in - 

N

Supply in-24V - 

L

N = Neutral L 

= Load

S = Signal

RC  in / ou

t

CT

CN

A

Lindab reserves the right to make changes without prior notice

2021-02-18

lindab  |  we simplify construction

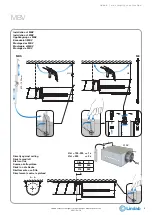
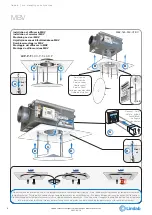
MBV 

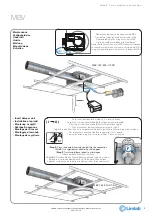
Do NOT disconnect cable here!

Frakobl IKKE kablet her! 

Koppla INTE bort kabeln här!

Älä irroita kaapelia

Trennen Sie hier NICHT das Kabel!

NON scollegare il cavo qui!

Ne déconnectez pas le câble ici!

Maintenance 

- Take out damper unit V

Vedligeholdelse  - Demonter spjældenhed V

Underhåll 

- Demontera spjällenhet V

Huolto   

- V-Säätöpellin irroitus

Wartung 

- Drossel V demontieren

Manutenzione  - Smontaggio serranda V

Entretien 

- Démontage du registre V

- Insert damper unit V

- Installation af V-spjæld

- Montering av V-spjäll

- V-säätöpellin asennus

- Montage der V-Drossel

- Montaggio di seranda V

- Montage de registre V

( A      I )

( I      A )

Hold manual switch down (C) and move damper to closed position (D).

Hold manuel knap nede (C) og flyt spjældet til lukket position (D).

Håll den manuella knappen nere (C) och flytta spjället till stängt läge (D).

Pidä painiketta alhaalla (C) ja siirrä säätöpelti suljettuun asentoon (D).

Handentriegelung gedrückt halten (C) und Klappe in die geschlossene Position fahren (D).

Tenere premuto l’interruttore manuale (C) e portare la serranda in posizione chiusa (D).

Presser et maintenir le switch manuel (C) et fermer le registre (D).

Summary of Contents for MBV Series

Page 1: ...esignations are protected by intellectual property rights IPR lindab we simplify construction LindabMBV Room supply unit Installation instruction UK Tilluft enhed Installations vejledning DK Rumsförsörjningsenhet Montageinstruktion SE Tuloilmalaite Asennusohje FI Anschlusskasten Montageanleitung DE Plenum di mandata Istruzioni di montaggio IT Plénum de soufflage Instructions de montage FR ...

Page 2: ...schlossen Blocco Verrouiller Unlock Lås op Låsa upp Avaa Geöffnet Sblocco Déverrouiller supply air Tilluft Tilluft Sisäänpuhallus Zuluft Aria di mandata Soufflage Open damper Åbent spjæld Öppet spjäll Säätöpelti auki Geöffnete Drossel Serranda aperta Registre ouvert Damper motor Spjældmotor Spjällmotor Säätöpelti moottori Drossel motor Motore della serranda Moteur du registre Damper motor cable Sp...

Page 3: ... Farum Phone 45 7323 2525 Fax 45 7323 2526 www lindab com MBX XXX XXX X Lindab MBV 160 250 CT RC 10 600 1000 mm 6 Lindab reserves the right to make changes without prior notice 2021 02 18 lindab we simplify construction MBV Unpacking and protection of MBV Udpakning og beskyttelse af MBV Uppackning och skydd av MBV MBV laatikon pakkaus ja suojaus Auspacken und Schützen des MBV Apertura della confez...

Page 4: ... Trafo 10VA 37 56 93 66 68 Trafo 10VA Trafo 20VA 53 56 108 66 68 Trafo 20VA Trafo 10VA Trafo 20VA 56 93 37 Trafo 10VA Trafo 20VA 56 108 53 MBV 160 250 CT RC L 10 MBV 160 250 CN MBV 160 250 CT RC 20 P P IP54 RC e 7 15 18 Ød2 C B L Ød1 D a H e 7 15 18 W 2 C W B L Ød1 D a H Lindab reserves the right to make changes without prior notice 2021 02 18 lindab we simplify construction MBV Dimensions Dimensi...

Page 5: ...without prior notice 2021 02 18 lindab we simplify construction MBV Installation of MBV Installation af MBV Upphängning av MBV Kannakointi MBV Montage des MBV Montaggio di MBV Montage de MBV Directly against ceiling Direkte mod loft Dikt mot tak Suoraan kattopintaan Direkt an die Decke Direttamente a soffitto Directement contre le plafond ...

Page 6: ...ce vajror Huoltovaijerit Service Draht Cavo per manutenzione Cable de maintien Connect tilslut tilsluta kytkeä Anschließen collegare connectez Do not remove the protective cap of the temperature sensor before commissioning Fjern ikke beskyttelseshætten på temperatursensoren før idriftsættelse Ta inte bort skyddslocket på temperatursensorn innan idrifttagning Älä poista lämpöanturin suojaa ennen kä...

Page 7: ...V G Load 24V G0 Neutral 24V S Control Cool Actuator G Load 24V G0 Neutral 24V S Control Heat Actuator G Load 24V G0 Neutral 24V S Control P Position Air flow Damper 8 G0 Neutral 24V 7 G Load 24V 6 5 RS485 B 4 RS485 A 3 Damper Pos 0 10V 2 Damper Control 0 10V 1 RJ45 SH Shield G0 Neutral 24V A B BUS RS485 G0 Neutral 24V G Load 24V Supply Supply 24V 24V S1 DI2 S2 24VDC G0 Neutral 24V G Load 24V CO2 S...

Page 8: ...ps du registre par le coté G F MBV 160 250 CN CN CT 1 1 2 2 Lindab reserves the right to make changes without prior notice 2021 02 18 lindab we simplify construction MBV Maintenance Take out damper Vedligeholdelse Demonter spjældenhed Underhåll Demontera spjällenhet Huolto V Säätöpellin irroitus Wartung Drossel demontieren Manutenzione Smontaggio serranda Entretien Démontage du registre A I LCP P ...

Page 9: ...r follow steps A I in reverse order Følg trin A I i omvendt rækkefølge for at geninstallere spjældet Följ steg A I i omvänd ordning för att återinstallera spjället Takaisinasennus päinvastaisessa järjestyksessä A I Folgen Sie den Schritten A I in umgekehrter Reihenfolge um die Drossel wieder einzusetzen Per reinserire la serranda ripetere le operazioni A I a ritroso Pour ré installer le registre s...

Page 10: ...ions that are easy to use as well as offering ef ficient availability and logistics We are also working on ways to reduce our impact on our environment and climate We do that by developing methods to produce our solutions using a minimum of energy and natural resources and by reducing negative ef fects on the environment We use steel in our prod ucts It s one of few materials that can be recycled ...

Reviews: