background image

2

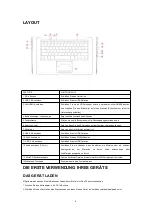
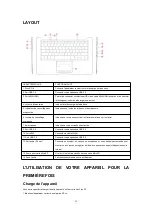
LAYOUT

FEATURE

FUNCTION

1.DC-In socket

Connect the supplied power adapter

2.USB 3.0 port

Connect USB device

3.Mini HDMI port

Connect HD television via optional MINI HDMI cable and switch the display to a wider

screen (Not Included)

4.Power light/Charging Indicator

Indicates the battery-charge status

5.Caps Lock Indicator

Indicates when all letters are capitalized

6.Num Lock Light

Indicates that you can use the numeric keypad on the keyboard

7-8.Microphone

Indicates that your microphone is activated

9.USB 2.0 port

Connect USB device

10.RJ45 port

Connect the WLAN cable

11.USB 2.0 port

Connect USB device

12.Audio port (3.5 mm)

Connect a headset, headphones, microphone, or other audio equipment, to listen to

stereo sound, record audio, or make web phone calls

13.MicroSD card slot

Reads and writes files stored on a MicroSD Card

14.Presicion Touchpad

Functions like a computer mouse

USING YOUR DEVICE FOR THE FIRST TIME

Charging the device

You might need to charge the battery before using your LincPlus P3.

1.Plug the power adapter into the DC-In socket;

2.Connect the power adapter to an electrical outlet and charge the LincPlus P3 until the battery is fully charged.

Note:

1. The battery is not fully charged when you unpack your Device;

2. A fully discharged battery takes about 5 hours to fully charge;

3. When the battery is being charged, the LED indicator light is red. When the battery has been fully charged, the LED

indicator light is green.

Summary of Contents for P3

Page 1: ...User Manual Notebook LincPlusP3 English Deutsch Français ...

Page 2: ...port 3 5 mm Connect a headset headphones microphone or other audio equipment to listen to stereo sound record audio or make web phone calls 13 MicroSD card slot Reads and writes files stored on a MicroSD Card 14 Presicion Touchpad Functions like a computer mouse USING YOUR DEVICE FOR THE FIRST TIME Charging the device You might need to charge the battery before using your LincPlus P3 1 Plug the po...

Page 3: ...Connect 3 Input the password if necessary then select Connect to begin an internet connection Inserting a MicroSD Card sold separately 1 Align the MicroSD Card so that the pins are pointed toward the card slot 2 Push the MicroSD Card into the card slot until it locks into place Removing a MicroSD Card Caution Removing the MicroSD Card while it is in use may cause data loss or result in application...

Page 4: ... Wipe with a soft dry cloth or tissue paper to clean 12 DO NOT attempt to dismantle the product Unauthorized handling of the LincPlus P3 may damage it and will void your warranty 13 Keep the laptop away from magnets or magnetic fields 14 NEVER use the device near emergency intensive care medical equipment or if you have a pacemaker fitted 15 Never use the device during an electrical storm 16 The u...

Page 5: ... who have such devices should always keep the wireless device more than 6 inches 15 3 centimeters from the medical device turn the wireless device on if there is any reason to suspect that interference is taking place follow the manufacturer directions for the implanted medical device Hearing Warning When you use a headset or earphones your ability to hear outside noise may be affected Do not use ...

Page 6: ...ist 9 USB 2 0 Anschluss Schließen Sie ein USB Gerät an 10 RJ45 Anschluss Schließen Sie das WLAN Kabel an 11 USB 2 0 Anschluss Schließen Sie ein USB Gerät an 12 Audioanschluss 3 5 mm Schließen Sie ein Headset einen Kopfhörer ein Mikrofon oder ein anderes Audiogerät an um Stereoton zu hören Audio aufzunehmen oder Web Telefongespräche zu führen 13 MicroSD Kartensteckplatz Liest und schreibt Dateien d...

Page 7: ...schalten des Wi Fi 1 Wählen Sie das WLAN Symbol im Infobereich in der unteren rechten Ecke des Bildschirms aus um die verfügbaren WLAN Hotspots anzuzeigen 2 Wählen Sie ein verfügbares Netzwerk aus um eine Verbindung herzustellen Verbindung mit einem Netzwerk 1 Wählen Sie das WLAN Symbol im Infobereich in der unteren rechten Ecke des Bildschirms aus um die verfügbaren WLAN Hotspots anzuzeigen 2 Wäh...

Page 8: ... aus da sich elektronische Komponenten und Kunststoffteile bei Hitzeeinwirkung verformen können 4 Setzen Sie das Gerät NICHT niedrigen Temperaturen aus da sich im Inneren des Gerätes Feuchtigkeit bilden kann die Leiterplatte beschädigen könnte 5 Schlitze Löcher und Öffnungen des Produktes dürfen NICHT blockiert werden z B indem das Gerät auf Heimtextilien wie Teppiche Läufer oder Betten gestellt w...

Page 9: ...müll entsorgen 6 Versuchen Sie nicht den Akku zu modifizieren Fremdkörper einzulegen ihn in Wasser zu tauchen oder mit anderen Flüssigkeiten in Berührung kommen zu lassen Akkus können bei Beschädigung explodieren 7 Benutzen Sie den Akku und das Ladegerät nur für den vorgesehenen Zweck Bei unsachgemäßer Verwendung oder der Nutzung von nicht genehmigten oder nicht passenden Akkus oder Ladegeräten ka...

Page 10: ... Garantie unterliegt folgenden Bestimmungen 1 Die Garantie erstreckt sich nicht auf versehentliche Beschädigungen Verschleiß oder Fahrlässigkeit 2 Das Gerät muss ausschließlich für häusliche Zwecke verwendet werden 3 Die Garantie wird ungültig wenn das Produkt weiterverkauft oder durch eine nicht durch uns authorisierte Anpassung Modifizierung oder Reparatur beschädigt wird 4 Technische Angaben kö...

Page 11: ...r numérique sur le clavier 7 8 microphone Indique que votre microphone est activé 9 Port USB 2 0 Connecter un périphérique USB 2 0 10 Port RJ45 Connectez le câble WLAN 11 Port USB 2 0 Connecter un périphérique USB 2 0 12 Port audio 3 5 mm Connecte un écouteur un casque un microphone ou un autre équipement audio pour écouter un son stéréo enregistrer de l audio ou passer des appels téléphoniques vi...

Page 12: ...nfoncé pendant au moins 4 secondes 2 Cliquez sur l écran de confirmation de l arrêt pour confirmer que vous éteignez l appareil Connexion au Wi Fi Activation Désactivation du Wi Fi 1 Sélectionnez l icône Wi Fi dans la zone de notification dans le coin inférieur droit de l écran pour afficher les points d accès Wi Fi disponibles 2 Sélectionnez l icône Wi Fi disponible pour établir une connexion Con...

Page 13: ...1 Conservez le produit et toutes ses pièces hors de la portée des enfants 2 Gardez le au sec Évitez les expositions aux précipitations à l humidité et aux liquides qui pourraient affecter les circuits du produit 3 NE le laissez PAS à des températures élevées car les appareils électroniques et les pièces en plastique risquent de se déformer sous l effet de la chaleur 4 NE le laissez PAS à basse tem...

Page 14: ...nt 5 Ne jetez pas les piles au feu elles pourraient exploser Respectez les réglementations locales Recyclez si possible Ne pas jeter avec les ordures ménagères 6 Ne pas démonter couper écraser plier percer ou endommager la batterie de quelque manière que ce soit Si une pile fuit ne laissez pas le liquide toucher votre peau ou vos yeux Si cela se produit rincez immédiatement les zones touchées avec...

Page 15: ...la date d achat Cette garantie couvre les pannes dues à des défauts de fabrication ou de conception Si un défaut de fabrication véritable est détecté LincPlus Limited en émettra un autre La garantie est soumise aux dispositions suivantes La garantie ne couvre pas les dommages accidentels l usure ou la négligence Il doit être utilisé uniquement à des fins domestiques La garantie sera annulée si le ...

Page 16: ... sehr geschätzt wenn Sie sich die Zeit nehmen können eine Bewertung zu unserem Produkt zu schreiben Es wird uns bestimmt sehr ermutigen Wenn Sie Fragen haben wenden Sie sich bitte an uns Unser Kunden Support Team steht Ihnen zur Verfügung Haben Sie einen guten Tag Freundliche Grüße LincPlus Service Team Cher client LincPlus d Amazon aimerait vous remercier pour votre achat récent Nous nous soucion...

Page 17: ...tallation If this equipment does cause harmful interference to radio or television reception which can be determined by turning the equipment off and on the user is encouraged to try to correct the interference by one or more of the following measures Reorient or relocate the receiving antenna Increase the separation between the equipment and receiver Connect the equipment into an outlet on a circ...

Reviews: