background image

A-4

INSTALLATION   

A-4

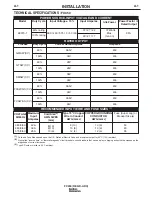
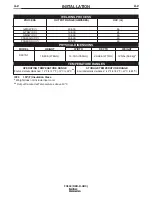
INPUT FUSE AND SUPPLY WIRE
CONSIDERATIONS

Refer to Specification in this Installation Section  for
recommended fuse, wire sizes and type of the copper
wires.  Fuse the input circuit with the recommended
super lag fuse or delay type breakers (also called
"inverse time" or "thermal/magnetic" circuit breakers).
Choose input and grounding wire size according to
local or national electrical codes.  Using input wire
sizes, fuses or circuit breakers smaller than recom-
mended may result in "nuisance" shut-offs from
welder inrush currents, even if the machine is not
being used at high currents.

INPUT VOLTAGE SELECTION

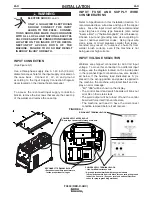
Welders are shipped connected for 460 Volt input
voltage.  To move this connection to a different input
voltage, see the diagram located on the inside panel
in the reconnect/input connection area, also illustrat-
ed below. If the Auxiliary lead (indicated as ʻAʼ) is
placed in the wrong position and power is applied to
the machine, the machine will protect itself and dis-
play an error message:

• "Err" "058" will be shown on the display.  
• The control board and switch boards will blink out

error 58 on their status leds.

• The weld output will be turned off and the control

board will force itself into an idle state.

• The machine will need to have the misconnect

condition removed before it will recover.

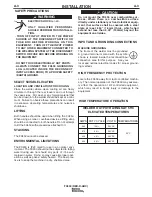
ELECTRIC SHOCK 

can kill

.     

ONLY A QUALIFIED ELECTRICIAN
SHOULD CONNECT THE INPUT
LEADS TO THE FX450.  CONNEC-

TIONS SHOULD BE MADE IN ACCORDANCE
WITH ALL LOCAL AND NATIONAL ELECTRI-
CAL CODES AND THE CONNECTION DIAGRAM
LOCATED ON THE INSIDE OF THE RECON-
NECT/INPUT ACCESS DOOR OF THE
MACHINE.  FAILURE TO DO SO MAY RESULT
IN BODILY INJURY OR DEATH.

----------------------------------------------------------------------

WARNING

INPUT CONNECTION

(See Figure A.1)

Use a three-phase supply line. A 1.40 inch (36 mm)
diameter access hole for the input supply is located on
the case back.  Connect L1, L2, L3 and ground
according to the Input Supply Connection Diagram
decal located on the internal horizontal panel.  

To access the reconnect/input supply connection
blocks, remove the 8 screws that secure the case top
of the welder and remove the case top.

FX450 (RED-D-ARC)

RECONNECT TERMINAL BLOCK

• Reconnects auxiliary transformers 

  for the proper input voltages

POWER SUPPLY TERMINAL BLOCK

• Line Cord/Cable attaches here.

• A ground terminal marked with the symbol shown 

  is provided separate from this block for connecting the ground 

  lead of the line cord.  (See your local and national electrical 

  codes for proper grounding methods.)

POWER SUPPLY ACCESS HOLE

• Route input power cable through this hole. 

RECONNECT TERMINAL BLOCK 


RECONNECT TERMINAL BLOCK
• Reconnects auxiliary transformers 
  for the proper input voltages

POWER SUPPLY TERMINAL BLOCK
• Line Cord/Cable attaches here.
• A ground terminal marked with the symbol shown 
  is provided separate from this block for connecting the ground 
  lead of the line cord.  (See your local and national electrical 
  codes for proper grounding methods.)

POWER SUPPLY ACCESS HOLE
• Route input power cable through this hole. 

RECONNECT TERMINAL BLOCK 


FIGURE A-1

Summary of Contents for RED-D-ARC FX450

Page 1: ...uilt with safety in mind However your overall safety can be increased by proper installation and thoughtful operation on your part DO NOT INSTALL OPERATE OR REPAIR THIS EQUIPMENT WITHOUT READING THIS MANUAL AND THE SAFETY PRECAUTIONS CONTAINED THROUGHOUT And most importantly think before you act and be careful For use with machines having Code Numbers 11789 North America s Largest Fleet of Welding...

Page 2: ...AKER WEARERS SHOULD CONSULT WITH THEIR DOCTOR BEFORE OPERATING Read and understand the following safety highlights For additional safety information it is strongly recommended that you purchase a copy of Safety in Welding Cutting ANSI Standard Z49 1 from the American Welding Society P O Box 351040 Miami Florida 33135 or CSA Standard W117 2 1974 A Free copy of Arc Welding Safety booklet E205 is ava...

Page 3: ...or cooling 3 h Never simultaneously touch electrically hot parts of electrode holders connected to two welders because voltage between the two can be the total of the open circuit voltage of both welders 3 i When working above floor level use a safety belt to protect yourself from a fall should you get a shock 3 j Also see Items 6 c and 8 FUMES AND GASES can be dangerous 5 a Welding may produce fu...

Page 4: ...s to adjacent areas Avoid welding near hydraulic lines Have a fire extinguisher readily available 6 b Where compressed gases are to be used at the job site special precautions should be used to prevent hazardous situations Refer to Safety in Welding and Cutting ANSI Standard Z49 1 and the operating information for the equipment being used 6 c When not welding make certain no part of the electrode ...

Page 5: ...riés et non inflammables 4 Des gouttes de laitier en fusion sont émises de lʼarc de soudage Se protéger avec des vêtements de protection libres de lʼhuile tels que les gants en cuir chemise épaisse pan talons sans revers et chaussures montantes 5 Toujours porter des lunettes de sécurité dans la zone de soudage Utiliser des lunettes avec écrans lateraux dans les zones où lʼon pique le laitier 6 Elo...

Page 6: ...______________________ Date Purchased___________________________________________________________________________ Where Purchased_________________________________________________________________________ Whenever you request replacement parts or information on this equipment always supply the information you have recorded above CUSTOMER ASSISTANCE POLICY The business of our company is manufacturing ...

Page 7: ... 3 Case Front Controls B 4 Power Up Sequence B 5 Case Back Controls B 5 Common Welding Procedures Weld Controls and Displays B 5 thru B 8 _______________________________________________________________________ Accessories Section C Options Accessories C 1 ________________________________________________________________________ Maintenance Section D Safety Precautions D 1 VISUAL INSPECTION D 1 ROUT...

Page 8: ...tput 95 Input Voltage 10 380 460 575 3 50 60 1 Cord and Fuse Sizes based upon the U S National Electric Code and maximum output for 40 C 104 ambient 2 Also called inverse time or thermal magnetic circuit breakers circuit breakers that have a delay in tripping action that decreases as the magnitude of current increases 3 Type SD cord or similar in 30 C ambient VOLTAGE 50 60Hz 380 3 50 460 3 60 575 ...

Page 9: ...RE RANGE Environmentally Hardened 14 F to 131 F 10 C to 55 C STORAGE TEMPERATURE RANGE Environmentally Hardened 40 F to 185 F 40 C to 85 C PROCESS GMAW CV GTAW CC SMAW CC FCAW GS CV FCAW SS CV OUTPUT RANGE AMPERES 40 500 10 500 15 500 40 500 40 500 OCV Uo 60 24 60 60 60 WELDING PROCESS IP23 155º F Insulation Class Weight does not include input cord Output De rated at Temperatures above 40 C ...

Page 10: ...USE BOX BEFORE WORKING ON THIS EQUIPMENT TURN OFF THE INPUT POWER TO ANY OTHER EQUIPMENT CONNECTED TO THE WELDING SYSTEM AT THE DISCONNECT SWITCH OR FUSE BOX BEFORE WORKING ON THE EQUIPMENT DO NOT TOUCH ELECTRICALLY HOT PARTS ALWAYS CONNECT THE FX450 GROUNDING LUG LOCATED INSIDE THE RECONNECT INPUT ACCESS DOOR TO A PROPER SAFETY EARTH GROUND WARNING FX450 RED D ARC Do not mount the FX450 over comb...

Page 11: ...DS TO THE FX450 CONNEC TIONS SHOULD BE MADE IN ACCORDANCE WITH ALL LOCAL AND NATIONAL ELECTRI CAL CODES AND THE CONNECTION DIAGRAM LOCATED ON THE INSIDE OF THE RECON NECT INPUT ACCESS DOOR OF THE MACHINE FAILURE TO DO SO MAY RESULT IN BODILY INJURY OR DEATH WARNING INPUT CONNECTION See Figure A 1 Use a three phase supply line A 1 40 inch 36 mm diameter access hole for the input supply is located o...

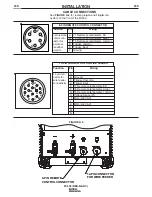
Page 12: ... hand foot amptrol A E C F B D A E C F B D 6 PIN REMOTE CONTROL CONNECTOR Pin A B C D E F G H I J K L M N Wiring Ground Trigger Common Trigger input 77 Remote potentiometer 5K 76 Remote potentiometer wiper 75 Remote potentiometer common Voltage Sense 21 Motor 42 VAC Motor 42 VAC Function 14 pin con nector for wire feeder connectivity G F E M N D B A J I L K C H G F E M N D B A J I L K C H 14 PIN C...

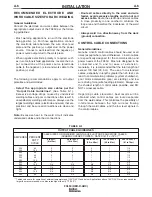
Page 13: ...om the work ground connection CONTROL CABLE CONNECTIONS General Guidelines Genuine Lincoln control cables should be used at all times except where noted otherwise Lincoln cables are specifically designed for the communication and power needs of the FX450 Most are designed to be connected end to end for ease of extension Generally it is recommended that the total length not exceed 100 feet 30 5 m T...

Page 14: ...f from the work and ground Always wear dry insulating gloves FUMES AND GASES can be dangerous Keep your head out of fumes Use ventilation or exhaust to remove fumes from breathing zone WELDING SPARKS can cause fire or explosion Keep flammable material away Do not weld on containers that have held combustibles ARC RAYS can burn Wear eye ear and body protection Observe additional guidelines detailed...

Page 15: ... is 500 amps The FX450 is also rated for Desert Duty elevated temperature operation in a 55 C 131 F ambient The machine is output de rated for this application DESIGN FEATURES Severe Duty Design for outdoor use IP23 rating Passive Power Factor Correction reliably gives 95 power factor for lower installation costs 89 Efficiency rating reduces electrical utility costs Simple user interface designed ...

Page 16: ...perature Range is 10 C to 55 C Output De rated at Temperatures above 40 C FX450 RED D ARC Note The FX450 is not compatible with 115V Wire Feeders K3073 1 K2327 5 K2149 1 K1842 10 3100211 FX450 LF 72 Bench Model Work Lead Package 10 Ft Weld Power Cable Harris Regulator and gas hose Basic Package K857 K857 1 K870 K963 3 Remote Output Control 25 feet Remote Output Control 100 feet Foot Amptrol Hand A...

Page 17: ...cal Remote Toggle Switch 9 Arc Control Dial 10 Weld Terminals On Remote toggle selector switch FX450 RED D ARC 1 2 3 4 5 6 7 8 9 10 11 12 13 14 15 1 2 3 4 5 6 7 8 9 10 11 12 13 14 15 FIGURE B 1 11 Wire feeder voltmeter polarity selection toggle switch 12 Circuit breaker reset button for the 14 pin wire feeder connector 13 14 pin wire feeder circular connector 14 6 pin remote circular connector 15 ...

Page 18: ...ld process selector switch a hot start toggle output control dial and arc control dial are provided to setup and fine tune the welding procedure WELD CONTROLS AND DISPLAYS Weld Process Selector Switch 4 Position switch used to select the welding process Hot Start Toggle Switch The Hot Start control regulates the starting current at arc initiation Hot Start can be set to Off and no additional curre...

Page 19: ...t relative to the preset current at arc initiation FX450 RED D ARC Arc Control The Arc Control regulates the Arc Force to adjust the short circuit current The minimum setting 10 will produce a soft arc and will produce minimal spatter The maximum setting 10 will produce a crisp arc and will minimize electrode sticking Weld Terminals On Remote Set to On so the machine is in the ready to weld state ...

Page 20: ...age When the Local Remote is set to Remote this dial sets the maximum welding amperage The remote potentiometer controls the amperage from minimum to this pre set maximum FX450 RED D ARC CV GAS This weld mode is a constant voltage CV mode featuring con tinuous control from 10 to 45 volts It is intended for the GMAW FCAW GS MCAW welding processes and arc gouging Hot Start Toggle to ON position to p...

Page 21: ... amperage is displayed After welding the meter holds the actual amperage value for 5 seconds Output adjustment while in the hold period results in the prior to operation characteristics The displays blink indicating that the machine is in the hold peri od Voltage Display Meter This display will display the pre set welding voltage when the machine is in the idle state While output is enabled the ac...

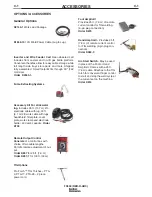
Page 22: ...er plate work clamp and electrode holder 400 amp capacity Order K704 Remote Output Control Consists of a control box with choice of two cable lengths Permits remote adjustment of out put Order K857 for 25 ft 7 6 m Order K857 1 for 100 ft 30 m TIG Options Pro Torch TIG Torches PTA 9 PTA 17 PTA 26 2 piece power cord FX450 RED D ARC Foot Amptrol Provides 25 ft 7 6 m of remote current control for TIG ...

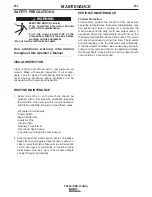
Page 23: ... equipment Do not touch electrically hot parts See additional warning information throughout this Operatorʼs Manual WARNING VISUAL INSPECTION Clean interior of machine with a low pressure air stream Make a thorough inspection of all compo nents Look for signs of overheating broken leads or other obvious problems Many problems can be uncovered with a good visual inspection ROUTINE MAINTENANCE 1 Eve...

Page 24: ...labeled POSSIBLE CAUSE lists the obvious external possibilities that may contribute to the machine symptom Step 3 RECOMMENDED COURSE OF ACTION This column provides a course of action for the Possible Cause generally it states to contact your local Authorized Field Service Facility If you do not understand or are unable to perform the Recommended Course of Action safely contact your local Authorize...

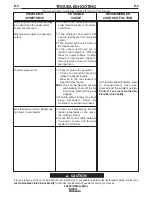
Page 25: ...remote control connection and operation 1 Check for proper fan operation Check for material blocking intake or exhaust louvers Blow air in the rear louvers to clear dirt from the fan Note The Fan As Needed circuitry automatically shuts off the fan 5 minutes after welding has stopped 2 Welding output ratings may have been exceeded Allow the machine to cool down and reset 1 Check circuit breakers by...

Page 26: ... primary reconnect is properly configured for the input voltage If condition persists contact an authorized Field Service Shop Check input power voltage and frequency while welding Verify the primary reconnect is properly configured for the input voltage Re trigger to recover from error If condition persists contact an authorized Field Service Shop Verify the primary reconnect is properly configur...

Page 27: ...It may not be accurate for all machines covered by this manual The specific diagram for a particular code is pasted inside the machine on one of the enclosure panels If the diagram is illegible write to the Service Department for a replacement Give the equipment code number ...

Page 28: ...F 2 DIMENSION PRINT F 2 FX450 RED D ARC L 1 5 6 9 8 A 0 1 2 6 6 6 1 8 7 8 1 4 1 4 2 6 5 1 1 3 0 6 L15698 A 01 26 66 18 78 14 14 26 51 13 06 ...

Page 29: ... electrically live parts or electrode with skin or wet clothing Insulate yourself from work and ground No toque las partes o los electrodos bajo carga con la piel o ropa moja da Aislese del trabajo y de la tierra Ne laissez ni la peau ni des vête ments mouillés entrer en contact avec des pièces sous tension Isolez vous du travail et de la terre Berühren Sie keine stromführenden Teile oder Elektrod...

Page 30: ... gute Be und Entlüftung des Arbeitsplatzes Mantenha seu rosto da fumaça Use ventilação e exhaustão para remover fumo da zona respiratória Turn power off before servicing Desconectar el cable de ali mentación de poder de la máquina antes de iniciar cualquier servicio Débranchez le courant avant l entre tien Strom vor Wartungsarbeiten abschalten Netzstrom völlig öffnen Maschine anhalten Não opere co...

Page 31: ...s and Service through Subsidiaries and Distributors Worldwide Cleveland Ohio 44117 1199 U S A TEL 216 481 8100 FAX 216 486 1751 WEB SITE www lincolnelectric com World s Leader in Welding and Cutting Products ...

Reviews: