background image

5/112 

IT-GB-FR 

mod. 940-940/SA 


Operazioni preliminari 


Togliere delicatamente l’imballo.


Il materiale che compone l’imballo va riciclato mettendolo negli appositi contenitori o 
conferito al sito preposto nel comune di residenza.


Prima dell’installazione assicurasi dell’integrità dell’apparecchio, in caso di dubbio non 
utilizzarlo e rivolgersi al rivenditore.


Posizionamento apparecchio 


Il sito d’installazione dell’apparecchio deve prevedere:


Una pavimentazione di adeguata capacità di carico, superiore al peso dell’apparecchio. 
Se la costruzione esistente non soddisfa questo requisito, misure appropriate dovranno 
essere prese (Es. piastra di distribuzione di carico). 


Una pavimentazione adatta all’irraggiamento calorico che garantisca l’ edificio contro i 
rischi di incendio. 


L’ installazione dell’ apparecchio deve garantire facile accesso per la pulizia 
dell’apparecchio stesso, dei condotti dei gas di scarico e della canna fumaria. 


Una distanza minima da materiali adiacenti infiammabili (vedi Distanze di Sicurezza) 


Che il locale sia permanentemente ventilato secondo le norme in vigore. 


L’installazione deve consentire un comodo accesso per gli interventi di pulizia 
dell’apparecchio e dello scarico dei fumi. 

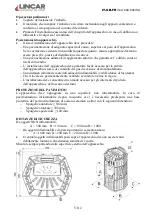
PROTEZIONE DEL PAVIMENTO 

L’apparecchio deve appoggiare su una superficie non infiammabile. In caso di 
pavimentazione infiammabile (legno, moquette, ecc.) è necessario predisporre una base 
protettiva del pavimento (lamiera di acciaio,ceramica o altro) con le seguenti dimensioni: 


Sp

orgenza anteriore ≥ 500

 mm; 


Sporgenza laterale ≥ 300

 mm; 


Sporgenza posteriore ≥ 100

 mm. 


DISTANZE DI SICUREZZA 

Da oggetti NON infiammabili: 


A > 500 mm    B > 100 mm 

C > 100 mm D > 1000 


Da oggetti infiammabili e da pareti portanti in cemento armato:


A > 1000 mm B > 200 mm C > 200 mm D > 1000 


Eventuali oggetti infiammabili posti sopra l’apparecchio devono essere tenuti 
debitamente lontani: a una distanza minima di 1 metro.


Misurare sempre partendo dalla superficie esterna dell’apparecchio. 

Summary of Contents for 0000

Page 1: ...ace heating appliances with boiler fired by wood pellets Appareil à combustible solide avec chaudière pellets de bois Monella Mod 940 940 SA IT LIBRETTO USO MANUTENZIONE Pag 02 GB USING INSTRUCTIONS AND MAINTENANCE Pag 39 FR INSTRUCTIONS USAGE ENTRETIEN Pag 75 ErP Cod 90003204 Rev 3 ...

Page 2: ...di 18 Regolazioni apparecchio 19 Avviamento 20 Segnalazioni Display 21 Sicurezza 22 Menu Pannello Comandi 23 Dettaglio Menù 25 Pulizia a carico dell utilizzatore 29 Manutenzione ordinaria 30 Accessori 31 Possibili inconvenienti e loro rimedio 31 Segnalazioni Allarmi 32 Esempi di collegamento impianto 33 Condizioni di garanzia e richiesta intervento 38 Targhetta caratteristiche 112 ...

Page 3: ...nzionamento Il costruttore declina ogni responsabilità derivante da installazione errata manomissione utilizzo non corretto dell apparecchio uso improprio cattiva manutenzione inosservanza delle normative vigenti e imperizia d uso Il collegamento dell apparecchio all impianto termico deve essere eseguito da personale qualificato e realizzato a regola d arte Per prevenire problemi derivati da depos...

Page 4: ...ndensazione Pertanto al fine di evitare incrostazioni e o altri spiacevoli inconvenienti dovuti a condense occorre prevedere canne fumarie ben coibentate e sistemi di raccolta condensa normalmente in commercio come previsto dalle norme in vigore Produzione acqua sanitaria in Rapido Solo Mod 940 E opportuno predisporre in assenza di altro generatore quale es caldaia a gas un accumulatore che permet...

Page 5: ...tesso dei condotti dei gas di scarico e della cannafumaria Una distanza minima da materiali adiacenti infiammabili vedi Distanze di Sicurezza Che il locale sia permanentemente ventilato secondo le norme in vigore L installazione deve consentire un comodo accesso per gli interventi di pulizia dell apparecchio e dello scarico dei fumi PROTEZIONE DEL PAVIMENTO L apparecchio deve appoggiare su una sup...

Page 6: ...ompatibilità Per gli apparecchi dotati di acqua sanitaria rapida mod 940 è vivamente consigliata l installazione di un addolcitore anche in funzione della durezza dell acqua di rete al fine di evitare depositi di calcare nello scambiatore rapido che a lungo andare ne riducono fortemente l efficienza e quindi la capacità di produrre acqua calda L acqua dell impianto di riscaldamento deve rispettare...

Page 7: ...dell operazione o in caso di calo della pressione durante la disaerazione è necessario procedere con il reintegro dell acqua mantenere la pressione a circa 0 8 0 9bar Disaerazione del circolatore 7 Dopo aver sfiatato spurgato disareato l impianto è necessario eseguire la disaerazione del circolatore 8 Posizionare il comando del circolatore sul simbolo di disaerazione 9 Se il display dell apparecch...

Page 8: ...za che quest ultimo raggiunga temperature di riguardo ALLACCIAMENTO ALLA CANNA FUMARIA Prima di collegare l apparecchio accertarsi che i dati riportati sulla targhetta siano corrispondenti a quelli richiesti all acquisto Tutte le apparecchiature da riscaldamento a biomassa nella fattispecie stufe a legna e a pellets devono per legge evacuare i prodotti della combustione in una canna fumaria costru...

Page 9: ...In caso di incendio della canna fumaria munirsi di adeguati sistemi per soffocare le fiamme es utilizzare un estintore a polvere o ad anidride carbonica e richiedere l intervento dei Vigili del Fuoco Durante l installazione è necessario garantire un facile accesso per gli interventi di manutenzione e pulizia dell apparecchio del canale da fumo e della cannafumaria COLLEGAMENTO DELL APPARECCHIO ALL...

Page 10: ...sia comunque assicurato lo scarico dei prodotti della combustione Essere posizionato in modo da garantire una adeguata dispersione e diluizione dei prodotti della combustione e comunque al di fuori della zona di reflusso in cui è favorita la formazione di contropressioni Tale zona ha dimensioni e conformazioni diverse in funzione dell angolo di inclinazione della copertura per cui risulta necessar...

Page 11: ... seguito si riportano alcuni schemi consigliati a cui attenersi riguardanti lo scarico dei prodotti della combustione Canna Fumaria Coibentata Canna Fumaria Coibentata Canna Fumaria in Muratura Isolata Canna Fumaria in Muratura Isolata ...

Page 12: ... FUMARIA Eseguire il collegamento dell apparecchio alla canna fumaria del camino esistente assicurandosi che il tubo di uscita fumi non occupi la sezione liberadella canna fumaria Utilizzare esclusivamente tubi dotati di guarnizione di tenuta Limitare i tratti orizzontali max 2 metri e l uso di curve ...

Page 13: ...à con pericolo d incendio PRESA ARIA COMBUSTIONE DIRETTAMENTE DALL ESTERNO Qualora si desiderasse prelevare l aria direttamente dall esterno occorre Utilizzare tubi metallici di diametro 50 mm o maggiori resistenti alla temperatura di almeno 200 C nella zona di allacciamento all apparecchio Vedi schemacollegamenti Per garantire un sufficiente afflusso di aria la condotta non deve superare i 2 3 me...

Page 14: ...otenza termica utile Min 9 20 Rendimento Potenza termica utile Max 93 8 Potenza termica utile Min 96 7 Temperatura dei fumi Potenza termica utile Max C 119 1 Potenza termica utile Min C 64 6 Quantità di fumi al camino m Potenza termica utile Max g sec 11 0 Potenza termica utile Min g sec 3 7 Consumo combustibile al max kg h 3 81 Consumo combustibile al min kg h 1 08 Autonomia min max h 8 0 28 0 Ca...

Page 15: ...IT GB FR mod 940 940 SA 15 112 Curve caratteristiche Circolatore ...

Page 16: ...bambini disabili animali ecc Per l apertura della porta focolare utilizzare la dotazione dell apparecchio Il funzionamento corretto dell apparecchio è da considerarsi con porta focolare chiusa in caso di vetro della porta focolare rotto e o incrinato così come in caso di anomalie di funzionamento l apparecchio non può essere messo in funzione se non dopo aver rimosso l anomalia Disattivare l appar...

Page 17: ...io conservare il combustibile in luogo asciutto e protetto dalla sporcizia Messa in funzione La messa in funzione dell apparecchio deve avvenire solamente dopo il completamento delle operazioni di montaggio di collegamento ai condotti di evacuazione fumi e di collegamento all impianto di riscaldamento Una stufa nuova richiede il completamento dell essiccazione della vernice di finitura Vi invitiam...

Page 18: ...emuto una volta si entra in modalità modifica Temperatura Ambiente utilizzare P1 e P2 per modificare il valore P4 per uscire Se tenuto premuto visualizza sul display la temperatura fumi e la velocità del motore espulsione fumi All interno dei menu Modifica il valore a video Pulsante 3 P3 Premuto una volta si accede ai Menù di programmazione utilizzare P5 e P6 per scorrere i menù P3 per entrare nel...

Page 19: ...e l utilizzo di uno scambiatore rapido quando si richiede acqua calda un sensore avverte l apparecchio della richiesta quest ultimo aumenta la potenza al massimo per soddisfare la richiesta ed inizia la modulazione di potenza quando si raggiunge il valore di temperatura Sanitario impostato IMPOSTARE la Temperatura Sanitario Nella videata principale premere P6 Regolare la temperatura acqua sanitari...

Page 20: ...llarme tenere premuto P4 In caso il display segnali Pulizia Finale attendere fino alla comparsa sul display di SPENTO circa 15 minuti Apparecchiatura in stato di SPENTO Premere P3 per accedere ai menù di programmazione Premere P5 per posizionarsi sul MENU 06 Premere P3 per accedere al menù Carico Iniziale Premere P1 per attivare il carico in continuo del combustibile Quando il pellets comincia a c...

Page 21: ...chio ha rilevato la presenza di fuoco nel cestello bruciatore ed inizia la stabilizzazione LAVORO Funzionamento a potenza L apparecchio ha terminato la fase di accensione in questo momento è in funzione alla potenza programmata LAVORO MODULA Funzionamento a potenza ridotta La temperatura dell ambiente o della caldaia ha raggiunto i valori impostati ATTESA RAFFRED Funzione Stand By Controllo Appare...

Page 22: ...aria tipologia di combustibile temperatura caldaia impostata lunghezza tubazioni di trasporto acqua e isolamento impianto termico Mod 940 SA La produzione di acqua calda sanitaria con apparecchio NON fornito di scambiatore rapido è dipendente alla tipologia di impianto termico collegato all apparecchio Qualora si desiderasse produrre acqua calda sanitaria si rende necessario l utilizzo di un accum...

Page 23: ...e i valori di controllo non rientrano nei parametri di funzionamento inizia un ciclo di arresto e sul display sarà visualizzato il messaggio SONDA FUMI o SONDA ACQUA MENU PANNELLO COMANDO Per accedere ai menu premere P3 Utilizzare P5 e P6 per scorrere i vari menu Premere nuovamente P3 per accedere all interno del menu visualizzato Utilizzare P5 e P6 per scorrere i vari sottomenu P1 e P2 per variar...

Page 24: ...ridurre il consumo di combustibile Nel momento in cui la temperatura scende al di sotto del valore impostato l apparecchio ripristina il funzionamento a potenza programmata esempio pot 3 Nel caso del modello 940 kit di produzione acqua sanitaria l apparecchio funzionando in questa modalità è sempre pronto alla produzione di acqua calda sanitaria 2 Modalità STAND BY ON L apparecchio al raggiungimen...

Page 25: ...care il numero visualizzato su display nella parte superiore come indicato nella tabella sottostante per aumentare la quantità di pellets aumentare il valore per diminuire la quantità di pellets diminuire il valore ATTENZIONE Si raccomanda di eseguire variazioni aumentando diminuendo il valore iniziale di un solo numero alla volta verificare il funzionamento dell apparecchio per 1 o 2 giorni e com...

Page 26: ...no tutti i giorni della settimana in ugual modo Per una corretta esecuzione dei programmi regolare con attenzione i dati del MENU 01 Selezionando oFF in un programma di accensione spegnimento l apparecchio non eseguirà il comando relativo utilizzare oFF quando si vuole che la stufa esegua solo l accensione o lo spegnimento ignorando l altro comando del programma Display Descrizione Esempio Range M...

Page 27: ... Attivare on Disattivare off il PROG 3 per il Domenica on on oFF M 2 3 29 START PROG 4 Inserire orario accensione 16 00 00 00 off M 2 3 30 STOP PROG 4 Inserire orario spegnimento 22 30 00 00 off M 2 3 31 LUNEDI PROG 4 Attivare on Disattivare off il PROG 4 per il Lunedì oFF on oFF M 2 3 32 MARTEDI PROG 4 Attivare on Disattivare off il PROG 4 per il Martedì oFF on oFF M 2 3 33 MERCOLDI PROG 4 Attiva...

Page 28: ...ati della temperatura ambiente o della temperatura caldaia continuerà a funzionare a potenza minima senza spegnersi Menu 05 MODO CICALINO Impostazione del suono cicalino Display Descrizione Esempio MODO CICALINO Selezionare la modalità cicalino desiderata SOLO ALLARMI Selezioni disponibili OFF SOLO ALLARMI ON SEMPRE OFF Sempre spento SOLO ALLARMI Suono solo in caso di Allarmidell apparecchio ON SE...

Page 29: ...ire la leva nel perno centrale a vista vedi figura agire tirando verso il basso e rilasciando per N 4 5 volte Si otterrà così la pulizia dei condotti fumi Una volta eseguita la pulizia procedere al ripristino dell apparecchio facendo quando descritto sopra in modo inverso Pulizia ordinaria della camera di combustione La camera di combustione deve essere tenuta sotto controllo per assicurare che le...

Page 30: ...ere l apparecchio successivamente scollegarlo dalla presa di corrente e ad apparecchio freddo mediante aspiratore asportare i depositi sul fondo Se necessario asportare la griglia serbatoio Ad operazione ultimata ripristinare il tutto Manutenzione Ordinaria operazione da eseguirsi da personale qualificato IMPORTANTE Almeno un volta l anno ed in ogni caso a fine stagione di utilizzo per mantenere e...

Page 31: ...a impostata L impianto termico è sottodimensionato rispetto alla potenza dell apparecchio Impostare una temperatura ambiente più elevata Impostare una temperatura della caldaia più elevata Aumentare le dimensioni dell impianto termico Il combustibile si accumula nel cestello bruciatore Combustibile di scarsa qualità Carburazione manutenzione apparecchio Coperchio cassetto cenere aperto o non chius...

Page 32: ...llegamenti del contagiri encoder Rottura motore fumi Sostituzione motore Errore Fuoco Non viene rilevata la presenza di fuoco nel cestello Mancata alimentazione del combustibile Sonda rilevamento Verifica presenza pellets nel serbatoio Verifica funzionamento coclea Verifica intasamento otturazione coclea Verifica collegamenti elettrici Verificare posizione sonda fumi Verificare sostituire sonda fu...

Page 33: ...hio da un Centro Assistenza Tecnica Utilizzare un combustibile di migliore qualità Procedere alla Correzz Pellet Sonda rilevamento Verificare posizione sonda fumi Verificare sostituire sonda fumi Carburazione apparecchio errata Far visionare l apparecchio da un Centro Assistenza Tecnica Procedere alla Correzz Pellet Hot Acqua Temperatura acqua caldaia troppo elevata Rottura Blocco pompa di circola...

Page 34: ...IT GB FR mod 940 940 SA 34 112 ...

Page 35: ...IT GB FR mod 940 940 SA 35 112 ...

Page 36: ...IT GB FR mod 940 940 SA 36 112 ...

Page 37: ...IT GB FR mod 940 940 SA 37 112 ...

Page 38: ...chimici elettrochimici La Garanzia decade se esistono malfunzionamenti generati da cattiva installazione manomissione dell apparecchio uso non appropriato imperizia d uso La Garanzia decade se esistono malfunzionamenti generati dall uso di combustibili non conformi quali ad esempio legna verde legna con molta umidità combustibili diversi da quelli indicati sul libretto nel caso di apparecchi a pel...

Page 39: ...ata 51 Utilization 53 Fuel 54 Control panel 55 Appliance regulation 56 Starting 57 Indications on Display 58 Security 59 Control panel menu 60 Menu details 62 Cleaning to be carried out by the User 66 Ordinary maintenance 67 Accessories 68 Possible failures and cure 68 Alarm indications 69 Examples of connections 70 Technical data plate 112 ...

Page 40: ... and steam drains and waste disposal The appliance should be connected to an electrical plant suitable with the declared electrical power of the appliance itself see data plate The manufacturer disclaims all responsibility caused by incorrect installation using tampering maintenance or no respect of normative in force In order to avoid problems arising from residuals and or deposit it is deeply re...

Page 41: ...of warm water even in hours during the equipment is off The sanitary fast water production is submitted to the equipment use with cutoff cock of heating installantion open so normally not during the summer time Attention in case of fast sanitary water production the power give to the installation decrease MEASURES FUME EXHAUST AND WATER TUBES CONNECTIONS Should it be necessary to make holes on the...

Page 42: ... see security distances The room must be continuously ventilated according to the local rules It s prohibited to install the equipment into sleeping rooms bathroom or where another heating equipment without an independent air supply is just installed It s prohibited product positioning in environments with explosive atmosphere FLOOR PROTECTION The equipment must be installed on a non combustible s...

Page 43: ...ld prearrange all necessary to solve compatibility problems Per for the equipped appliances of fast sanitary water mod 940 is lively advised the installation of a water softener also according to the hardness of water system to avoid limestone coking in the rapid exchanger that in the long time reduce strongly the efficiency and therefore the ability to produce warm water The installation water sh...

Page 44: ...tors etc 5 Repeat the venting clean phase 2 times paragraph 4 6 When the operation is ended or in case of pressure drop during the venting phase it s necessary to reinstate water keep a pressure value of 0 8 0 9 bar Circulator venting phase 7 After the venting operation of heating installation it s necessary to do the same operation with the circulator 8 Position the circulator knob on Ventil Symb...

Page 45: ...ntire heating installation to avoid that particular temperatures are reached Connection to the chimney Before connecting the appliance verofy if the technical data reported on the technical correspond to the ones you have required at the moment of purchaser All heating biomass equipments especially wood and pellet appliances have to evacuate the combustion products in a flue which must be built in...

Page 46: ...denses collection placed under the flue throat and easy to be reached and opened through a sealed little door for inspection In case of fire of chimney or flue employ the right system to soffocate the flames and call for firemen The chimney and gas tubes should be easy to log on for every maintenance and cleaning operation EQUIPMENT CONNECTION TO FLUE AND EVACUATION OF COMBUSTION PRODUCTS The flue...

Page 47: ...ts with any type of wind Positioned to guarantee the right fumes dispersion especially out of re flux area This area has several dimensions and conformations in function of the inclination corner of the covering therefore it is necessary to adopt the minimal heights as indicated in the following tables Inclination Roof C A H Re Flux Area Highness Z m 15 1 85 1 00 0 50 30 1 50 1 30 0 80 45 1 30 2 0...

Page 48: ...IT GB FR mod 940 940 SA 48 112 Hereby some suggested schemes regarding the exhaust of the combustion products Insulated Flue Insulated Flue Masonry insulated flue Masonry insulated flue ...

Page 49: ...ollow and respect what indicated in the Section Installation Connect the heating equipment to the flue chimney verifying that the exhaust pipe does not enter into the free section of the flue Employ only tubes supplied by seal gasket Limitate the use of horizontal tubes max 2 meter and curves ...

Page 50: ...ted in the Section Installation To take air direct from outside it s necessary Use metal tubes of diameter Ø50 mm or more resistant to temperature of al least 200 C in this area of connection to the appliance See the connection schedule To guarantee a sufficient air influx the connection s tube has not to be longer that 2 3 mt and it has not to have a lot of curves If the air intake is direct to o...

Page 51: ...at Output 0 0194 Reduced Heat Output 0 0453 Emissions of CO2 Nominal Heat Output 10 68 Reduced Heat Output 9 20 Efficiency Nominal Heat Output 93 8 Reduced Heat Output 96 7 Flue gas temperature Nominal Heat Output C 119 1 Reduced Heat Output C 64 6 Flue gas mass flow Nominal Heat Output g sec 11 0 Reduced Heat Output g sec 3 7 Fuel consumption at max kg h 3 81 Fuel consumption at min kg h 1 08 Aut...

Page 52: ...IT GB FR mod 940 940 SA 52 112 Characteristic curves Circulator ...

Page 53: ...th short experience y knowledge unless they are not controlled or instructed to use by the person responsible forsecurity Employ the specific utensil to open the fire door The correct use of the appliance is with closed door if the fire door glass is broken and or damaged or in case of bad functioning the appliance must not be lighted till the problem has been solved Disconnect the appliance in ca...

Page 54: ...ion to exhaust fumes duct and to the heating plant A new appliance needs to complete the drying process of the paint During the first heatings you can notice the following situations During the first ignitions the appliance may exhale bad smell We suggest a good aeration of the room till bad smells have been eliminated The complete drying process will be obtained after some heating operations WOOD...

Page 55: ...lue on video Button 3 P3 Pushed for one time you enter into the Menù of programming use P5 and P6 to run in the different menu P3 to enter into the menù P4 to exit Inside of a menu it confirms the value displayed on the video and proceeds to the next one Button 4 P4 If pusched for few seconds it switches on off the appliance If pushed inside of a menu you go back to the previous position or you ex...

Page 56: ... a rapid exchanger when warm water is requested a feeler transfers this request to the appliance which increases the power to the max level to satisfy the request and the power modulation will start as soon as the selected value of domestic water temperature has been reached TO SELECT domestic water temperature Push on button 6 Regulate the temperature of plant utilizing the buttons P1 and P2 Term...

Page 57: ...nce In case the display is signalling an alarm keep the push button P4 pressed In case the display is signalling Final cleaning wait until on the display appears Off approx 15 minutes Appliance in switched off condition display OFF Push on P3 to get access to the programmation menu Push P5 to go on MENU 06 Push P3 to go to the menu load initial Push on P1 to activate the continuous charge of fuel ...

Page 58: ...d the presence of fire in the basket stabilization phase starting WORK Working at power The appliance has terminated the lighting phase and is now ready to work at the selected power WORK MODULAT Working at reduced power Boiler or room temperature has reach the selected values COOLONG WAITING Function in Stand By Room or boiler temperatures have exceeded the selected ones Appliance works in stand ...

Page 59: ...SA The production of warm domestic water with an appliance which is NOT including a rapid exchanger depends from the type of heating plant connected to the appliance Should you desire to have warm domestic water you have to utilize an accumulator out of the appliance which will be heated by mean of appropriate deviations of the heating plant SECURITY FEATURES The appliance is equipped with differe...

Page 60: ...top cycle starts while on the display appears FEELER EXHAUST or FEELER WATER CONTROL PANEL MENU Push on button P3 to have access to the menu Use buttons P5 and P6 to run on the different menu Push again on button P3 to enter into the displayed menu Use buttons P5 and P6 to run on the different submenu the button P1 and P2 modify the value shown on the display The button P3 accedes to the displayed...

Page 61: ...remains at the minimum until one of the temperatures goes under the selected value In case o the Mod 940 including kit for domestic water production is working in this modality it is always ready for the production of domestic water 2nd Modality STAND BY ON Once the appliance has reached one of the selected temperature room or boiler it reduces the power to the minimum and the display signals WORK...

Page 62: ...o enter into the modality of combustion modification g Use buttons P1 and P2 to modify the number shown on the display on the upper part as indicated in the below table to increase the quantity of pellet you must increase the value to decrease the quantity of pellet decrease the value ATTENTION We recommend to modify the value increasing decreasing by only one number per time Verify the working of...

Page 63: ...STOP 2 DAY Insert extinction hour OFF 00 00 off The program hours will be repeated every day of the week in the same way For a correct execution of the programs set very carefully the data of Menu 01 Selecting oFF instead of the starting or extinction hour the appliance exclude the automatic starting or extinction Display Description Example Range M 2 3 WEEKLY PROGRAM M 2 3 01 CRONO WEEKLY Activat...

Page 64: ...RIDAY PROG 3 Activate on Deactivate off PROG 3 for Friday on on oFF M 2 3 27 SATURDAY PROG 3 Activate on Deactivate off PROG 3 for Saturday on on oFF M 2 3 28 SUNDAY PROG 3 Activate on Deactivate off PROG 3 for Sunday on on oFF M 2 3 29 START PROG 4 Insert starting hour 16 00 00 00 off M 2 3 30 STOP PROG 4 Insert extinction hour 22 30 00 00 off M 2 3 31 MONDAY PROG 4 Activate on Deactivate off PRO...

Page 65: ...ure it starts the extinction cycle OFF If the appliance is exceeding the set value of room or boiler temperature it will continue to work at min power without extinctinguishing Menu 05 STATUS BUZZER Setting up of buzzer sound Display Description Example STATUS BUZZER Select the buzzer modality you wish ONLY ALARM Available selections OFF ONLY ALARMS ALWAYS ON OFF Always off ONLY ALARMS Sounds only...

Page 66: ... effected with appliance switched off and in strictly cold conditions Take the lever placed inside the lower door turn the ceramic in anticlockwise and insert the lever into the central pivot and move it up and down for 4 5 times see picture In this way you clean the fume ducts Once the cleaning has been effected re put the ceramic in its correct position Routine maintenance of the combustion cham...

Page 67: ... a duster Every Month Cleaning about pellet tank Clean with a vacuum cleaner to remove every residual of combustion Before cleaning let finishing the pellet inside the apparatus and remove the plug If necessary take away also the tank grate Ordinary maintenance by qualify staff At least once a year a general control on the appliance should be effected by a specialized technician It is advisable th...

Page 68: ...e the quality of the fuel The fuel is accumulating itself into the burner basket Carburation maintenance of appliance Ashtray cover opened or not correctly closed Effect Cleaning by User and or ordinary maintenance Effect a pellet correction menu09 Verify if the ashtray cover is correctly closed The heating plant thermo siphon is tepid Appliance just started The room temperature has reached the re...

Page 69: ...nection of the motor and revolotion counter encoder Breakdown motor Replace motor Error Fire No fire is noted in the burner basket No pellet feeding Fume feeler Verify pellet available in container Verify screw feeder operating Verify stoppage clogging screw feeder Verify electrical wire Verify the position of fume feeler Verify replace fume feeler Chimney clogged Verify chimney Failure Depress Fu...

Page 70: ...o high Change fuel Verification of appliance by a technical service center Utilize better quality of pellet Proceed with Pellet Correct Fume feeler Verify fume feeler position Verify replace fume feeler Wrong appliance carburation Verification of appliance by a technical service center Proceed with Pellet Correct Hot Water Boiler water temperature too high Breakdown block circulation plant pump Ai...

Page 71: ...IT GB FR mod 940 940 SA 71 112 ...

Page 72: ...IT GB FR mod 940 940 SA 72 112 ...

Page 73: ...IT GB FR mod 940 940 SA 73 112 ...

Page 74: ...IT GB FR mod 940 940 SA 74 112 ...

Page 75: ...nneau des commandes 91 Régulations appareil 92 Allumage Mis en fonction 93 Signalisation Display 94 Sécurité 95 Menu Panneau des commandes 96 Détails Menù 98 Nettoyage au soin de l Utilisateur 102 Entretien Ordinaire 103 Accessoires 104 Possibles inconvénients et leur résolutions 104 Détection alarme 105 Exemples de laçage 106 Fiche Technique des caractéristiques 112 ...

Page 76: ...ra relié doit supporter la puissance électrique déclarée et nécessaire au fonctionnement Le fabricant n est pas responsable au sujet de mauvais installation utilisation pas correcte altération usage impropre et mauvais entretien Le laçage de l appareil à l installation thermique doit être effectué par personnel qualifié et selon toutes les règles de l art Il est convenable d effectuer un lavage co...

Page 77: ...iter incrustations et ou autres inconvénients que le conduit soit bien calorifuge et qu il soit supporté par des systèmes de collection condensés comme prévu par les normatives en force Production eau sanitaire en Rapide Seulement Mod 940 Il est convenable en absence de autre générateur par exemple chaudière à gaz un accumulateur qui puisse permettre de avoir à disposition quantités majeures de ea...

Page 78: ...ortie fumées et du conduit centrale Une distance minimale de matériel inflammable Voir distances de sécurité La pièce doit être toujours ventilé selon le normes en force L installation doit permettre une facile maintenance de l appareil et du conduit fumées PROTECTION DU SOL L appareil doit s installer sur une surface qui ne soit pas inflammable En cas de pavage inflammable bois moquette etc il es...

Page 79: ...nvenable d installer un adoucisseur en fonction aussi du type de l eau de connexion pour éviter dépôt de calcaire dans l échangeur rapide qui puissent aussi en réduire l efficace donc la capacité de production d eau chaude L eau de l installation du chauffage doit respecter aucunes caractéristiques chimiques et physiques pour que l appareil puisse fonctionner bien et pour longtemps L eau d aliment...

Page 80: ...en cas de chute de pression pendant la désaération il est nécessaire avancer avec la réintégration de l eau maintenir la pression à plus ou moins 0 8 0 9 bar Désaération du circulateur 7 Suite à l opération de désaération purge de l installation il faut faire l opération de Désaération purge du circulateur 8 Positionner la poignet du circulateur sur le symbole de désaération 9 Si le display de l a...

Page 81: ...indre certaines températures LACAGE DE L APPAREIL AU CARNEAU Avant d installer l appareil il faut vérifier que les données sur la plaquette soient correspondants à ces que Vous avez demande à l achat Tous les appareils de chauffage à biomasse et en particulier les poêles à pellets doivent pour loi évacuer les produits de la combustion dans le carneau construit conformément au normatives en force d...

Page 82: ...s fumées il faut s équiper par les systèmes convenables pour fermer les flammes ex employer un extincteur à poudre ou an carbonique demander l intervention des pompiers Pendant l installation il est nécessaire de garantir un accès facile pour les interventions de nettoyage de l appareil du conduit de fumées et du carneau LACAGE DE L APPAREIL AU CARNEAU ET EVACUATION DES PRODUITS DE LA COMBUSTION L...

Page 83: ... dans la façon que ne soit pas permis la pénétration dans la cheminée de la pluie de la neige ou autres corps et surtout de permettre la sortie des produits de combustion avec n importe quel régime des vents Positionnés dans la façon de garantir une correcte dispersion des fumées et dans tout le cas en dehors de la zone de reflux qui favorise la formation des contrepressions Inclination de toit C ...

Page 84: ...2 En suite quelques exemples de réalisation de l enlace pour la sortie des fumées de la combustion Conduit fumées calorifugé Conduit fumées en maçonnerie calorifugé Conduit fumées calorifugé Conduit fumées en maçonnerie calorifugé ...

Page 85: ...U CARNEAU Exécuter le laçage de l appareil au carneau de la cheminée existante en s assurant que le tube de sortie fumées n occupe pas la section libre du carneau Employer exclusivement tuyaux doués de garniture Limiter les traites horizontales max 2 mètres et l emploi des courbes ...

Page 86: ...ient directement de l extérieure il faut Employer tuyaux métalliques de diamètre Ø50 mm ou plus qui soient résistantes au température au moins 200 C dans la zone de connexion à l appareil Voir le schéma de laçage Pour garantir un flux d air suffisant la conduite ne doit pas être plus longue de 2 ou 3 Mt et elle ne doit pas avoir trop de courbes Si la conduite va à l extérieure celle ci doit termin...

Page 87: ...nce therm utile Max 0 0194 Puissance therm utile Min 0 0453 Rendement Puissance therm utile Max 10 68 Puissance therm utile Min 9 20 Température des fumées Puissance therm utile Max 93 8 Puissance therm utile Min 96 7 Quantité des fumées à la cheminée m Puissance therm utile Max C 119 1 Puissance therm utile Min C 64 6 Emissions de CO al 13 di Oxygène Puissance therm utile Max g sec 11 0 Puissance...

Page 88: ...IT GB FR mod 940 940 SA 88 112 Courbes caractéristique circulatoire ...

Page 89: ... avec enfants animaux ou personnes diables Pour l ouverture de la porte feux il faut utiliser les outils en dotation Le fonctionnement correcte du poêle est entendu avec porte fermée dans le cas de vitre de la porte feu cassé et ou fêlure ainsi que dans le cas des anomalies dans le fonctionnement na faire pas fonctionner l appareil que depuis avoir éliminé l anomalie Désactiver l appareil dans le ...

Page 90: ...combustible en pellets CONSERVATION DU PELLETS Au but de garantir une parfaite combustion il faut conserver le combustible dans un lieu qui soit le plus possible sec y propre MISE EN FONCTION La mise en fonction de l appareil se doit réaliser seulement après toutes les opérations de montage et de laçage aux conduits évacuation fumées Un nouveau poêle exige le séchage des vernis et des peintures Il...

Page 91: ...iance employer P1 et P2 pour modifier la valeur P4 pour sortir S il est gardé poussé il visualise sur le display la température fumées et la vitesse du moteur expulsion fumées Dans les Menus il modifie la valeur à vidéo Bouton 3 P3 Poussé une seul foi il permet d accéder aux Menùs de programmation employer P5 et P6 pour défiler les menus P3 pour entrer dans les menus P4 pour sortir Dans les menus ...

Page 92: ...rapide à la demande d eau chaude un capteur avise l appareil de la demande ce dernier augmente la puissance au maximum pour satisfaire la requête et l appareil commence à moduler la puissance jusqu à la réalisation du valeur de température sanitaire programmé PROGRAMMER la température sanitaire Dans l écran principale pousser P6 Réguler la température eau sanitaire en employant P1 ou P2 Terminer l...

Page 93: ... appareil Si le display signale une alerte maintenir poussé le bouton P4 Si le display signale Nettoyage finale attendre jusqu à quand le mot éteint apparaît sur le display env 15 min Appareil en état de ETEINT Pousser P3 pour accéder aux différents menus de programmation Pousser P5 pour se positionner sur le MENU 06 Pousser P3 pour accéder au menu Charge Initial Pousser P1 pour activer le chargem...

Page 94: ...s dans le panier brûleur PRESENCE FEUX Allumage du combustible L appareil relève la présence du feux et dans le panier brûleur et commence la stabilisation TRAVAIL Fonctionnement à puissance L appareil a terminé la phase d allumage maintenant il est en fonction à la puissance programmée TRAVAILLE MODULE Fonctionnement à puissance réduite La température de la pièce ou de la chaudière a rejoint les ...

Page 95: ...eur tuyaux de transport eau et isolation laçage thermique Mod 940 SA La production d eau sanitaire avec appareil PAS DOUE D ECHANGEUR RAPIDE dépends de la typologie de connexion thermique relié à l appareil Si la production d eau sanitaire se rend nécessaire il faut employer un accumulateur extérieur à l appareil qui sera chauffé à travers déviations de la connexion thermique SYSTEMES DE SECURITE ...

Page 96: ...trent pas dans les paramètres de fonctionnement un cycle d arrêt commence et sur le display sera visualisé le message SONDE FUMEES ou SONDE EAU MENU PANNEAU DES COMMANDES Pour entrer dans les menus pousser P3 Employer P5 et P6 pour défiler les différents menus Pousser encore P3 pour entrer dans le menu visualisé Employer P5 et P6 pour défiler les différents sous menu P1 et P2 pour modifier la vale...

Page 97: ...ommation de combustible Si la température baisse au dessus du valeur programmé l appareil reprends à fonctionner avec la puissance programmé es puis 3 Dans le cas du mod 940 kit de production eau sanitaire l appareil qui fonctionne en cette modalité est toujours à la production d eau chaude sanitaire 2 Modalité STAND BY ON Quand l appareil atteint à la température ambiance ou à la température de l...

Page 98: ...er le numéro visualisé sur le display dans la partie supérieure comme indiqué dans le tableau ci joint pour augmenter la quantité de pellets il faut augmenter le valeur pour baisser la quantité de pellets il faut baisser le valeur Attention Il est convenable de faire variations augmenter baisser le valeur initial d un seul numéro par foi vérifier le fonctionnement de l appareil pour 1 ou 2 jours e...

Page 99: ...es programme se répèteront tous les jours de la semaine dans la même façon Pour une exécution correcte des programmes il faut régler avec attention les données du MENU 01 En choisissant OFF dans un programme d allumage éteignement l appareil ne suivra pas le relatif commande employer OFF quand le poêle doit seulement s allumer ou s éteindre ignorant l autre commande du programme Display Descrption...

Page 100: ...ROG 3 Activer on Désactiver off le PROG 3 pour le Dimanche on on oFF M 2 3 29 START PROG 4 Introduire heure allumage 16 00 00 00 off M 2 3 30 STOP PROG 4 Introduire heure éteignement 22 30 00 00 off M 2 3 31 LUNDI PROG 4 Activer on Désactiver off le PROG 4 pour le Lundi oFF on oFF M 2 3 32 MARDI PROG 4 Activer on Désactiver off le PROG 4 pour le Mardi oFF on oFF M 2 3 33 MERCREDI PROG 4 Activer on...

Page 101: ...mpérature ambiance ou de la température chaudière commencera à fonctionner à puissance minimum sans s éteindre Menu 05 MOD SONETTE Programm Sonette Display Description Example MOD SONNETTE Sélectionner la modalité sonnette SEULE ALERTE Sélection disponible OFF SEULE ALERTES ON TOUJOURS OFF Toujours éteint SEULE ALERTE Il sonne seulement dans le cas de Alerte de l appareil ON TOUJOURS Il sonne dans...

Page 102: ...eure ouvrir la porte supérieure introduire la lève dans le perne central voir dessin tirer ver le bas et répéter l opération 4 ou 5 fois les conduits fumées seront nettoyés Une foi que le nettoyage est finit il faut tout remonter en faisant ce qui est décrit ci dessus au sens envers Nettoyage ordinaire de la chambre de combustion La chambre de combustion doit se contrôler pour assurer que les ouve...

Page 103: ...ectrique et quand l appareil est froid avec un aspirateur nettoyer les résidus du fond Si nécessaire enlever la grille réservoir et à opération terminé il faut remonter toutes les parties Entretien Ordinaire opération à faire par personnel autorisé Au moins une foi par an il est nécessaire de faire un check up général à l appareil par un technicien qualifié Il est convenable de faire tous les anné...

Page 104: ...ons de l installation thermique Le combustible se accumule dans le panier brûleur Combustible de qualité faible Carburation Maintenance appareil Couvercle tiroir cendres ouvert ou pas fermé correctement Améliorer la qualité du combustible Exécuter le Nettoyage au soin de l Utilisateur et ou maintenance ordinaire Exécuter correction pellet menu09 Contrôler fermeture couvercle tiroir cendres Les rad...

Page 105: ... tours encoder Rupture moteur fumées Substituer le moteur Erreur Feux Pas relevé le feux dans le panier L appareil n est pas alimenté par le combustible Vérifier la présence du pellets dans le réservoir Vérifier fonctionnement vis sans fin Vérifier laçages électriques Sonde fumées Vérifier position sonde fumées Vérifier Substituer sonde fumées Obstruction cheminée Vérifier cheminées Manquant Dépre...

Page 106: ...du combustible Appeler le Centre Assistance Technique Employer un combustible de qualité meilleure Avancer avec Correct Pellet Sonde fumées Vérifier position sonde fumées Vérifier substituer sonde fumées Carburation de l appareil pas correcte Appeler le Centre Assistance Technique Avancer avec Correct Pellet Hot Eau Température eau chaudière trop élevée Bloque pompe de circulation de l installatio...

Page 107: ...IT GB FR mod 940 940 SA 107 112 ...

Page 108: ...IT GB FR mod 940 940 SA 108 112 ...

Page 109: ...IT GB FR mod 940 940 SA 109 112 ...

Page 110: ...IT GB FR mod 940 940 SA 110 112 ...

Page 111: ...IT GB FR mod 940 940 SA 111 112 Note ...

Page 112: ...R mod 940 940 SA 112 112 4 Targhetta caratteristiche Technical data plate Fiche Technique CORISIT S R L Via Enrico Fermi 5 Z I Rame 42046 Reggiolo RE Italy P Iva IT02628000354 www corisit com info corisit com ...

Reviews: